Tuesday, February 24, 2015

She Can't Find Her Keys!

With the numerous amount of new students in our classes I've been noticing and old problem resurfacing.  Many people are confused by the term 'white glass' that we sometimes need to point out the difference between white and clear. In the picture below we have three images.  The one on the left is made entirely of clear glass.  There can sometimes be a whitish tint due to the amount of texture embossed onto the glass but there is no actual white coloration.  The scene in the middle consists of four different pieces of white glass. And on the right we see a combination of white glass (the bow) on clear glass (the box).


Calling clear glass 'white' can be confusing, especially when picking an actual white piece of glass for the same window.   Proper terminology will help you pick out the glass you need in our shop and in catalogs and online listings.

Well, I'm glad to get that out of the way because I can't wait to show you Martha's Octagonal Iris and Dragonfly Window which is officially complete. I'm just going to come right out and say that it's an exceptionally beautiful window.  The border glass is the perfect color to compliment the purple Irises, and the soft, demure green leaves are much more realistic than any deep, dark, flat green.  This completed window hadn't even been posted yet and two other people wanted the pattern! Paula's going to love this.


Janet's Peaches and Dragonfly Window already looked spectacular and then she went and gave it those curvy wire accents that really set the entire design off.  The spirals fill in blank spaces and give it a look you don't see very often in glass (since lead lines always need to connect on both ends).   Adding wire-work is a fun way to give your windows a little something extra that no one can ignore.  The colors Janet used in this design are bright and cheerful which will make it really stand out in her kitchen. It's just a shame that its size doesn't translate to the picture-- it's 3 feet wide!


Carol's first circular window came out as round as you could ever hope.  There are no angles or unintentional straight lines anywhere on this Magnolia Window so I'm going to give her an A+ for her work on this.  Carol is ready to begin her next challenge and I know she'll handle it effortlessly.  Seriously though, isn't this window beautiful? 


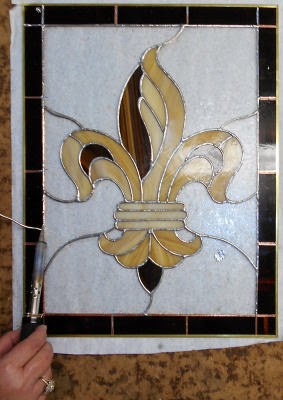
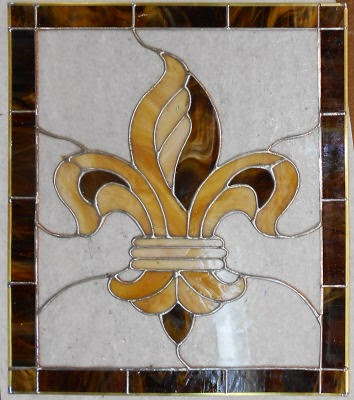
Sue finished her Autumn Window and I must say that for a first project with us her soldering is very nice.  She wasn't rushing so all this needed were a few touch ups rather than a complete re-soldering which meant that Sue got to take her window home as a completed project this week.  After it was finished she and Mary Grace worked on getting my four very filled pattern drawers into some sort of order.  We now have a "Flowers and Living Things" drawer to go with our "Fleur De Lis and LSU" drawer.


Natalie finished her Cross Window and her choice of colors gives it a distinct antique feel which is perfect for this design.  Natalie did a great job soldering this so I had very little to touch up work to do on it save for a few solder joints.  I always say that a window will actually solder itself if you just allow the solder to melt completely while applying it.  Natalie didn't rush but still managed to complete her soldering quickly because she didn't need to keep remelting solder over and over again to smooth it out.  What a great looking window.


And our last completed piece of the week was made by Chuck, who took a Weekend Workshop with us last year and has really taken his knowledge and run with it over the past few months.  He made this window entirely on his own and it's as perfect a piece as any of our weekly students could have made.  Chuck always impresses me, and I'm not horsing around when I say that! Some of our students may remember him as the man who came bearing chocolates one night.  Great job!


Jane's Rose Window is all cut out and just waiting to be soldered now.  She got her border and the zinc channel attached during class and took the whole kit and caboodle home with her to finish there.  I'm unsure if we'll see it again but I'm hoping I can get a completed picture because it's another impressive window measuring almost three feet across.


And Janet  began working on a pair of Hand Mirrors after she completed the work on her Peaches and Dragonfly Window.  With just the flowers left to cut out I'd say she'll be grinding these before you know it.  


Mary Grace may have helped organize patterns this week but she also got all of her background pieces cut, ground, and wrapped for her Sunflower Window.  She's used a pale blue for her background (it looks brighter than it is only because it's resting on a white piece of paper) as opposed to the clear glass that all the others have been made in.  Me, I love the change.  Mary Grace is making this her own window and is all ready to add a border next week and begin soldering.


Gale came in and soldered a second butterfly suncatcher that she made while she was at home during the week and then resumed grinding on her Heron Window.  By the time class ended she had everything ground!  She's taken all of her pieces home with her so she can (possibly) have it foiled when she comes back in.  If that happens she'll easily tack this together and get her final border added.  Gale has caught on quickly, that's for sure.


Well look at that.  Jeannette's Geometric design is all cut out and she has started soldering the front side already!  The green glass that she used for her border came from windows that were removed from her church which really makes this project special for her.  She's taken it home so she can work on it there because Jeannette is ready to start a new project already!


Susan 's doing a new window that measures a scant 10 inches by 10 inches but contains 55 pieces.  The hardest part of this panel will be stopping Susan from straightening it out and making things work too perfectly.   There IS the off chance that when this is complete it will be a perfect chess board. But the idea behind this is to have a somewhat crooked, unmatched fit.  With all of the glass cut I'd say Susan is off to a great, wobbly (in a good way) start.


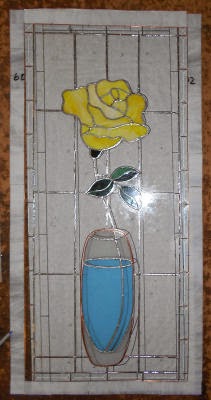
Linda's Yellow Rose is all assembled and has its zinc channel attached.  The rectangle you see surrounding the vase is only a cut out in the cardboard that we made so that the double layer of glass used in the vase can rest in the opening allowing the entire window to lay flat.  Linda has the front completely soldered and  is ready to flip this over and start the back side when she returns.


Becky S decided to start making this long Bamboo Window and managed to get her pattern all traced out and the Calla Lily portion of it cut out.  She was actually hoping to start her version of the Octagon Iris Window but someone else already took the pattern home to trace out!  Perhaps after this window is finished...


Shelley was sorting patterns along with Sue and Mary Grace while she was looking for this pattern of the Bird and Flower Window that she's made numerous time now.  With her background all cut out I'd say that she's almost to the point where she can cut this out from memory and not need pattern pieces at all.  Look for her to add some color to this window next week.


Terry also sorted through patterns, being unsure of what to make next, and then stumbled upon this Oval Iris Window.  I made it once about 10 years ago and it's always been a favorite of mine that's never seen the light of day again.  Terry managed to cut out all of of her paper pattern and then got her clear background glass cut out as well. I can't wait to see this window made again because it really is a pretty one and I suspect that many people will agree.


Natalie not only finished her cross, she also traced out her new window which (as you can see) is a crab.  There are a lot of pieces here but the cuts are all easy so I suspect that they'll go quickly. Since the pieces are relatively easy cuts I'm thinking this will be a great second project for her to help get her cutting skills fine tuned.  


That about wraps things up.  We'll have a secondary post this week showing a few pictures of our last ('last' as in past) Glass Cruise.  We've already got one planned for next year so prepare to sail away with us in February of 2016.  It will be here before you know it!

Paul


Saturday, February 21, 2015

Out The Door!

As you might already know we had the first of four yearly Weekend Workshops during the Valentines Weekend.  We had four sisters in our class which started Saturday morning at 8am and ended Sunday around 7:00pm.  Yes, there were breaks for food and sleep (with quite a Halftime Show between Saturday and Sunday) but there was a lot of work going on as well so let's get right into it and see what was accomplished.  I do want to mention that you can see a larger view of each picture by simply clicking on it.

Okay, so when Bonnie, Fay, Judy and Pat arrived we did some introductions, filled out some paperwork and then settles down to a quick glass cutting lesson which lasted about an hour.  No one had ever cut glass before but everyone took to it easily and by 9:30 they were each cutting glass like a pro.  Here's a look at the crescent moons they all cut after working through a series of straight cuts, curves, and complex curves.  Not bad at all.


Let's go down the list in alphabetical order which means that we'll start with Bonnie.  After cutting her paper pattern into individual pieces she then began laying out those pattern pieces onto the different colored glass.  after tracing each piece with a fine point marker she started actually cutting the glass.  About 45 minutes later this is what she'd accomplished.


Once all of her pieces were cut out the next step involved using the grinder.  The glass we cut isn't very precise compared to the pattern so we need to 'shape' it a little more.  Bonnie took her glass to the grinder, smoothed out any rough spots and roughed up the edges of all her glass so the copper foil would stick firmly to it.  Here is her window almost completely ground  before the foiling process.We called it a day right about at this point.


The next morning (Sunday) all of her pieces were ground and then wrapped.  The pieces were tacked together and then we added a glass border.  Next came the soldering process.  The idea is to melt a bead of solder onto the copper foil that we surrounded all the glass with.  Bonnie has her first side done and is working on the back side in the picture seen below.


And this is Bonnie's completed window.  I must say that she handled the soldering easily.   This is a beautiful window and Bonnie did a great job making it.


Next up we have Fay, and as you can see she moved along with the cutting of her Fleur De Lis in a quick and easy manor.  What you see below isn't even ground and it already basically fits the pattern.  That means that her grinding will go easily.


Once her grinding was complete we wrapped all of her glass in a copper foil which is what the melted lead adheres to.  The window is completely wrapped in this picture and is waiting to be tacked together before we add the final pieces of glass that make up the border.


Fay was concerned about the glass we had originally picked out for her border so she used the same dark brown that's actually used in the Fleur De Lis itself for her border.  The front side of her window is completely soldered in this picture which means that all she needs to do is flip the window over and then solder the back side. 


You can easily see the difference in the borders here in this picture because we have some light behind the finished window.  It's amazing what a difference some light behind the glass makes to the finished color scheme.  Her Fleur De Lis is perfect and I couldn't complain about any of the work that Fay did while she was with us.


Then there's Judy who handled the glass cutting lesson flawlessly and couldn't wait to get started cutting actual usable pieces of glass for her window.  She's well under way as you can see here.


With her confidence building, Judy finished cutting her clear background glass quickly and efficiently and then began grinding her pieces to ensure that perfect fit.  As you can see, there's not much left to go and this was were Judy was when we called it a day. 


Next we see Judy's window all fitted together and wrapped.  The next step is to tack everything with solder so the pieces can't shift and then add the border pieces.  Adding a border is simple because we use a strip cutter to make nice even cuts.  Within 5 minutes all the pieces were cut and then there was another half hour spent skimming the pieces along the grinder and finally wrapping them with the copper foil.


Judy's finished window is a work of art that I would hang beside my own work without any hesitation at all.  She certainly seemed to enjoy herself while she was in class and is now on our waiting list to get into weekly classes.  I know that when she comes back she'll do great things.


We'll now move along to Pat who really had an easy time with her cutting and moved through her glass easily.  In no time at all she the hardest cuts made and then started working on the longer, less complex cuts.  Contrary to popular belief, long gradual curves are easy to cut out.  It's the small deep curves that are more difficult.


Grinding went really well for Pat.  In the picture below you can see that she only has 3 pieces left to grind before calling it a night.  Notice how everything fits together so nicely?  That means her window is most certainly going to look great.  When working with glass it's important not to rush things because that's when imperfections become very apparent.


With the front side of her window soldered, Pat is tackling the back side.  By simply taking her time and allowing the lead to completely melt a bead will form naturally on its own.  Solder will smooth itself out if it's completed melted before you move the soldering iron.  There's really just border left to solder at this point and straight lines are the easiest to manage.


Pat's finished window, like all the others, is something she should be proud of.  As you can see she used the same brown glass that Fay did for her border.  There are no faults here and her window is nothing short of gorgeous.


Everyone had a great time (Russ and I included) and we're all going to be meeting again later in the year because Judy, Pat, Fay and Bonnie have all signed up to take one of our Fusing Classes.   It will certainly be good to get this group of sisters together again and laugh away another weekend.
 

Well, I've been saving the best part for last.  We were lucky enough to have a live Halftime Show performance by none other than Trace Adkins himself. He played a set Saturday night and the ladies just loved it!  Of course, he was at the casino and not here in the shop, but technically he DID perform between classes and everyone was in a great mood the next day because of him.  If he ever wants to take classes with us we'll work something out.  :-)


Paul
Bayou Salé GlassWorks

Tuesday, February 17, 2015

Icy Blue Lines

We had our annual Stained Glass Cruise 2 weeks ago (which explains the lapse in between posts here) and I'll post a picture of the event shortly.  After classes ended when we returned we had our first Weekend Workshop of the year with four new students.  We'll show you what happened there in our next post.

Right now we're going to kick things off with Susan's cross window which she knocked out in no time at all.  It's an easy looking pattern but the trick is in keeping all of those lines straight which Susan did without any problem at all.  As I always say, flowers and birds are easy because if you're cutting or grinding is off no one will notice.  But when you make a window consisting of nothing but straight lines, well, there's absolutely no margin for error at all.


Ann's latest Fleur De Lis Window is finished and she timed it just right for Mardi Gras.  The purple, green and gold colored design works great and the matching border gives it that perfect "Laissez Les Bons Temps Rouler!" mood.


Bonnie's Owl is finished and it's a hoot.  (You know I had to say that, however corny it was.)  She has an idea for her next project and I told her to leave it in my hands to come up with a pattern because I used to know of one that I think she's really going to like.  You'll see that next week though.


Shelley's Cat Window is officially complete and everything about it is purr-fect.  (I'm on a roll here.)  Faces, like straight lines,  are hard to do because if you are off just the tiniest amount you could have a cross eyed subject, but Shelley got it all together with nary a problem. 


Here's the second clear Beveled Window in a set of four that Brenda is making.  Her soldering is amazing and I didn't have to touch up anything on this project at all (I just added the channel around the edges for her).  I hope she's proud of the work she's doing because she should be.


Carol's Round Magnolia has really taken shape.  Everything has been cut and she even knocked out and replaced the flower center because it was mislabeled on that pattern and Carol ended up cutting it out of the wrong color.  But it was an easy fix and Carol got to see first hand how you get a piece of glass out of a window once it's been soldered in place.  We have the zinc channel for this already curved so we'll be attaching that and hopefully hanging this when Carol returns.


Our newest student, Gale, made excellent headway this week and has all of her glass cut out for her first full sized project with us.  Her Heron Window looks great and you should be thoroughly impressed when I tell you that this window hasn't even been ground yet! It looks like it fits together already, doesn't it?  I think Gale really paid attention when I told her to cut on the inside of those blue lines when she's cutting her glass.


Here's a look at the first of two Octagon Windows that we have under construction this week.  Martha's Dragonfly and Irises Window is sized out perfectly and Martha has begun the soldering process.  I think there's a chance we'll see this completed when she comes back in and that will REALLY make Paula D. happy.  


Jane came in with the center piece of her large Rose Window all cut, ground and tacked together.  The window itself is larger than the sheet of glass she picked for her background so we had to 'splice' together three pieces of glass to get it to size.  Luckily the pattern design made piecing together the background glass easy.  She traced her centerpiece onto the glass and then add the straight lines that form the 'checkerboard' pattern and began cutting.  By the time she left everything was cut and ground save for the border. 


Jeannette has all of her Geometric Window cut and ground.  I was thoroughly impressed with the speed and accuracy of her grinding this week because she cut out in a number of missing pieces in her background and then got everything ground before she left as well.  That's impressive.


Linda L's Yellow Rose in a Vase Window surprised a number of students when they saw it under the table because no one expected it to be nearly as large as it is!  What surprised me is how quickly Linda is moving on this project.  Everything is cut out now, including her white border which she ground and took home with her to wrap.  She'll be soldering this when she returns for her next class.


Paula has all three sections of her Mirror Window all cut out and ground.  With only about ten pieces left to wrap I suspect that she'll be cutting the mirror center section of this project when she returns.  She wanted a nice mirror for her bathroom and I know that when this is completed it will be nothing short of beautiful. Next week we should see each section in their proper placement and orientation.


Terry's latest window, a Geometric Octagon design, is all cut out and ready for soldering.  This week she got to see just how much 'fun' it is to get an octagon window to fit a template.  Sadly, octagons are never perfect and the window must be made to fit these imperfect openings.  They're never off enough to see with your eye but the discrepancies are enough to make you want to pull out your hair when you try to make the window to the (in)correct measurements. But Terry has it all ironed out now and her window looks great.


Rowena has all of her glass cut (save for the border) on her Grapes and Butterfly Window.  The butterfly looks a bit off only because it has no antennas (antlers?) on it--yet.  We're going to add those as a wire overlay when the window is finished being soldered. Next up comes the border and that's always easy.


Sue has the front side of her Autumn Window soldered and is now working on the back side (as you can tell from the backwards lettering).  I must say that her soldering is wonderful and I know without a doubt that she'll complete this when she returns.  I can't wait to see what she starts after this is completed. 


Wow.  That's all I can say about Mary Grace's work this week.  She impressed me so much with her attention to detail and her glass cutting and grinding.  I haven't touched this window at all and it's fitting together like a dream.  I guess I must be doing something right when it comes to teaching because this work is perfection!


Myrt was as busy as a beaver while we were away on our cruise last week.  Her Outhouse and her Louisiana Sheriff Badge window are tacked together and ready for more glass to be added.  I think she'll easily get the border on her  LA Sheriff window when she returns.


Betty's Trio of Angles is all cut and ready for solder.  In the end she went with a clear glass for a border and although I'm never a fan of uncolored borders, this was the correct choice for this window.  She has her brass channel on so this is ready for soldering.  And since we all know how much Betty loves to solder while she's at home this may be completed when we see it again.


And Cindy's Circular Fleur De Lis Suncatcher is only 14 easy pieces away from the finish line.  With all of her black and gold glass cut she'll begin cutting out her background next.  She's eying up another Fleur De Lis design and a geometric design about the same size as this piece so we may see her start one of those soon enough.


And that wraps things up for this post.  Expect two more updates during or around the weekend before our next regular post is made next Tuesday.

Paul
Bayou Salé GlassWorks