Monday, October 30, 2017

The Queen Of Color


First up in this post we have Shelley's newest Kokopelli Window that was completed this week.   For the record I think it's a very stunning window indeed.  I really love her glass choices and how each of the three glasses that she's used tie into each other.  This is truly a window that flows.


Now you may have noticed that we're changing things up by posting our tip AFTER a featured Window of the week.  So then, you may be asking,  why have we alteration our old look for this new format?  Well, due to a change on Facebook the first image in our post becomes the featured picture for the link.  This has made our Facebook posts less than stunning lately (since they haven't shown our student's work) and hopefully this will fix the problem.   

So then, this week's tip is about curves.  When working with stained glass curves tend to get lost in the lead.  Whenever I work on windows I exaggerate my curves.  Most times I do this by giving an extra push while at the grinder to the center of my inside curves.   When I'm actually drawing out a pattern I always exaggerate my curves.   Look at the drawing on the left which I found on the internet.   It's certainly a flower but it just doesn't flow.   The image on the right was adjusted by tracing over the pattern and adding curves to each line.   I'll admit that I'm not thrilled with the end result and would like to take another shot at it but I did this at 10:30 pm trying to get a tip ready for this post.   Still, I have to admit that it does look better than the original design.   So flesh out those curves by leaning into them while you're at the grinder-- your windows will thank you!


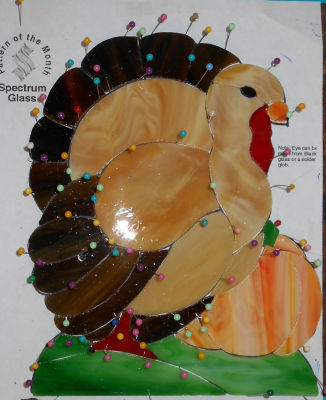
Next among our completed projects is Bonnie's Thanksgiving Turkey Suncatcher which she finished well ahead of Thanksgiving. Her colors are flawless, the pattern is flawless and her work is meticulous.   Should she decide to do the detailed Last Supper Window that  she is thinking about making, well, I know all will be fine.


Sheri made this wonderful Crawfish Window based on a whimsical painting that she brought in.  If you ask me, it's  the wire work that really sets it off.   She's got another almost completed and we'll see that later on down in this post.


Cindy completed these two Beveled Heart Suncatcher pieces and the beauty that you see in them comes from their simplicity.   How can you not love these?   As you may or may not be able to see, she's colored one of them in copper (on the right) and left the second one in silver (on the left).


Linda F completed her Noel Window and what can I say other than , "It's perfect."  She's done a top notch job with this and her cutting skills are formidable to say the least.  


Linda L completed her second LOVE Window and like the first one, it's a winner.   She's also started work on a new Mickey Mouse Window which we'll look at next week.  I will reveal this much-- it's Easter themed.


Lara is working on a Starry Night Window which might seem a little intimidating but she's already got a lot of it cut out.   Shades of blue will be predominant in this window and I know that Lara will be quite pleased with it when she's got this under her belt.


Beth has decided that the multi-piece Tree that she traced out last  week might do better after she gets a little more familiar with the Stained Glass Making process.   So the Tree pattern that you saw last week is now something for the future.  In it's place she will be doing a wonderful Dragonfly Window which will show her how to assemble two separate sections of a window and then combine them into one.  This is her background (which she cut out wonderfully but which doesn't 'pop').   Next week she'll cut out her Dragonfly and begin grinding.


Betty has started this beautiful Rose Window and since she's using a beveled outer border we have assembled the double border first.  She still needs to grind, wrap, and tack the inner border but when that's completed she will have the opening ready for the center Rose portion of her window.  Doing it this way ensures a perfect fit.


Angie's Calla Lily Window got its double border attached as well as some brass channel to surround the window.   The only thing left to do is the soldering which shouldn't take Angie long at all.  Slow and steady wins the race and when it comes to soldering you just have to realize that if it doesn't look good while you are doing it, you're probably moving too fast. 


Terry began this Poinsettia Window while she was at home during the week and I must say that she got a whole heck of a lot of work done on it!   All the pieces that you see have already been cut and ground so Terry was able to spend a relaxing class just sitting down and foiling her pieces. There's going to be a bow in it's upper right but Terry doesn't like what she drew up will be changing it after this tacked together.


Roxane's Nautical Compass Rose Window is already all cut out.  She won't finish cutting the final border pieces until the rest of this is ground so we can make sure that it's a perfect circle when it's completed.   Any adjustments that need to be made will happen on the final border.


And speaking of nautical items, we next look at Cindy's Mermaid Window which will surely be completed when she returns.  It's already wrapped save for the final border  which we'll attach as soon as Cindy walks in the door next week.


Tasha's Smiling Mouth Window got ground while she was in class and the valuable lesson that Tasha learned was to not mix up your teeth when you move them around to grind your lower lip!   All worked out fine though and Tasha's window already makes me want to smile.


Becky S has been busy grinding away at her Geometric Window and by the end of class she had it all ready for foil.   This is another window that will incorporate solid lead pieces so some of the glass that you see below will be completely wrapped in foil.  You'll see how that works out very shortly.


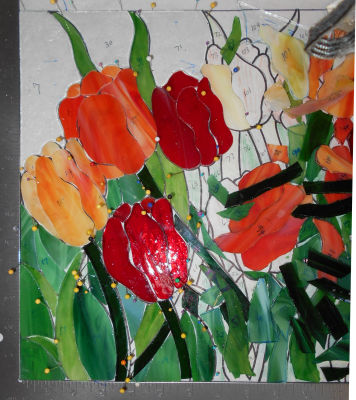
Barbara is also doing very well at the grinder.   With her Tulip Window  almost half way ground but she's wondering what happened to a number of pieces that are mysteriously missing.  All I can say is that this is a common problem when dealing with so many tiny pieces.   Sometimes things get tossed into the trash unknowingly.   The best course of action when his happens is to simply continue grinding what you have and then the missing pieces can be filled in later (usually after the window has been tacked together). 


Linda F has started working on this very modern Tulip window that is actually a flower window and a geometric window all in one.  It's very modern and because the border is irregular she's had to cut that by hand rather than with a strip cutter.  There's an air of Art Nouveaux in this window and I like it.


Susan R's newest Pumpkin Window (or Fall Harvest as the pattern calls it) is all ready for foil.  Just look at that multi colored corn-- It's awesome! After this is tacked together we'll cut the background and then slap a border on it. 


Brenda now has all of the glass cut for her second Transom Widow and only needs to wrap the outer border before she can start soldering it.  That means she's just about finished with this beautiful pair of windows.


Mary is grinding away on her Iris Window and look how far she's come along in just one class!  She's doing a spectacular job on this and moving at an incredible rate of speed as well.   I think it's safe to say tat Mary has the art of grinding down to a science.


Mary Grace is another student who has made spectacular progress on her project in a short time.   Her Tree of Life Window is all cut out now which means that she'll be grinding on this when she comes back.  That  shouldn't take long because her cutting has been amazing on this and it looks so great that Shelley is thinking of making one herself.


Rowena's latest Initial Window is a big one and it's just about ready to be soldered.  With only the final border left to wrap and tack, this window is just about completed.  I will say that the beveled C in the center will become much more obvious once this is off the table and back lit.  That will allow all of the different textures of the glasses that Rowena's used to become apparent.


As promised, here's a look at the second Crawfish Window that Sheri is working on.  The one under construction is on the far left while the painting that she based it on is on the far right.  The one in the center is the completed Crawfish that you saw at the beginning of this post.


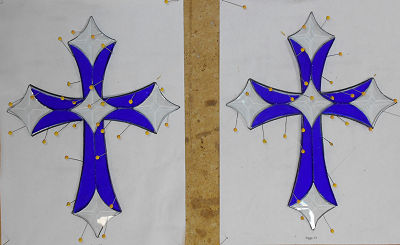
Martha has stopped working on her Day Lily so she can knock out two quick Beveled Cross Windows.  She has her pair of crosses cut out and ground so each window just needs four pieces of glass and then some border pieces.


Melissa has three crosses very similar to Martha's all cut and ready to be ground.  This is the first one and I must say that I think it went much easier than the one she made last week now that we've changed the pattern for something more symmetrical.


Tracey finished grinding her 3D Butterfly Lawn Ornament and then wrapped and tacked each wing together.  Although it looks like this is one piece the wings have NOT been joined down the center.  Once they have both been soldered separately they will join at an angle to form a realistic butterfly which will surely be done next week.


Lastly, Susan D is busy leading her leaves and I have no picture of them  they pretty much look the same but the pile is much smaller now!  Perhaps she'll have the 100+ of these completed when she returns.

That's it for this week.  See you again soon!

Paul


Monday, October 23, 2017

Some Mistakes Are Built To Last


I often show photoshopped images of suncatchers that have been 'constructed' using glass that has harsh straight lines throughout it but this week I have an actual example from a lap that I repaired.   In the pink flower below you can see that the petals were cut from glass that consisted of straight lines.  Then, to make matters even worse, it was cut from one continuous piece of glass so that all of the lines join perfectly through the flower petals.  Yes, this made the flower VERY easy to grind but it also makes the flower look like a sheet of glass rather than a soft beautiful, flowing flower.  And every flower in this lamp looks the same-- if you look closely you can see that the darker flower to the left of the lamp has the exact same problem.  :-(


Now on to something done beautifully.  Jeannette completed her large Pumpkin Window and it is a window that just can't be ignored.   There's just something about earth tone colors that strikes a chord with me (and most other people).  The soldering on this window was also exquisite as I really had nothing to touch up at all.  A beautiful job all around for sure. (And a big thanks goes to Angie for the picture!)


Jeannette also completed this Santa Moon along with her Pumpkin Window.   She's practically knocking them out faster than I can keep up with!  


Rowena made this new Peacock Suncatcher from a picture that she found on the internet.  After printing it out she just put a piece of paper on top of it and traced around all of the lead lines to make her pattern .   The end result is a very graceful Peacock!   


Terry's Santa Face is living large!   This is bigger that the picture suggests (as is usually the case.) And Terry always makes turns out a quality product which is also usually the case!  But Santa isn't all that Terry managed to complete....


Terry also made two Crosses that she designed herself.   They underwent one or two minor design changes as she's re-made them but the design is now perfect.  These are truly beautiful and their owners will surely be pleased with them.  Also, be sure to notice the Louisiana Disc that she made as well.  It is the perfect size for a tree ornament.


Melissa got this beautiful teal colored Stained Glass Cross made all in one short night.   Rather than using bevels for the four ends of the cross Melissa used a single bevel in the center and then four iridized pieces of glass cut into the shape of bevels.   Unfortunately, she had used an older version of the cross pattern and it wasn't 'optimized' so things had to be ground to get the perfect fit you see below.   I've given her an updated pattern so that the rest of her Cross cutting will go far smoother over the weeks to come.  


Angie began work on this Calla Lily Window and already has it all cut out.   She's begun grinding her pieces and has taken it home so that she can get it ready for it's border.  She hopes to finish this when she comes back in next week and if it's all wrapped when she walks back into class I have no doubt that will happen.


As you can see, Bonnie  doesn't waste any time while she's in class because she cut and ground her Thanksgiving Turkey in one 3 hour session.   She's taken it home to wrap and possibly even solder.


Sheri worked on a Crawfish Panel that she's based on a painting that she owns.   After getting the crawfish cut out she then proceeded to grind it, wrap it, tack it together and even get the background cut and ground.   Then she began work on a second one!   That's a lot of work but I have to confess she was in for two classes this week since she'll be out for the next few weeks.    THIS JUST IN:  SHERI'S SURGERY HAS BEEN POSTPONED!  MORE NEWS AS DETAILS COME IN.


Cindy's Mermaid is tacked together and ready for its background glass.   She's hoping to get some letters fired on to the hat and we'll see how that goes next week because that is one small hat.  It's in the kiln as I type this so by the time you read this we'll know what happened.


Roxane has started working on a Compass Rose Window and began that by tracing out her paper pattern and then cutting it all out.  She sorted those pattern pieces by color and then started cutting out the Steel Blue sections of her window. 


Mary was a cutting fool throughout class as she completed cutting out all of her flowers and leaves.   Now she's working on her background glass and that should be very easy for her since the glass she picked cuts far easier than the other glass that she's used in this window.


Susan R began cutting out  this small Pumpkin Panel which is somewhat reminiscent of Jeannette's larger window.   Pumpkins are fast becoming a popular subject here in class and Susan's is going to be beautiful.  This week Susan saw how putting too much pressure on the glass as you score it can cause BIG problems when trying to break it.   Sometimes just a little is enough.


Mary Grace started a Tree of Life Window and she's moving along wonderfully on it.   She's got the majority of it cut out already and I'm proud to say that she has randomized her color placement of the leaves without overthinking it.   Random Color Placement means that two neighboring pieces may very well be the same color.  Systematic Placement would prevent neighboring pieces from being the same color.  Interestingly enough, many people  don't realize there's a difference.


Betty got her Geometric Window all ground and then tacked it together so she could cut her first border and fill in two missing pieces.   See, once you've ground your pieces it's ALWAYS best to avoid re-cutting any pieces from your original pattern beause you can get a more accurate fit by tracing out the opening once the window is tacked.  I've watched many people waste a lot of glass by ignoring this simple piece of advice.. 


Linda F decided that an artists license isn't all that it's cracked up to be because when she cut her holly berries out of yellow glass she just didn't like the look.  So she found some red that had a different hue and texture from the red she's used for her background and cut the berries out of that.   She was able to get her entire window ground before she left class and I must say that her cutting abilities have grown by leaps and bounds.


Barbara H worked some more on grinding her tulip window and learned how important it is to pin your pieces into place.  We discovered that things had been shifting continually to the right so we nipped that problem in the bud by pinning down all of the pieces that she had ground and then refitting them at the grinder.  By the time Barbara left she had a much better understanding of the grinding process and I have come up with a great way to illustrate it.  We will be showing that to our students next week.


Myrt is well on her way to the soldering stage of her Ribbon Bordered Fleur De Lis Window.   Now that everything has been ground she's begun wrapping all of her pieces.  She's taken this home with her in the hopes of getting some work done on it over the next two weeks because Myrt won't be in class next week.   The Margarita Club will be having  a meeting  that conflicts with glass class and, well, a woman has to have her priorities. ;-)


Linda L has her second LOVE panel cut, ground, wrapped and tacked together.   She'll certainly finish this when she comes back in and will then move on to another Mickey Mouse Window.


Shelley got her Kokopelli Window tacked together and then added the perfect border to her already stunning window.  It's been cut from a baroque glass that fits in perfectly with the two other colors that she's used.    She's taken this hone with her and may even get it completed when she returns.


 Martha's Day Lily is looking incredible.  She's taking her time while cutting this and as you can see it's already fitting together.  When you keep your cutting wheel inside the line that you've traced onto the glass you are able to grind your window by simply skimming the pieces.  Martha will be able to do that with this window.


Rowena not only finished her Peacock Suncatcher-- she also started work on a new window featuring a beveled letter C in an oval.  This one is bigger than the last letter window that she made, but it will undoubtedly be just as beautiful.


Terry's working on a new Caduceus Window and after drawing her pattern she cut out the paper pieces and started tracing them onto her glass.  Although there's only one piece of glass cut here I'm sure we'll see a lot more cut out when Terry returns.


Brenda began working on her second Transom Window and already has her background glass cut out, ground  and ready to be foiled.  She's almost finished with this pair of windows  and she's doing them in record time.


Beth has decided to make a Tree Window as her first project with us.  There are a lot of tiny pieces in this but Beth is going to take it one piece at a time until it's completed.  I have no doubt that she'll do a wonderful job on this.   She's already got her brown tree trunk traced onto her brown glass and will begin cutting it when she comes back in.


And to wrap things up we look at Jan's new Madonna pattern which I'm pretty sure will turn into a popular design here in our classes.  Although the picture we saw of this was squared off, Jan thinks that she's just going to make this as a large suncatcher.  I think it's going to look great!


And there you have it.  A weeks worth of classes in one small easy to digest blog entry!

Paul
Bayou Salé GlassWorks