Monday, January 27, 2020

I'd Rather A Barker Than A Whiner

Have you ever soldered a line and noticed that wrinkles were left behind in the solder?  If this happens to you just relax and go over the line one more time after adding just 1 drop of solder to your soldering irons tip.   The wrinkles appear because there's the smallest amount of lead missing to make the bead perfect. Re-soldering the line without adding lead won't fix the problem and adding lead all throughout the line invariably gives you a bead that's too thick.   Just run the tip of you iron through your solder and go over the line a second time.  You'll see those wrinkles just melt away.  (Literally!)


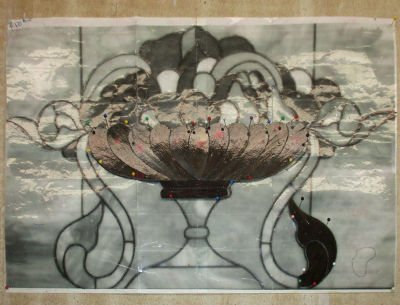
Angie completed her Peacock Window and the end result is, as always with Angie, wonderful.  This is one of my favorite patterns and Angie made it look as good as ever with her colors and workmanship.


Kerry finished his Beer Glasses Window and now that it's got some light behind it you can really see how nice his choice of glass was.  Kerry works quickly now and a little further on in this post you'll learn what he's making next so keep on reading!


This week Betty learned the (sometimes) complex art of wire bending.   The most important thing is to start with a straight piece of wire.  Some people have trouble straightening out wire that has bends in it but not Betty.   Attaching the wire to her Cardinals was a little daunting at first but by the end of the class she had it all very well under control   Here are her first two pairs of Cardinals which look wonderful indeed.


 Next up we see that Cindy had finished a second Heart Suncatcher this week before moving along to an entirely new project.


That new project that Cindy has begun is a Double Heart Love Window.  The hearts themselves are easy to see but the 'love' part is hidden within the clear glass.  Once this is wrapped the letters will become plain to see.


Susan R has begun cutting the background out for her Seafood Window and she's done that by placing a large piece of glass under the seafood pieces that she's already got tacked together.  She traced around the pieces, removed the glass from underneath and then cut out the background pieces from the large sheet piece of background glass.  Once these are finished she'll have to wrap and tack them into place before moving along to another section and repeating the process.


 Regardless of what she believes, Melissa got a lot more ground on her Peacock Tail Window this week. She's thinking that this window will take forever but I feel that she's work at a nice steady pace.  As I always say, we strive for  quality not quantity and Melissa is delivering quality all the way.


MiMi got her Heron Window tacked together and while the table she was working was somewhat cleared off we curved the zinc channel that will surround this.  That will be attached upon her return and I'm thinking that there's a good chance that this window will be seeing some back light when it returns.


Belinda managed to get almost all of her Church Window ground and wrapped. Next week she'll begin cutting across the three largest sections of the church so that the church will appear to be made of  wooden slats.  Normally we cut straight lines with a straight edge or a strip cutter but in this case we want a little less perfection to make the wooden boards look authentic.


Tracey got all of her Magnolia Window wrapped but there was one slight problem--- there's still one leaf yet to cut out but she's missing the pattern pieces so she'll have to tack what she has together so we can get at the pattern under her glass to retrace new leaf pattern pieces.   It may sound like something scary but it's actually easy and will be accomplished upon her return.


Jeanne L has most of the basket ground for her Fruit Basket Window now.  She only has one 'handle' left to go before she can begin cutting out all of that colorful fruit.  She's already in love with this window and says she's going to keep this one.


Angie began this Easter Lily and Cross Window while at home and by the time she left class she managed to have it just about ready to be soldered.   She just has to wrap her final border before she can start the soldering process.  I think it's safe to say that the hard part of this window is well behind her now.


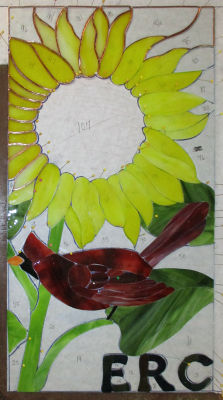
Shawn now has her two borders attached and the only thing left to do is solder this amazing Sunflower that everyone has talking about in our other classes.  Here Comes the Sun has never looked so good and I can't wait to see this with some light behind it.


Rowena is someone else who got a lot of border work done this week.  Now that all of her glass has been cut she's can see the light at the end of the tunnel. Her beautiful Mardi Gras Window features an iridized background glass that's barely revealing it colors while it sits there on the table.  Trust me though, you'll easily see those colors once we have this hanging up.


Susan D has begun cutting glass for her Ali Dog Window and and her choice of glass is making great fur!  She'll be mixing different glasses throughout to give Ali some realistic fur density and shadowing.


Jeannette almost got all of her Swan Window ground this week and now you can see just what this will look like when it's finished. I love the design but it's Jeannette's attention to detail that is really turning this pattern into and outstanding Window.


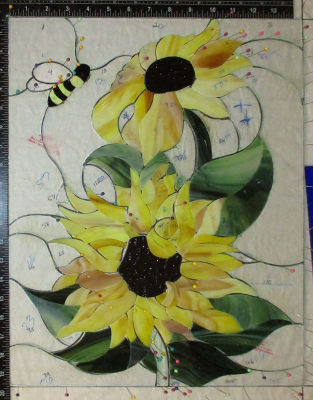
Also this week we got to see Mary tack her Sunflower Window together and then get the first border attached.  She'll follow that up with a second border to really frame out this wonderful window.


Annette finished grinding the few remaining pieces that she had left for her Max The Dog Window and then began wrapping each of those pieces.   As you can see, she doesn't have far to go which means that colors for her borders will be the focus of her next class.


With all of the clear glass in Martha's Swirling Curves design it's hard to make out what kind of progress has been achieved.  For the record,  she has finished all of the cutting and has begun grinding her pieces now.   Her cutting is spot on and the grinding is going quickly.  When this is off the table and in the light you'll really be able to appreciate the elegance of this design.


Barbara began working on a new Bumblebee Lawn Ornament this week but the difference between this one and her last one is that this one will be curved.


Kerry not only finished a window this week but also began work on a new project as well.  This Deer Window can't help but look great when completed.


Lastly we have a picture of the Sunburst Window that Cindy made 2 weeks ago.  Here you can see how it looks installed between 2 pieces of tempered glass in the front door of her house.  Marvelous!


And that about wraps things up this week!  Can you believe our next post will occur in February?  How fast is this year flying by?!

Paul

Monday, January 20, 2020

She's Got No Scents

I see a common problem that happens time and time again.  Someone tells me that something doesn't fit well and they just assume it was bad cutting on their part when, in fact, it's just a simple error in positioning.

When you are dealing with symmetrical or mirror images, be sure to try the piece you are working with in all possible positions before deciding that it fits.   First, make sure you are looking at the front of the glass and that you don't have the bottom side up.  Then spin the piece slowly clockwise 360 degrees so you can see all the ways the piece can fit to the pattern.   Sometimes a piece may look correctly orientated when it isn't. In the example below the red triangle isn't perfect and will only truly fit one way.  You can grind it so it fits with a different point on top but that would leave gaps along the three edges.


Always check for the best possible fit before you grind AND before you tack a piece in place.  It's simple mistakes like these that separate the hobbyists from the stained glass masters!

So this week we got to see Cindy put the finishing touches on her Sunburst Window before starting on a new project.   All she really had to do was color and wax it but the coloring process takes 45 minutes when using black patina so there's a lot of down time while you wait.   Once that was done Cindy waxed this and then we took a picture.  A lot of our students said that they weren't sure what to expect from a clear sunburst window but that they were amazed at how impressive this was when they actually saw it completed.


Barbara H made the most of the bad weather that we had last weekend by spending two days in her shop at home cutting, grinding, and wrapping all of the pieces for this Cross Window.   I was blown away at how wonderfully she did entirely on her own.  When she came into class she soldered it and then we took this picture.  PERFECTION!  And this was only a 2 class project for her.


Linda F completed all the work on her Witch Panel this week and although she's early for the Witching Season I'll just say this, "It's far better to be early than late."  This is a cute pattern that she derived from a suncatcher  and I'm thinking that we'll see a few of these done as a suncatcher come October.


For our last completed project we have this Heart Suncatcher that Cindy started and completed with the remainder of her class time after finishing up her clear Sunburst Window.  Love is in the air!


Jeannette found a Swan Window online and adored the background but didn't really care for the swan itself.  After searching a bit more she found a swan she liked and we then put the two patterns together to make this stunning window.  In just one class she managed to get almost all of the pieces cut out, so she'll surely be grinding when she comes back in.   I'll be surprised if no one else will want to do this pattern as well.


Here we look at Belinda's Church Window and it's all ground and ready to be wrapped.  There are still slats that form the boards that make up the church which she'll cut AFTER most of this is tacked together.  Once she gets that done we'll go into detail about how she achieved that quickly and easily.


After tacking her Sunflower and Cardinal Window together Shawn took the piece of tan glass that the music to 'Here Comes the Sun' has been fired on and placed it behind her sunflower leaves.  After positioning it the way she liked (with a slight tilt) she traced around the leaves and then cut her final piece out.  It only took a small amount of time to cut, wrap, and tack it into place.  It looks great, doesn't it?  Then to top it all off, she even got her first border cut and ground as well!


Jan came in knowing that she'd be spending the class grinding but I don't think she thought she'd manage to get it all ground before leaving.   Alas, that's exactly what happened!  The hard part is well behind her now  and the foiling and soldering should be as nice and relaxing as her fish makes me feel.


Betty has been busy, busy, busy!  She got three pairs of Cardinals, 2 solo Cardinals, and a Flower suncatcher all ground and wrapped before class ended.  That means that next week she'll be ready to embark on the wild art of wire bending since each of these pieces requires wires of assorted lengths and twists and turns.


Lara got all of her background cut out and then ground and wrapped the pieces as well.   Everything fits perfectly and since Lara already knows what glass she'll be using for her border I can assure you that it will all be tacked together upon her return and ready for soldering.


Max is looking good!   Annette got almost all of this ground this week so she'll be wrapping glass when she returns.   Before she starts that I'll  show her how the nose is going to be cut into place although the word 'cutting' is a bit of a misnomer.   It will actually involve drilling a hole in the glass to avoid having nuisance lead lines coming out of the nose and ruining Max's face.


With all of her background cut out Martha is ready to move on over to a grinder.  He background was cut out of clear water glass so it's hard to see on the pattern but trust me when I say that it's all there.  Her cutting is VERY precise so I don't think the grinding will take her long at all.


Tracey forgot her green glass at home for the remaining pieces of leaves in her project but that didn't mean that she couldn't begin grinding what she had already cut out.  Three hours later all of her pieces were ground and her Magnolia Window looks SPECTACULAR! With just 11 pieces left to cut out I'm sure she'll have this tacked together before she leaves class next week.


With all of her seafood glass now wrapped Susan R squared out her window by building a frame around it into which she will put her background glass.  Once in place she'll then trace around the seafood so the background can be cut to perfectly match her pieces.  It's a long and tedious process but in a window like this it will be well worth it.


Angie got her two borders attached this week and even managed to solder the front side of her Peacock Window as well.   I have no doubt in my mind that she'll have this finished before she leaves class next week as well as having another project started as well.


Last week I said that Rowena would certainly be able to handle the next task at hand for her Mardi Gras Mask Window and this week she proved that she's the woman!  In the 7 days before she came back to class she managed to cut, grind, and wrap 49 small 3/8th inch circles along with 3 slightly larger ones.  She then tacked them together form a string of beads and then she traced them onto her background glass.   By the time class was finished she had all of the background cut out and fitting perfectly.  Bravo!


Mary Grace has four pieces that ended up being just a tad bit too small to use so she's left those blank (she had left her glass at home) and began the grinding process of her Anchor Window.  The outside is nice and round which means that it's going to fit into the zinc channel without any worries of holes marring the circle.  


Kerry got his border cut, ground, wrapped, and tacked onto his Beer Window this week and then even completed soldering both the front and back side before calling it a night.  This just needs some hooks and a good coloring so expect to see this completed upon Kerry's return next week.


Jeanne L has begun grinding the basket part of her Fruit Basket Window and her pieces are fitting together perfectly.  It won't be long before she starts working on cutting out the fruit itself.  I think she'll be surprised at how challenging picking colors for that can be.  I always end up cutting out multiple pieces to see what looks best.


Melissa's been working very hard with some long hours which isn't leaving her much time to get glass work done throughout the week.  In fact, she only managed to get into class with about an hour and a half to spare but in that time she got another feather section ground for her Peacock Window.  I know she's concerned but like I always say, "Slow and steady wins the race."


Mary came in, cut out some iridized clear wings for her Bee and then ground them to fit.  The rest of her night was spent wrapping glass and if you look closely you can easily see that she's working from the bottom upwards.  I love her attention to detail on this.


Here we see that Susan D is about to embark upon a new window which she drew up from a picture of her dog Ali.  She's getting all the fur in the proper place and is just about ready to trace out her pattern onto poster board.


Finally we look at Jeanne M's newest window or should I say pattern?  She's got her Easter Window all traced out and spent the night busily cutting up her card stock pattern into their respective pieces that she'll begin tracing along and onto her glass next week.


Well now, things are certainly picking up again in the shop now that people are falling back into their familiar routines for the new year.    See you all next week!

Paul
Bayou Salé GlassWorks


Monday, January 13, 2020

Do You Do Nails Here?

When cutting inside curves the first thing we do is cut a straight line from the starting and ending points of the curves.  This is called cutting 'Point To Point' and should ALWAYS be done before attempting an inside curve.   The second step is to take a nice graceful curve or two out of the glass before attempting to cut the curve itself.  

In the picture below the orange line represents the graceful curve I would first cut into the glass to help get the final curve cut out.  There are no sudden turns and it's somewhat shallow.   This gracefulness helps the glass to break correctly.


This next picture shows what I see too many people doing.   The orange line is ragged, en-even, and has sudden turns in it.   This is the perfect recipe for a broken piece of glass.   Take your time and if you have to don't be afraid to draw a line onto the glass to guide you.


Lastly, even after the orange line was cut I'd still go in a little deeper before attempting that final true cut.


Okay then, our first completed piece this week is of a Wedding Plaque that Jeannette made as a gift.  She started by sandwiching the invitation between two pieces of glass and then foiling them together so she ended up with one (thick piece).  Then she just added borders while building it upside down so that the invitation is flush with the front.  After washing it carefully she had this beautiful wedding keepsake that will be cherished forever.


Jeanne M finished her first of three(?) Mardi Grass Mask Suncatchers and judging by how nicely this one turned out I have no doubt that we'll see even more of them in the days leading up to Mardi Gras. Jeanne takes her time, never rushing, and always turns out quality work.


Jeannette also put the finishing touches on her latest Cardinal Suncatcher which was actually a repair that required some major work to get back together again.  Looking at its picture you'd never know that this was literally ripped apart into three pieces to repair.


Annette's begun her next project and although it's hard to see right now I'll tell you that it's another Christmas Window that will match the happy Grinch window that she made just in the Saint Nick of time for Christmas last year.  (Was it really that long ago?)  I'm not going to tell you what it is this week but if you can't guess then you'll have to come back and read our next post when I reveal just what it is .  The hints above should be enough though as I can already see him in the glass that she got cut out this week.


Jan has begun making a Red Fish  and got all of her glass cut out in just one class.   Well, actually that's a bit of a lie because when she began grinding she realized that two of the leaves are missing but that's trivial and will be rectified when she returns next week. Meanwhile, it's on to grinding for Jan.


It's been a while since we saw a Peacock Window being made so Angie has 'volunteered' to make the newest addition to what has become one of our Bayou Salé GlassWork staples.  She wrapped her bird this week, tacked it together and then got the background cut, ground, wrapped and tacked as well.   That leaves just a border and some solder left to go on this.


Rowena is making a Mardi Gras  inspired window and she plans on decking it out with all the trimmings by adding beads to it.  Now that sounds simple enough but let me tell you that cutting out all those round circles and then cutting out the background to match it is very, very challenging.   But I know if anyone can do it, Rowena can!


Martha's begun working on a window featuring all clear glass.   There will only be three (possibly two) textures in the entire window but mark my words when I tell you that this is going to sparkle.  With just background left to cut she's moving along at a nice pace with this project.


Linda F's Witch Window is so very near completion.  After finishing up with her cutting Linda moved along to the grinding process and with only 3 pieces left to go she'll easily get a border on this upon her return.  Who know-- this may even be finished when we see it again.


Mary Grace made some major headway on her round Anchor Window as she completed the rest of her cutting and then even got most of it ground as well!   That's a productive class and with just a few pieces left to grind she'll surely be wrapping her pieces upon her return.


Kerry also managed to accomplish a ton of work on his Beer Window as he completed grinding and then wrapping all of his pieces.  Then he tacked it all together for good measure.   Next week he'll be adding a border and soldering for sure.


Susan R worked on her Seafood Window over the holidays and now has all of the subject matter all cut and ground.   She's even very nearly finished wrapping all of her pieces but that process is painstakingly slow due to the fact that most of her pieces are microscopically small!   And that's why this window already looks as great as it does.


Tracey's Magnolia is another round window  that's being worked on-- one of three in fact.  She has just a few more pieces of the leaves left to go and then a small amount background glass which I'm sure will be accomplished upon her return.   After that she'll move along to the grinder.


Jeff has decided to forgo a border on his window which is fine because it's going to be installed into a window opening rather than suspended with chains.   He was very careful about the size of his window while he was working on it and a small piece of brass channel along all four sides finished it off beautifully.  He spent his time in class soldering and has the front side just about completed already.   His soldering is perfection and there's a slight chance that this will be completed upon his return.


Shawn finished grinding all of her prices for her stunning Sunflower and Cardinal Window and then moved along to the wrapping phase of her window's creation.   As you can see she got a lot of it done already  and she's taken it home with her so she can possibly get some wrapping done there throughout the week.  The sheet music for 'Here Come's the Sun' has been fired onto the glass that Shawn will use for the sunflower's center and once this is tacked together we will cut that the center for a perfect fit.


Betty has been busy working on 3 pairs of Cardinals which will involve some tedious wire work.  Before any wires get attached she'll have to finish all six of her cardinals completely-- that means all the grinding wrapping and soldering needs to be completed.  This makes attaching the wire much easier.


Mary's been as busy as a bee working on her own Sunflower Window.   Now that everything has been ground and fitting together perfectly she'll be able to begin foiling (wrapping) each of those pieces.  She's done excellent work on this and you can clearly see that in the picture below.


MiMi's Circular Heron Window is creating quite a stir on the Facebook Stained Glass pages and you can easily see why.  She got most of the grinding on this completed before calling it a night and I know for a fact that she's got it all ground and and ready for foil.  I'm still unsure if she'll be going with a border or not on this and that's something that we'll discuss when she comes back in.


Cindy began soldering her clear textured Sunburst Window  and when class ended she had finished the second side of her project.   This would have been completed  but she wants to color the solder black which means that she'll need to let this sit for about 45 minutes with black patina on it before she can wash and wax it.   So, for all intents and purposes, this is a finished window that we'll see featured next week.


And lastly we take a look at the window that Barbara H is working on.   This week she traced and cut out the paper pattern for a Cross Window that always looks great.  She has her 9 bevels set into place and her glass all picked out so when she comes back in she'll begin cutting glass.


And that as they say is that!

Paul