Tuesday, December 30, 2014

Mirror, Mirror On The Wall


To clarify things a bit I'm going to start off by telling you that he work you see below occurred before December 25th.  I've been a week behind and am just getting caught up which has confused more than one reader.  Luckily, all of the windows completed in this edition of the Blog made it out on time to become Christmas gifts.  So let's get started by first looking at the largest window completed ust before Christmas.

Here's Lynn's completed 'G' Window.  There's a lot going on in this piece and Lynn's attention to symmetry is spot on.  Now, Lynn may say that she wasn't focusing on that aspect of the window but in truth she may just have not realized doing it.  A window usually becomes unsymmetrical when a few pieces go over the pattern line and their neighboring pieces are adjusted to make everything fit.  After two or three of those unplanned adjustments you end up with a window that no longer mirrors its opposite side and that's when things start to look helter-skelter.  That is  certainly not the case in Lynn's window. It's perfectly balanced in both color and design.


This is Lynn's last class with us as she's taking some time off to concentrate on other things that have been popping up in her life.  We'll miss her and will certainly be mentioning her in classes to come. 


Ann has made more than a few of these hand mirrors in the past and they always turn out nice.  Carol took one look at this and immediately put it on her list of stained glass projects to make.  Ann has another one of these started in a completely different color scheme which we'll see soon enough.


Shelley's Wine Window is nothing to whine about, that's for sure.  This is the quickest window Shelley has ever made and I think that the speed in which she accomplished it will go a long way towards bolstering her confidence.  Let's make a toast to Shelley's window, shall we?


Bonnie's Triple Tiered Sunflowers are framed with a royal blue border that I think may be one of Bonnie's favorite colors.  The blue and the yellow offset each other perfectly and (as always) I like the way the flowers cut into the border pieces.  It may make things a little bit harder to square up, but isn't the end result worth it?


And I love these birds that Cindy made!  Cindy used clear glass in between the birds to make this project rock solid without the need to add a background color which would take away from the openness of the design.  Cindy did a great job on this one.


Jeanne's Beveled picture turned out exactly as we all thought it would-- perfect.  I was worried that the image on the bevel wouldn't show in the picture but it does.  That red water glass really catches your eye and draws your attention to the etching.  This project shows that Jeanne understands how to use color effectively.


Terry's  Santa Face Window looks great.  She left the lead silver rather than doing it in black or copper, or did she?  If you look closely you can see that just the lead lines that form his glasses have been colored with black patina.  Terry carefully applied the patina with a q-tip and then took her time washing it off so the rest of the lead wouldn't turn black.  A very nice effect indeed.


Brenda's 'H' Window is complete and ready to reside in a window that gets some sun light.  I like the font of the letter because it's made in one continuous stroke.  It's not only very elegant, it's very well made as well.


Carol's Birdhouse window is already looking great.  She's making this using the 'grind as you go' technique so what you see below can be foiled at any time.  With the rest of the pieces being essentially straight cuts I'd say the the worst of this is over.


Look at that detail!  That Isis already looks amazing and Martha hasn't even cut it out of glass yet!  And just look at the back end of that yellow Dragon fly with a ton of pins holding it down so it won't scurry out of position.  Great job, Martha!


Myrt has the front side of her Transom Window completely soldered and there's no need for touching it up-- she's that good.  I think she'll solder the second side during her next class and then call this a finished project.  


Although it's hard to tell, Susan's Traditional Geometric Window is all cut and tacked together.  That means that she'll be adding a zinc channel to the edges and soldering it when she comes back in.  I don't think the soldering process will take much time at all so I have a good feeling that Susan will finish this inside of two more classes.


Cindy's newest project is a Pink Flamingo/Bird Of Paradise Window that she started working on this week.  It will be a large window--  exactly two feet wide by two feet high when it's completed.  And although it's not pictured below, the hardest cut in the entire window has already been made.  When I took the picture Cindy was grinding the pink head piece with the deep inside curve where the eye rests.  Knowing Cindy I suspect that she'll have this completed in no time at all.


And that wraps up the year 2014.  it's hard to believe another year is almost over but it is.  But rather than look behind us I'm going to look ahead at the further adventures we'll be having in and out of our classes.  Happy New Year everyone!

Paul
Bayou Salé GlassWorks

Sunday, December 28, 2014

Ironing Out The Details

Our tip this week is short and simple.  When cutting your glass you want to focus on three things:  1) An even pressure throughout the score, 2) A slow and steady pace, and 3) Following the line accurately.  People often tell me that they can't follow the line and when I watch them score the line I see that they're moving at 65 miles an hour.  Remember, slow and steady wins the race.  If you take an extra hour cutting out your pieces I can guarantee that you'll shave at least that much time off of your grinding time.

Okay, Brenda's latest Wood Duck looks anything but fowl.  She didn't cut her sky from one continuous piece of glass but she did line everything up in the order that the pieces appear in the sky.  This gives almost the exact same effect and looks far better than just placing pieces randomly and having nothing match. 


Rowena's Butterfly Lawn Ornament has been affixed to its stake and is now ready to be skewered into the ground somewhere in her garden.  The orange color scheme is classic and anyone who can't tell what this is needs a kick on the side of their head!


Paula sure surprised me and came in with this G Suncatcher completed and ready for hooks.  She drew it up herself and did it all with no help at all.  I looked over her soldering but it was essentially flawless with no need for me to touch anything up.  And her circle is perfectly round-- something that a lot of people overlook, but not Paula.


Linda L walked out the door with her three Kaleidoscopes ready to be gift wrapped.  There are some thick and long lead lines on the body of these Kaleidoscopes but Linda got a bead on them with nary a problem.  Her wheels are nice and round (on the kaleidoscopes!), spinning freely without resting at the same position due to any unevenness.  There are only 16 pieces of glass in each of these but this project requires precise fitting which Linda delivered on in spades.


Here's a look through one of them:


Carol's pair of Fleur De Lis Boxes worked out perfectly as well. When she came in she had the tops completed and the four panels that form the box sides already wrapped.  Once they were tacked together she cut the glass bottom and then soldered it to the sides to finish off the bottom box sections.  When they were washed, colored and waxed,  Carol learned just how easy it is to attach the Fleur De Lis lids and this is what she had. Wonderful gift boxes!


Becky S completed three more of her Double Bordered Frames and even resumed work on her Fleur De Lis Window as well (but I forgot to get a picture of that project).  Here are her finished frames complete with views of her yard throughout the seasons.  When Becky returns we'll check out her Fleur De Lis Window.


Brenda not only completed her Wood duck window-- she also finished this 'C' Window as well.  Brenda tells me that she'll be doing a 'D' Window next.   I'm guessing that an 'E', 'F', 'G' and 'H' will be under way soon enough.


Terry's version of Santa Claus certainly is jolly and fitting for this time of the year.  Once she got the border tacked on she got the front side completely soldered leaving only the back side and the brass channel to surround the edges to go.  


Mary Grace just needs to grind the glass she used for her sky and add an eye for her deer and then she can begin soldering this project.  The sky practically fits into place already so she won't be spending much time at the grinder, that's for sure.  We're just about a border away from calling this window complete!


Betty's pair of Nativity Windows are very close to being finished now.  In fact, the one on the left just needs to be soldered.   The one on the right still needs its border wrapped and tacked as well as 2 corner pieces but that won't take Betty any time at all.


Cindy's Birds are just about finished-- she has this all tacked together after getting all of those little, tiny eyes cut and ground (that was fun!)  It's looking great and I can't wait to see what it looks like with some light behind it when Cindy returns with it.


Linda F has all of her glass cut and almost all of her Wise Men Window wrapped and ready to be tacked.  She'll need a border on this but that won't take any time at all.  I suspect this will be done just after the new year.


Well, it turns out that I misled all of you readers.  I forgot that Brenda has already begun working on this 'H' Window so I guess she's attacking the alphabet in a different sequence (so as not to be too predictable?)  As you can see, this window is all cut out already.  It looks like Brenda may be onward to the letter 'D' when she returns.


Talk about taking an initial window and livening it up!  Lynn has all of the glass cut and ground for her 'G' window and has taken it home to solder.  Once that's done she'll be able to add a zinc channel to the edges and then wash it and color it.  I suspect that will happen when she returns and that we'll get a final look at this with some light behind it before the end of the year.


Martha resumed work on her Dragonfly and Irises Window and as you can see it's looking...wait a minute... there's nothing to see.  Martha certainly is a fox isn't she?  Well, rest assured that any day now we're going to blow the cover off of this story!


And Myrt has all of her Beveled Transom Window tacked together save for a small piece on the left hand side that was cut a little too short.  Once that's put in place she's going to be able to sit back and relax while soldering this bad boy!


Next we take a look at Susan's Traditional Window design.  All of the bevels have been tacked into place and all of the difficult long cuts have been made.  All she needs to do now is fill in the triangular pieces along the top and bottom to make a straight edge and then add the final beveled border.  There's not much to solder on this window but those long straight lead lines have been known to drive people a little crazy at times.  But I'm sure Susan will muscle right through them though.


There's not much to say here.  Bonnie's Triple Tiered Sunflower Window is all tacked together and the front is completely soldered. With just the back side to go I'm sure that this will be another window that is completed during our next set of classes.


And Rowena is also working on a Sunflower pattern but hers will be a Lawn Ornament when it's completed.  With just one round, brown piece left to cut I'm sure that this will be another quickly made project for Rowena.  She can stake it in the ground next to her Butterfly when it's finished!


And that wraps things up this time around.  I'm very late with this post (by over a week) and I have another one to get out within the next two days so expect one more update before we ring in the year 2015.

Paul
Bayou Salé GlassWorks

Monday, December 15, 2014

It's a Girl!


We have a lot of students who are unsure of what to do once they have finished soldering their window.  The rule of thumb is to never wash off any flux until the window is 100% completed and ready to have patina applied to it.  If the window is going to sit untouched for more than a month I'd wash it but you really shouldn't begin soldering if you are going to have that long of a wait between washing and coloring.  That said, here's a problem area or an exception to the rule:  Never allow flux to rest on Zinc Channel for any length of time (even one day is too long).  If you are using Zinc Channel you should attach it to your window and then wipe any flux off of the zinc with some water (just the channel, not the window itself).  Flux is an acid and it will eat into the zinc if left on too long so that it won't react to the patina.  And we never use soap when washing off flux.  Never.  No exceptions.  Never ever.  Never ever ever ever.  It's a question I get asked about 15 times a week. 
 
Never use soap to wash flux off of your window.

Okay, so let's face facts here-- Terry 's Kaleidoscope Window is gorgeous.  In fact, it's outright one of my favorite windows that a student has made.  She changed out a few more colors and ended up with a window that is certainly impressive.  Her colors, the symmetry, and her soldering are all perfect.  It's everything we strive for.


Ann  completed  this teal and iridised white Cross in the span of just one class.  She's become a lean, mean stained glass machine. Just look at how straight those outside edges are-- that's never an easy task to achieve in stained glass.


Cindy had an interesting class with us this week.  She barely got started working on her project when she received a phone call informing her that the alarm at her store had been tripped.  She left class and got there only to discover that a florescent bulb had fallen from a ceiling fixture thus setting off the alarm.   Once she  got things under control she came back to class and still managed to complete her Double Butterfly Window which looks great!.


Becky S has managed to complete yet another frame.  This holds a 6x4 picture and features a random stock photo family.  In real life Becky's family is much more attractive than these people.   I'm thrilled that she used the back granite textured side of the glass since this isn't going to be back lit.  This way you can clearly see that the thinner border isn't cut from the same glass that the larger border is cut from.


Well, Jeannette  says she finished making boat windows.  She's learned a lot from doing a pair of them though because the skies have been done in a way that most hobbyist stained glass makers wouldn't think of.  And I love how her border matches the small amount of trim of the boat.  It made dark blue a perfect color choice for the border.


Martha completed her Beveled Cross Window and her work is exquisite.  Everyone agrees that these cross windows are difficult to cut out but the end result is such a nice window that everyone wants to go the extra miles and try their hand at those eight tough cuts.  Martha learned a neat shortcut that helps make it a little easier that we'll discuss next week.


Jeannette also managed to completed two Fleur De Lis Suncatchers along with her boat and one of them was even completed from start to finish during the last hour of class.  When her boat was finished she was almost content to just call it a good days work but then she started the suncatcher on the right and finished it as well.  THAT'S a good class!  


And Paula completed her window repair.  Let me ask you, which is the one that the center was knocked out of and replaced?  To be honest, even I don't know-- her work is THAT good.  She put hooks on both windows and now after somewhere around 20 years these windows will see the light when they get hung up for the first time ever.


Rowena is ending the year with a roar with her LSU/Tiger Eye Window which she completed this week.  We hung it in the window and decided it was best to take the picture of her completed window with a florescent light behind it rather than the sun because the green grass behind it was making the transparent purple look grey.    I can't tell you how many photo's I've had to color adjust due to the large amount of green reflecting through the glass.  But rest assured, this picture shows exactly what Rowena's window looks like.


And like Jeannette, Rowena had a little extra time in class and decided to make this Christmas Fleur De Lis Suncatcher in her remaining time.  She made it in under and hour and ended up taking home 2 projects rather than the one which always makes our students feel good about their abilities.


Betty  is wrapping up 2014 by working on two Nativity Scene Windows. One  just needs the borders cut to size and two corner background pieces cut. The other requires only a little more work which basically consisting of cutting out a sky before moving on to the border.


Bonnie got her border all ground into place, wrapped it, tacked it and even soldered one of the flowers.  And that was done while she was recovering from a cold that had her off her feet just a few days earlier.  On Saturday I got a call asking if she could pick up her window and take it home to solder there.  This leads me to assume two things:  1) that she's feeling much better and 2) that this will be finished when she comes back in.


Linda F is wrapping up the work on her Three Wise Men Window.  With only the hats themselves left to be cut I think she'll be wrapping her pieces and soldering this for her next class.  Who knows, it may see the light of day also!


Cindy not only completed her Double Butterfly Window, she also managed  to complete another bird on her 'Seven Birds A Hanging' Window.  (Doesn't that sound Christmassy to you?)  Anyway, this leaves just four large birds left to go.


Janet resumed work on her Peaches and Dragonfly Window and now has all of her background cut out of a wispy white glass that is all but invisible while it's laying on top of the white pattern paper. With almost everything cut save for the border,  Janet will be completing this quickly.  And she's also working on two more FDL Transom windows at home as well! Talk about keeping busy.


Becky S still has a few more Double Border Frames to work on.  Here's a look at three more that she has all ready to be tacked and soldered.   These make great gifts and are relatively easy to make since they are essentially just border work. 


Jeanne  is making a double bordered frame for a large etched bevel that she has. The image on the bevel is of  an older couple  walking together, but you can't really see them in the picture below.  The first border is cut from red water glass that she's cut very wide.   The outer border consists of 1" wide bevels .   She also has a nameplate to attach to this when it's completed which should easily happen next week.


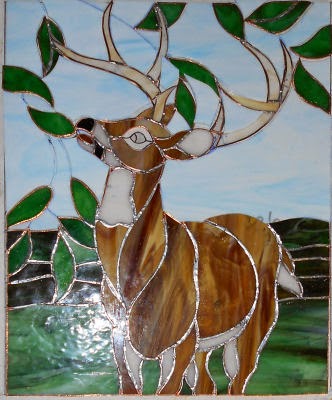
And Mary Grace's Deer Window is now complete save for the sky.  She'll be cutting that out of one piece of glass for a nice fluid sky effect and it should only take a few minute to grind it once it's all cut.  Will Mary Grace go with a double or a single border?  We'll find that out during her next class.


Linda L worked on her Kaleidoscopes and they are just about set now.  The six image wheels are completed and the tubes themselves just need eyepieces and hardware which will only take a few minutes to make.  Then she'll just add the mirrors, screw on the wheels, and these will be complete  (some assembly required).


Myrt's  transom window needs just one more section (it's the left section) and then some solder.  In fact, I have no doubt that the soldering will begin when we next see her because her window is THAT far along.  Unless Disney has her all worn out...


This is easily Shelley's fastest window ever. The center section is now complete and all she needs to do now is add a border and solder it.  Shelley learned one important lesson while making this window-- if your pattern is off your window will be off as well.  Fixing a paper pattern is easy but trying to re-adjust glass that has already been cut incorrectly is a lot harder.   So ALWAYS start with a perfect pattern and NEVER say you'll fix 'that' later.


Terry also had time left over in class after finishing her Kaleidoscope Window to start this new Santa Face Window.  She's got a lot completed on it and I won't be surprised if this Santa isn't ready to come down a chimney in time for Christmas.


Lynn managed to get all of her background cut and ground this week (which is a large accomplishment.)  Once those background pieces  are wrapped and tacked into place she'll only need to add a border and then some solder before she can call this window a job well done.


Paula not only repaired her window but she started these Christmas Light Ornaments as well.  Once these are soldered together she'll attach them all to a copper wire which will turn them into a nice bright strand of Christmas lights that she can hang just about anywhere.


And how can we possibly forget Brenda  who is working on another Monogram C Window .  She didn't have the  pattern that I had originally drawn for her so Terry drew up a C of her own design that ended up being nearly identical to mine. (Great minds think alike.)   The only real difference was the direction of one of the lead lines.  With both of her borders cut I'd say that Brenda has this window completely under 'C'ontrol.


And lastly, Ann is ending the year by NOT working on any more Fleur De Lis Windows.  After completing her Cross Suncatcher she started cutting out this Flower Hand Mirror using blue baroque as the background.  As with her FDL windows, she's a real pro when it comes to making these because she's made so many of them in the past.


You may have noticed that this update is late, but that's only because we took some time off to take a quick cruise.  The trip was fun but it's going to be nice to see all of our students smiling faces again.  Christmas is a little over a week away and there's a lot left to accomplish so expect to see a slew of finished windows in our next update.

Paul
Bayou Salé GlassWorks