Monday, September 25, 2017

My Rat Trap


This week we start things off with instructions for making a strip cutter board.  It works quite well with this Glastar Strip and Circle Cutter and similar strip cutters made by other manufacturers.

A Strip Cutters is essential for cutting professional looking borders that do not deviate in width along its length.  I would never cut a border without one and insist that our students use a strip cutter as well.

Putting together the wooden cutter board is actually very simple and only requires 3 items:  a Cutting Surface board, a Running Board, and a wooden yardstick.

Sizes can vary but you should have a cutting surface with a height of 36 inches so it can accommodate a full sheet of glass.  My Cutting Surface Board measures 36 x 24 x 1/2.
Along the left edge of the Cutting Surface board I've attach my Running Board which measures 36 x 2 1/2 x 3/4 with 6 screws.    It is very important that this board be perfectly straight because this is what your strip cutting will be traveling along.  If the board wavers, all of your strips will waver as well.   It also has to be 3/4" tall so that the strip cutter will remain level as you slide it along the Running Board.   Lastly, I've screwed a wooden yard stick along the bottom edge to act as a brace which stops the glass from shifting as you pull the cutter down the board.  Just be sure to use a square so that the yard stick is at a perfect right angle to the Running Board.

And that's all there is to a Strip Cutter Board.  If space is an issue you can always just mount a 36 x 2 1/2 x 3/4 Running Board to the edge of your work table.   The only issue with that solution is that you have to clean your table each time you want to cut strips.  Yes, I use my Strip Cutting Board on a table but I have been known to use it on the floor when space is limited.


Okay then, Sheri's Heron Window is finished and all her hard work has paid off in spades.   Everything lines up perfectly and her soldering is top notch.   Large windows like these can take a toll on you due to the amount of time that is spent working on them but just look at the end result.  Beautiful.


Janelle's Pelican Window was also completed this week and what a great job she did on this, her second window.  She had her doubts along the way but in the end the finished piece speaks for itself.   I'm just sorry I referred to it as a Seagull two weeks in a row!


Ann  completed her first two Crosses this week and they are perfect.   I remember when Ann started long ago and struggled to get pieces to fit together.  Now she lines up her projects with the greatest of ease.  Let me also say that the work she did on putting solder on the edges of these crosses is nothing short of outstanding.


Bonnie has finished her Glob Tree which I'm calling her Tree Of Life.  The pictures that you see in the tree have been photoshopped into place by me to show you the effect that Bonnie is going for.  They are NOT her actual family-- just models pretending to be her family here on the blog.


Betty completed her second Day Lily Oval and I think she made much better time on it as compared to her first one.   The workmanship is still the same perfect job that Betty always achieves but that's simply to be expected.


Angie was back in this week and both started and finished this stylized Angel Suncatcher.  These are becoming popular since Rowena is making one and Jeannette took the pattern along home with her as well.


Our newest student's name is Paul and he skipped doing the butterfly because he wanted to make this pair of Angel Wings Heart instead.  Since he has some experience in making stained glass we let him do what he wanted and in an hour and a half he finished this.


Susan R is grinding her Summer Window already and the pieces are just dropping into place perfectly.   At the rate she's going she'll be ready to wrap this before you know it.  And let me tell you that Susan can fly through the soldering process!


 Myrt accidentally left the glass that she was going to use for her back ground at home so instead of cutting glass she ended up grinding the pieces that she had cut the week before.   We find her guilty of absentmindedness (but boy can she do nice work)!


Linda F started this new Butterfly design by cutting out her pieces and by the time class was over she even had it ground.   Once this is wrapped it will only take a half hour to solder and then finish up.   I think we're going to really go hog wild and curve the wings in multiple directions on this one!


Jan finished grinding her Sunburst Window and has even begun to wrap it.   Her work has improved in a dramatic way and her color choices on this are magnificent.   There is one piece of background glass that we need to re-cut since its neighboring piece of yellow broke incorrectly, but since the break was small we're going to use the yellow piece and adjust the background to fit it.


Barbara H has made incredible progress on her Tulips Window.   She's working at a nice steady pace and as you can see it's all coming together in a beautiful way.   There are still two or three more shades of green left to cut out for the remainder of the leaves which means that this window is just going to look better and better with every piece that Barbara cuts.


Jeannette spent her day with us at the grinder where she practically got her entire window fitting together in just one class.  She's taken it home to begin wrapping the pieces that she's ground and will most likely finish it before you know it.  I already know for a fact that this is going to be one beautiful window. 


Linda L  has ground her LOVE Window and it has been ground to absolute perfection!   I am thrilled with how wonderfully this fits together.   Linda says she wanted to take her time so that the lettering would be nice and she certainly succeeded because you can't even tell that there's any clear glass in this at all!


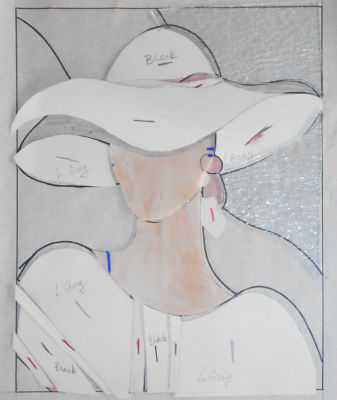
Lara has all of her African Woman Window soldered and the only thing left to do is make a few touch ups, cover the brass channel with lead, and add two hooks.  It's a shame that she got this close to finishing  but in the end time won out and forced Lara to abandon her window until next week.     


Martha has finished soldering the front side of her deer window and is making her way through the back side of it now.  That means that this will, without a doubt, be completed when she comes back into class next week.  


Terry has begun work on another Ribbon and Flowers Circular Window.   After getting the pattern traced onto poster board and then cut into its individual pattern pieces she then proceeded to cut her iridized white back ground pieces.


Mary accomplished a great deal this week and left with all of her Bird Window soldered.    The only thing left to do is touch up a few rough spots and then Mary will be able to wash and color this window.   In fact, she'll have this done quickly enough to be able to start her next project when she returns for her next class.


After completing her Heron Window, Sheri began working on these two butterflies.  As you can see, she's got the first one (on the right) cut and ground already and she's made great progress on the second butterfly.   I'm not sure of these will be hung in a window or put on stakes to become Lawn Ornaments but I do know that the one on the right will have curved wings.


Tracey 's Deer Window is all ready for solder after she spent the class wrapping and attaching her final border and finally filling in a few missing pieces.  This will be a nice relaxing soldering job so Tracey should have a restful, easy class when she returns.


Susan D has over 100 leaves cut out for her latest Flower Cornucopia and she spent the day at the grinder smoothing out the curves in all of those pieces.   Luckily they don't need to fit together so just rounding things off and tacking of the sharp edges will do just fine for these leaves.


Cindy  has the sixth side for her Panel Lamp all ground and ready to be wrapped. Her game plan is to have it soldered when she comes back into class and then be able to tack the 6 sides together to make one complete lamp.


Brenda  now has all of the bevels for her two small Transom Windows wrapped in 3/16ths foil Once that was done and we laid out the basic design I saw that something was 'off'.   I could plainly see that the inner beveled border was too close to the edge of the window but I couldn't figure out why.    After measuring and re-measuring numerous times we discovered that these are NOT the same height as the window that sits in between them.    Now that we know why there was a discrepancy I know how we're going to make this work.   And you'll see that come to light when we return.


Mary Grace now has all of the glass borders attached to her Hibiscus Window and even has her channel attached.   We're going to break out two pieces of leaves that stop at the end of one of the borders and make it reach out all the way into the next border so that it matches the leaves on the other side.   If all the others are complete leaves there's no reason for this one to be cut in half.  Id love to show it to you but I seem to have forgotten to take a picture of it!!!

Then there's Becky S who worked on this all night long.   What you see is the table that her project was on as she worked on her Geometric Window that she ran out the door too quickly for me.  In all seriousness though, she did get much more glass cut and it looked to me as if she might be getting ready to grind her pieces!


So there you have it--  Everything that occurred during classes last week.  We hope that you'll come back again a week from now so we can get you up to speed on what's about to happen this week since classes start again tomorrow morning. 

 Paul

Tuesday, September 19, 2017

Limitations Are Only In Your Head (Unless I Say So)

I'm late this week so we're just going to jump right on in here.  I do have to apologize to both Rowena and Janelle for incorrectly identifying their projects last week.  I was under the wire time-wise and accidentally referred to Rowena's Zebra as a Unicorn(!) and Janelle's Pelican as a Seagull.   :-(  The moral to this story is to NEVER try to rush out a blog update-- it's just too easy to end up with egg on your face if you do!

Okay then, Terry's Blue on Blue on Blue Window is completed and as was expected  it is spectacular.  With nothing but clear glass and three different shades of blue this  makes a striking, if not stunning, appearance.   Terry used black patina on the lead to set it all off and it was a perfect choice.  Beautiful indeed.


Jeanne was able to get back intro class this week and she put the finishing touches on her pair of Stained Glass Boxes.  She's a real fan pf the diamond textured clear glass and I must say that it really does make for an impressive looking finished project.


Linda L put the finishing touches on her Beveled Fleur De Lis Window this week and the bevels contrast perfectly against the heavily textured clear Krinkle background glass.   If you can't contrast with color then do it with texture!


Next we see that Shelley completed her mid-sized Humming Bird Window and the light blue background on this is exactly what was needed for this piece.   I love how the upper leaf of the flower has a small sliver of transparency following the upper edge of the glass-- it gives the leaf some added depth by suggesting that it is flipped over along its edge.  Nice work!


Brenda managed to put the finishing touches on her American Flag Window and the Stars that she painstakingly applied to it with glass paint are what really make it.  Her soldering is superb and just look at those two small darker pieces of red near the bottom edge of the flag.  They really give the illusion that the flag has doubled up over onto itself as a real flag does in the wind.  Little things mean a lot.


"Welcome"   That's what a Pineapple symbolizes and this Beveled Pineapple Window by Angie was completed both quickly and efficiently in just two quick weeks.   Angie liked coming in to our regular class so much that she says we'll be seeing her whenever Roxane can't make it in!


Rowena's Yellow Iris Window is one of the standout soldering jobs that I've had the pleasure to look at this week.   Her work on this tightly curved piece is nothing short of perfection.   A very common flaw that we see people make when constructing this window is for the flower stem not to line up.  In this case it is perfectly aligned and I never even warned Rowena about paying attention to that.  Nice!


Tasha's large Elephant Suncatcher was finished this week it looks great.  She did most of the work on this while she was at home and only needed hooks on it when she brought it back in.  Yep, that means that she's got something else to look at further on down in this post.


Rowena also made this hanging Monkey Lawn Ornament complete with a tail that wraps around the post that it 'hangs' from.  Rowena is turning out to be the Queen of the stained glass Animal Kingdom!


Our last finished piece was made by Susan D from start to finish in just one class.   it's another 3D Hummingbird Lawn Ornament and I think she can make these in her sleep now.  She even remembered to split the body so the wings had a lead line to attach to for stability.


Now we move along to the projects that are still under construction.   Becky S appears to have the most difficult parts of her Large Geometric Window all cut out and what you're seeing below hasn't been ground at all.  That's just very accurate cutting on Becky's part that makes this look like it's fitting together so nicely!


Ann was back in this week and she got two of her Crosses all ground.  Not only that-- she's also got one completely wrapped and ready for solder.  We're going to be seeing a few of these crosses come together as the next few weeks go by.


I must say that I love Jan's Sunburst Window.   With her beveled border tacked together she's begun to grind all of her pieces so that they fit inside of the framework that the bevels have created.  She's almost halfway through with her grinding so she could very easily begin wrapping these pieces  when she returns.


Barbara's Tulips Window is really taking shape now that most of the flowers have been cut out and placed on the pattern.  There are only four more flowers left to go on this and then Barbara will move along to the four different shades of green that will make up the leaf and stem section of this gorgeous window.


This Pumpkin Window that Jeannette is working on is coming together  in an amazingly quick manor.  With just the background glass left to cut Jeannette will be able to start grinding this when she returns to class.   I just love her varied use of colors in both the pumpkins and in the leaves.


Mary Grace managed to get all of her Hibiscus Window wrapped while at home so she started out the day by tacking everything together.  Once that was done she filled in three problem pieces and then tacked them into place as well.   Next she began working on the first of two more borders.  As you can see (if you enlarge the picture) she has the first of her final two borders ground and has started wrapping those pieces.


After completing her Beveled Fleur De Lis Window, Linda L began cutting out glass for her LOVE Window.  In just one class she managed to get all of the glass cut out and she is ready to begin grinding already.   What confuses most people is how the word LOVE is done.  Lead runs between any cuts in the glass so by cutting along the letters Linda has enabled the word LOVE to be 'written' into her window!


This is Tasha's newest project and it's already looking to be every bit as eye catching as her last full sized window.   This Woman's Head already drew a lot of attention while the pattern was pinned to the wall awaiting Tasha to start it.   She's moving along quickly on this and it will be done before you know it.


Susan R's Welcome Window has just a few small pieces left to cut out before she can start grinding it.  Although you can't see it in the picture Susan has alternated between two different yellow glasses for the rays of the sun which will give this a nice effect which we should be able to see soon.


Martha now has both of her borders attached to her Deer Window and is all set to start soldering.   Will this be completed next week?  Only time will tell.  Meanwhile, soldered or not, this looks fabulous!


With her borders in place Lara is now all set to begin soldering.   Matching the double borders to the skirt was a stroke of pure genius.  I will state for the record that this will be a standout window when it's completed-- of that I have no doubt.


Linda V got all of her paper pattern pieces traced out onto her glass and she's begun cutting the glass for her final two sides of this four sided panel lamp.  This version of Mickey has smaller pieces because it features his entire body.   It will take a little more time to make these last 2 panels because of the smaller pieces  but the end result will be entirely worth it.


Yes, you ARE seeing double here-- this is indeed another look at a Deer Window but this one is being made by Tracey.   These two Deer Projects are running neck and neck and I suspect that they'll both likely be completed together in the same class week.  Tracey just needs to attach her final border and then cut out two replacement glass pieces and then she'll be soldering!


Carol came in and started working on the top to a Yellow Rose Box.  With the rose itself already tacked together Carol will next cut the background glass to square it off.   She'll add a hinge along the top of the rose and then after it's been soldered she'll wash, color and then wax this.  Once the top is done she'll be able to get exact measurements for the bottom so that the box fits together perfectly.


Bonnie has her Glob Tree Panel all soldered and will wash and patina it black when she comes back in.  She was ready to color it at the end of class but we like to leave the black patina on the lead for 45 minutes to allow the color to set a little better.  This will easily be completed upon Bonnie's return.


With the front now all soldered Sheri added a multi-colored border to her Heron Window.   After we added the zinc channel we dropped it into the frame just to make sure everything was sized correctly and....it fit perfectly!  This may very well be completed when we see it again.


Sadly Betty had to repair a broken piece in the Day Lily Window that she completed last week but she did it all on her own!  Once that was done she resumed work on her second Day Lily Window where she changed out four of the pieces that she was unhappy with when she saw it pictured here on the Blog last week.  Now she has a more subtle green ribbon and I, like Betty, believe that the change is a good one.


Well now, Janelle is so close to completing her Pelican Window that she will easily be able to finish it when she returns and then even start to work on something else.   This is the back side of her window and as you can see there's not much soldering left to go on it!


Rowena found this Simple yet stylish Angel Suncatcher pattern on the internet and has it already cut out and set to be ground.  She's going to use a bevel for the head piece which doesn't quite match the pattern so she will grind the rest of the pieces and leave the head out.   Once all but the head fits together nicely she will trace the large circular bevel onto the wing and body pieces to know exactly how much to trim off of them so her bevel can just drop perfectly into place.


With the fifth panel completed on her six sided lamp, Cindy is ready to start her final panel.   Once she has that soldered she will attach 5 sides and then add a small drop border to finish off this lamp.  All of that will easily be accomplished in one class and that will happen real soon now.


Lastly, after completing her American Flag Window, Brenda began wrapping enough bevels to frame out two Beveled Transom Windows.  She made the large center section at the beginning of the year  and is now all set to begin working on the two smaller side pieces that bookend the larger piece.


That's it this time around!

Paul
Bayou Salé GlassWorks