Sunday, November 20, 2011

You Trashy Wh....Waaannn!!!!

Our Blog titles almost always come from something that was said in class. Most times they make no sense to the casual reader but if you were there in class when they were originally spoken I can guarantee that a smile will cross your lips when you spot the phrase here atop the Blog. I just wish I could remember all the things that are said because sometimes I think we're spending more time laughing than cutting glass!

This week we're going to start with a look at Bonnie's Medium sized Fleur De Lis Window. Bonnie has caught on quickly and is making some quality windows, don't you think? These Fleur De Lis windows are always stunning if the student takes the time to make sure everything lines up perfectly. As you can tell, Bonnie took the time.


This is the 3rd and final panel in the large set of windows that Janice is making. As you may recall she's currently in the middle of making more flowers to be cut into the same color background, the only difference will be the size of the window. Her next set of 3 will sit atop these large windows and be about a third of the size of these.

And here's another Fleur De Lis window, this one made by Terry. She wasn't sure what to think of it when she saw it completed but I like the design. She simply quartered off the pattern and used 4 different colors in a way that most people wouldn't think of using them. And as I said, I think it's a novel approach to a standard window that makes you take notice.

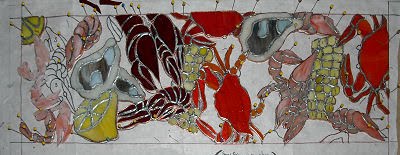
Terry's Wild Kingdom Window (formerly known as Fish eating a Shrimp) is so very close to completion that is isn't funny. There's just the back side to solder so we'll be seeing this one with light behind it next week.


With the front of her Peacock window almost completely soldered I think that Sonia will be wrapping this up within a week or 2. We still need to add the Zinc Channel and make touch ups but the bulk of the work is done on this one.

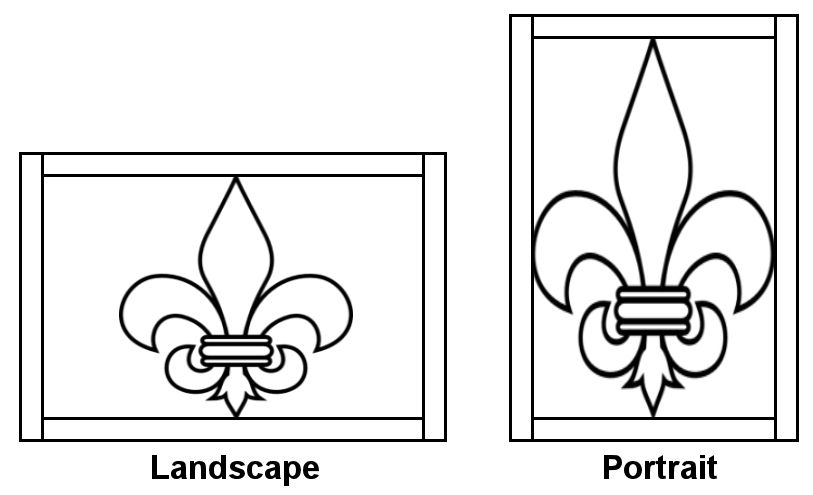
PeeWee has also completed all the cutting on his windows. Making 2 at the same time was a smart move because you get to keep your work rhythm. For example, why would you cut the 7 pieces that make the Fleur De Lis, grinding them, wrap them and then tack them together, only to start the process over again? It's far easier to simply cut the 14 pieces that make up the Fleur De Lis and grind them all at once. When making multiple items I always advise making more than one at a time.
And cutting things out all at once is exactly what Dianne did with her 2 windows. This week she got the first of her 2 windows ground and next time around she'll have the second one ground. In between grinding sessions she'll be wrapping these pieces while she's at home. I have to say that I was very impressed with the way she got this window to fit together. I watched her start grinding, then walked away and when I returned later on she was completely finished with it. Good job Dianne!


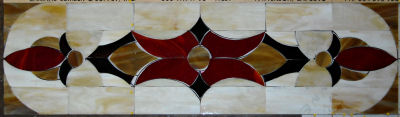
Patty's adding the final Shrimp to her boil. She better check to make sure that Terry's fish isn't eating any of her shrimp. Those things are hard to cut and grind!

Cindy resumed working on her hand mirrors. She has about 9 left to go and what you see here are 3 mirrors cut and ground to the pattern all lying on top of each other. (Another example of doing many of the same pieces at the same time.) She was grinding the blue petals on the upper right flower when I snapped this picture which explains why you are seeing multiple colored flowers.

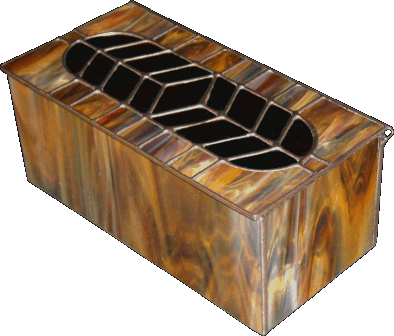
And Roxie's Fleur De Lis box top is all set. Next week she'll make her box bottom and hinge it together to make a completed box. I have to say that Roxie's soldering is superb! Roxie is talking about making some more butterfly faeries when this is completed.

We're almost up to date again. I wonder how long it will last this time around. We have the new drawings for the next Church windows that we're making almost completed so I'll be spending a lot of time in the shop again real soon now.

Paul
Bayou Salé GlassWorks

Friday, November 18, 2011

Good Eye!

With a lot of hard work and determination Cindy has managed to complete her front door panels with time to spare (about 1 week) even with the setbacks she encountered along the way to her deadline. She brought the actual wooden door into class so she could insert the last 2 panels as soon as they were washed and waxed which gave me the perfect photo opportunity. Here is Cindy's front door.


And while she was at home Cindy was keeping busy making her Christmas presents which happen to be nothing less than a slew of hand mirrors! These are here first batch and she's got just as many ready to be soldered at home yet.


Take a look at Ann's first full sized window. It's hard to believe that it's been about 3 years since she made her last full size window which proves that making stained glass is just like riding a bike-- you never forget how to do it. Her window is beautiful but the photo doesn't show the hint of color that runs throughout the background glass. It's visible in the upper left of the window but for some reason it's just not photographing well at all. Nonetheless, the work on this speaks for itself.

Anita and Myrt's Duck window was also completed this week. After changing 2 or 3 clear pieces this window is now flawless. A lot of times 2 people working on 1 window can be a problem but Myrt and Anita did it the best way possible-- one at a time. Two people working on one window at the same time just causes confusion especially if there is grinding going on. If it's a fact that too many cooks can spoil the soup then this is clearly the exception to the rule.

One good duck deserves another. This one that Pam made is about 1/8th the size of Anita and Myrt's Duck window but it's nothing short of charming. I think Pam may be working on something a little bigger next time around, but you never know-- she works a lot on her glass at home so she may just return with some other cute panels completed or just about ready to be finished.


Terry, who also manages to do a lot at home, finished up this Fleur De Lis window this week. The ambers and browns along with the diamond cut background give this window a nice tudor like feel.
Down here in Louisiana you can't go more than a day with out seeing a Fleur De Lis or two. And I've seen a lot of stained glass Fleur De Lis in my 5 years of teaching down here. Terry used up a variety of glass that she had lying around and came up with this modern view of a classic design.

Terry is extremely prolific with her glass work which is evident as we view the 3rd window she's been working on this week! It's another fish window with a bit of a variation from the last one she completed. This one is about to eat a shrimp rather than go after a fishing bobber. Talk about a subtle way to say Louisiana! Nice work all around, Terry.


Roxie decided that she needed to make another box and came up with this Fleur De Lis design for a box top. All it needs is some solder and a bottom and she'll be taking this home with her. Most glass is labeled by number but there are more than a few pieces are known by a name. In some cases our students or even a customer will 'name' a glass (unofficially of course). Roxie has dubbed the brown Spectrum Rough Rolled glass "Cinnamon" and we already have other students asking for it by that name now. It's certainly easier to remember than 110.8RR.

PeeWee is working on his FDL windows. It's a set of 2 and the FDL's are made out of Cinnamon glass. :-) This one has its background almost completely cut save for 3 pieces that he'll cut after it's tacked together. This will ensure that his edges are lined up perfectly. It would have been easier has the glass been large enough to accommodate the entire width of the window but it wasn't. But as always, we manage as you can see in the picture of his window below.

While PeeWee worked on his window, his wife Dianne cut out 2 more transom windows with a different design. We've stretched it a bit to get it to fit the opening but the design is completely recognizable when compared to the picture she originally brought in. I love her choice of colors along with the red in the center as larger accent pieces. And she's moving along quickly! She'll begin grinding this in her next class.

I smell Seafood! I wonder if Patty will smoke a cigarette when this is finished or if she'll have a beer to go with it! (Perhaps both!) With only a handful of shrimp to go this window is about to take a permanent residence in Patty's home soon. Since all the pieces were so small Patty wrapped it all with 3/16's foil which means that soldering it will be a breeze. She's close now!


Janice was cutting and grinding her new sets of flowers and as she finished each one she bagged it. When she left I found she had 9 flowers cut, ground and all put away. I'd love to show you the work but it would take a half hour to piece them all together and lay them out for you. So look at the contents of these 4 zip lock bags. Aren't the contents wonderfully colored? Just wait until you see them all assembled!


And Graces Medical window is REALLY taking shape now. there's only the final thin border left to go before she can start wrapping this and then solder it all together. It's an interesting shaped window as it isn't rounded or rectangular. I don't think we've seen anything quite like this in class before. I can't wait to hold it up.

After Anita finished up her Mallard window she came back to her Purple Calla Lily Window. With the front side soldered there's only the back side to go so I'm sure we'll be seeing this one completed soon. I love the blue-green border glass she's used on this.

Myrt made a few minor changes on her pattern (don't you just love White Out!) and began cutting it apart and separating by colors. She'll be cutting glass before you know it and I think this will be one colorful window. If you look back in time here in the Blog you'll see her original flower window that this pattern is based on. There have been a lot of changes but the sun in the corner will help point the way to the original design.


Lastly I need to apologize to Cindy for mislabeling her work as Pams a few weeks back. When Pam came in and asked who the other Pam was that I mentioned in the Blog my mind went blank as I searched for an answer. When she said that she hadn't made the 2 bird suncatchers as I said she did I got even more confused (which isn't hard to do) and it took me forever to realize that it was actually Cindy who made these two pieces. They say the mind is the first thing to go but with me it appears to be everything all at once!
That's about it for this entry. Come back soon and see what gets finished next down here in the bayou.

Paul
Bayou Salé GlassWorks

Tuesday, November 1, 2011

Superglue- Your New Best Friend

We'll start off looking with Roxie's Yellow Camp Window. The workwomanship is flawless and I must say that I'm going to miss playing with the letters of this window. It was always a challenge to see what else I could make this say on the Blog each week.

Myrt finished her Fancy Fleur De Lis Window and took it home. I believe she said that she wasn't giving this one away and that it was going to be found hanging out in one of her windows. So many of our students don't keep the windows that they make-- it's good to know Myrt will be able to enjoy this considering all of the extra work she put into it on the fancy scrolling inner border.


And here we have a look at Susan's first Business Card Holder. And it won't be her last one either. She'll tweak the pattern a bit for the next one but I can honestly say that there's NOTHING wrong with this as it is. (I've saved the pattern....)
This design came from a trophy that Cindy had. Terry saw it and said, Hey, that would make a GREAT window! So she drew it out on paper and started cutting it at home. When she brought it in last week it was all done save for the border and this week it's 100% complete. What a great design. Terry seems to have no limits when it comes to stained glass.


Now, Roxie finished up her Yellow Bayou window about midway into her class so she decided to start a Fleur De Lis box. She wasn't sure about making such a small FDL so we've decided to make it large and simply display the box in portrait format rather than landscape. It will still be hinged on the top and she can make the FDL large. She cut it out of a dark brown glass (Root Beer) but until there's some light behind it you would think it's black glass so don't let the picture fool you

Patty is down to the shrimp. This window is so close to having the lions share of the work done that I can safely state that there's a visible light at the end of this Seafood Medley's tunnel. And it even smells delicious! Expect to see some background being cut soon now. And that will be easy.

Fran's Donkey Window is coming all together now. It's almost completely cut out and Fran has been grinding at home. If it weren't for a delay due to travel plans I'd say that we'll be seeing this tacked together shortly. Fran will be rejoining us for classes in about 3 weeks so her Donkey is going to be placed on hold for a bit.

Bonnie has her borders cut and the inner one all tacked into place. She has half of the last clear border wrapped and the other half she's taken home with her so she can come back next class with it ready to be tacked on so she can start soldering this. In fact, I think she'll finish this next time around.

Lastly, Sonia has 4 pieces of border to cut and she'll be ready to solder this Peacock. Since blue is my favorite color I'm partial to this window. Truth be told, I've always loved the stained glass peacock windows that out students have made and this one is no exception.

I'm not going to bother explaining the Superglue title of this post because all of our students know what it means. And no, we don't use Superglue to fix breaks in glass. :-)

Catch you all soon!

Paul
Bayou Salé GlassWorks

Monday, October 31, 2011

What's a FID?

Well, it's been a while since I saw one of these Hand Mirrors made. Christine made a slew of them a few Christmases back and Cindy had the exact same idea. I have no clue how many she's making but she appears to have about 15 cut out in various states of completion so there are a lot of them. This is her first completed Hand Mirror, expect many more to follow. :-)


This is Susan's second box but to me it resembles a chest more than a box. And since it was made for a man I think the fact that it reminds me of a chest is actually fitting. And speaking of fitting, I'd say her top fit the bottom of this box rather perfectly. Susan has an eye for detail and perfection as you can see from her finished project.

And as I suspected, Terry brought in her Fish Window and wanted to know what I thought of the work. After nit picking at the solder (I want her to think she needs me to finish a project!) I gave it my seal of approval and she washed it and colored the solder copper. After another bath and a little bit of wax she took it home after I snapped this picture of it. I love her choice of glass for the water.

And when that was finished Terry resumed work on her Fleur De Lis Window. She has the front soldered already and all she needs to do now is grind and attach the border glass. Terry drew this pattern herself (as she does with most of her windows) and it looks great.

Sonia worked on the 3 layer border for her Peacock Window and now has the inner 2 borders complete. She's wrapping the clear center border at home and I forgot to take the picture of while those pieces were in place so you'll just have to use your imagination on what it will look like. Or you can come back and see what it looks like when she returns for her next class. :-)

Roxie's window is so close to being finished that it isn't even funny. The Zinc channel has been cut and tacked and the front side is completely soldered. The back side is about halfway soldered so this is going to be complete during her next class. I can't wait to see it lit up and I'm glad she didn't listen to me and use green glass for the letters. How she came up with yellow is beyond me. :-)

Pam was in and worked on this Mini-Duck Window. It's just about complete and only needs to be soldered now. We may need to put some brass channel on the edges since there are two long pieces of glass on 2 of the sides that may make soldering those lengths problematic. This is actually a very charming design and I may need to get me a copy of the pattern.

This next window is another one of Terry's and all it needed was a border. She tried a number of different colors with it but in the end we all agreed that Root Beer was the perfect color glass to suround this window. She got it all tacked together and has taken it home to finish up the soldering there.

As I promised, there's a lot more to see of Fran's Donkey window this week. She's got it all cut out and has begun grinding it from the top down. With the sky and the leaves all set there's not much more to go to get this donkey on the road!

Bonnie decided that a Fleur De Lis was what she needed to work on next after completing her Rooster Window last week. She picked this fancy but tasteful Fleur De Lis design and set it into a crackle background. She's going with a double border with the last border matching the background glass. There's something about an inner colored border that really makes a window POP! This window will be no exception.

Ann's window looks GREAT! I love the design and her choice of colors. Since the front is all soldered and the back has already been started on I'd say that this may very well be completed next week. And I have to say that Ann really has caught on quickly to the soldering process. Aside from perhaps a little extra solder on some of the joints I'd say that this is a top notch job. I know students who have taken months to get as good as Ann already is soldering.


And Myrt came in and spent the class working on her and Anita's Mallard Window. One small piece of the sun needs to be knocked out and replaced because the grain is running in the wrong direction but other than that this window has worked out well for Myrt and Anita. It's all about teamwork.


Myrt wasn't sure what color Anita would like for the border of this window she she decided to leave that ball in Anita's court (so to speak) this week. Like Terry, Anita ended up picking a Root Beer colored glass for her border. It's a color that is almost always safe since it resembles a wooden frame.
I have only 3 more Blogs to go before we're up to date. We're really making progress now. I hope to get at least 2 more finished this week but we'll have to see how that goes. And this time I'll never fall behind again. (Yeah, right.)

And before I leave I'll answer the question I started this Blog with. I commented that a FID was visable in one of the pictures in the last post and someone asked just what a FID is. Well a FID is used to flatten down the foil after you've foiled your piece they come in plastic now but back in the 70's (when I started doing this) they were pointed wooden dowels with a rounded end that made it easy to hold. The catalogs all called them FID's and when people would ask me what it meant I'd jokingly say that FID stood for Flatten It Down. Years later I saw a show about sailors and while they were untying knots they used a tool called a FID. Sure enough, it was a pointed wooden dowel with a rounded end to make it easier to hold. (look here) Go figure.

Paul
Bayou Salé GlassWorks