Tuesday, September 27, 2022

It's REALLY nice...For A Dump

Judy's Winnie The Pooh was completed with little time to spare and he looks fantastic.  She used black patina on the lead to give it that 'cartoon' feel and the face was drawn on Pooh Bear with paint.  That is one content looking bear!


Martha's Wedding Box is going to make the bride blush because it turned out beautiful.  These boxes are always the hit of the wedding and Martha's shows why that is the case!


Barbara wanted to make a stained glass window of the cabin that they stay at from time to time and this is an excellent rendition of the building.  She did a great job on this working almost completely on her own while at home.


Van Gogh glass has always confused me.   It's stunning on the front side but the back is just black paint over glue chip glass. That means that from the rear it's simply black glass while the front doesn't light up at all.  It's mainly used for mosaics where the back is unseen but I've seen it used in regular stained glass in various pieces online.  Lisa found an EXCELLENT use for Van Gogh glass by turning a 12 x 12 sheet of it into a 5 x 5 box that is to die for!  See for yourself. (And it was made in just over an hour.)


Check out this Frog!  Susan R used the perfect glass for her Frog Lawn Ornament that comes complete with a 3 dimensional front leg that reaches out from the rest of his body.  Her perfect craftsmanship is just the icing on the cake for this piece.


Ann's Wrought Iron Cross  design was put together using a unique blend of Yellow/black glass along with some black accent pieces.  The combination is perfect and the end result is inspirational.


Susan D has been working like a mad woman at home churning out these incredibly cute mixed media stained glass pieces.  She filled her ceramic vase with glass glob flowers on wire stems, and her cloth pumpkins come adorned with assorted Halloween glass figures!


Lisa also put together 6 or 8 of these teardrop suncatcher which feature a drop of iridized glass in the center along with a double swirled hanger on the top.    When it comes to shows you want a lot of small items, not a lot of large items because the small things sell MUCH faster.


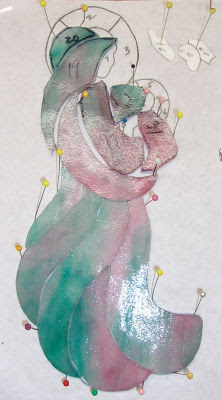
Ann is working on a Mary and Child Suncatcher that we have yet to see made yet.   Her choice of glass is stunning but she's decided to change the halo that she traced out because the glass she originally picked is twice as thick as normal glass and very difficult to get small curves cut into it.  We'll see what her new choice is when she returns.


Cindy's got two different pumpkins under construction and both of these patterns have always been good sellers for me.  You just can't go wrong with stained glass pumpkins at Halloween.


Check out all of those tiny pieces that Linda's Birds On A Wire is made from.   More than anything else it's the beaks, the feet and especially the eyes that make this pattern so difficult to make.  But as you can see, Linda is working piece by piece and everything about this looks like it's perfection.


Jan is in the grinding phase for her 'Our Lady of Guadalupe' window.   She's grinding from the bottom up and she has the lower angel fitting together wonderfully already.


Here we have the three Reindeer that Linda L is working on.  Alas, I just noticed that we have no eye openings so we'll fix that when Linda comes back in.  She may have been under the impression that we would paint those on but it will be FAR better to cut them into place since we can do it without adding any extra lead lines.  


Sheri's Sunflower window was tacked together and then she got her oval border cut and ground into shape.   It's especially important for the border to fit together perfectly because as an oval there will be no channel around the outside edge to hide any alignment flaws.  This is now ready for solder and I'm sure we will see this completed upon Sheri's return.


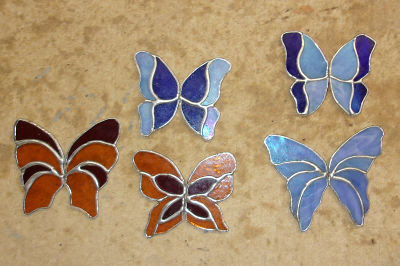
Annette is making even more 3D butterflies and now has ten wings soldered and  ready to be joined together to form five complete Butterflies. I don't think she's making another mobile but I could be wrong on this...


Cheryl has ground the bottom third of her Cardinal Window and it's really fitting together nicely.   At this rate it won't be long until she's ready start foiling all of her pieces and get a border cut out.


Let got two borders attached to her Geometric Window and she even has the front side soldered already.  That means that she'll be starting another window next week  as this will be completed with plenty of time to spare during her next class.


Melissa is making an Emergency Birdhouse!   Her Street Number sign is taking a back seat to this housing project which she may be making more than one of.  There's apparently a homeless bird situation  around her yard and she's determined to fix the problem pronto!


June has her sewing machine all ground and will begin working on her background glass when we next see her.   Actually there aren't that many pieces left to go (maybe 11 or so)  and then June will be able to get her entire window tacked together.


After completing her Wedding Box Martha resumed work on her Grinch Window.   This is coming together rather quickly now and I don't think it will be much longer before she tacks this together and adds a border to finish it off.


Susan D has another Bee, another Dragonfly Spoon, and a Starcatcher #3 cut out as well.   The Starcatcher is an advanced pattern which requires precision cutting of some seriously thin pieces of glass.  Susan not only cut them but ground them as well.   The toughest part of making Geometric Patterns is keeping them symmetrical but if you look closely you'll see that Susan achieved symmetry with relative ease.


Mary has another Angel Wing Heart started but she disassembled it before I could get a picture of it.  You can easily see the pieces that she's already ground in the zip lock bag to the lower left of the pattern.


Kerry's Umbrella Lady got her rain background cut out and now he's ready to tack her together.  He's found the perfect border glass for this and will be adding that to his window when he returns next week.


It's been tacked together and MiMi has filled in all of the gaps leaving behind a window that looks better now that there are no visible holes throughout it.   Next the owner has to decide on what she wants done for border(s).  We all believe that solid red is too much for this window so MiMi has assembled a few different color combinations and sent pictures of then to the owner.   We'll reveal the winner next week!


And to wrap things up here we have Shawn's Hera Flag.  The top panel has now been ground and I'm thinking that it will be tacked together next week.  The bottom third is the easiest to do so it won't be long now.

 
 And there you have it.
 
Paul 

Bayou Salé GlassWorks

Sunday, September 25, 2022

Square Corners


 WARNING!
ONCE YOU LOOK AT THE FOLLOWING PICTURES YOU MAY NEVER UN-SEE WHAT I'M ABOUT TO SHOW YOU.   WHAT YOU MAY HAVE PREVIOUSLY CONSIDERED TO BE A VERY NICE LOOKING STAINED GLASS WINDOWS MAY BECOME FLAWED ONCE YOU SEE THIS VERY COMMON FAULT.  READ AT YOUR OWN RISK!
(Ignorance is bliss)
 
When I'm online looking at stained glass windows I stumble upon many border corners positioned incorrectly.  It may not sound like much but once it's pointed out you always look for it.  I was guilty of windows with the same problem when I first started making stained glass until it was pointed out to me. The sad thing is that this problem is INCREDIBLY easy to avoid.
 
Look at the two corner pieces in the picture below and to the left.   They don't line up.  The red lines on the right side of the picture highlight this flaw.  The intersections don't match.
 
 
Below you can see that these corners align perfectly with the rest of the border and this is what you ultimately want- nice straight lines.   It only takes an extra second (two at the most) to make each of the corners fit into perfectly into place (especially of you cut your borders with a strip cutter like all of our students do or have done for them.) So go ahead and go that extra mile, spare the extra 8 seconds to make a perfect window rather than something that's close but obviously flawed.


Paul

Bayou Salé GlassWorks

Monday, September 19, 2022

Get Your Nose Out Of Your Pumpkin

Annette's Butterfly Mobile is the bomb!   She had wanted to make something that no one else had done before and this fit the bill.   I had assembled one long ago so I had an inkling of what would be involved.   It WAS a lot of work involving tedious and precarious balanced soldering but the end result was certainly worth it.  I'm including a video link so you can see it in action but this honestly needs to be seen in person to appreciate how truly stunning it is.


Let has her Bathtub Lady completed and it's a definite winner.   Her thin accent border accentuates the rest of the window perfectly and makes this a delight to look at.   I know you can't really see it in the photo because the bubbles are so small but she's cut them out of iridized waterglass which makes them look like actual soap bubbles!  Little things mean a lot.


Betty made this blue and clear abstract window quickly and efficiently.   In the end she decided to leave the lead silver because, let's face it, silver and blue just work so well together.


Susan D is on a  three dimensional project spree and her latest piece is Pumpkin consisting of six sides.   The pattern is her own design and she assembled this completely on her own.    She's got those mad skills! 


Cindy's latest Spiderweb Corner Decorations have been completed in time for Halloween with plenty of time to spare.  She always makes these in a set of two-- one for each top corner of a window, but I'm pretty sure that she sells them separately as well.


Ann's rendition of the Angel Wing Heart is stunning and changes things up by featuring an iridized white heart.   She's position the glass perfectly so that the light streaks of pastel colors run in a prefect vertical line.  It's a great look and a great Heart!
 
 
Jan finished her second Plate Window and it's a perfect match to the first one. Soldering the reverse side of this can be VERY tricky since the window is literally raised off of the table when soldering the second side.   This makes 'run-throughs' all the harder to avoid but Jan had only two of them which were easy fixes.  I always say that slow and steady is what gives you a great solder bead but you can go too slow and end up messing up your front side.  It's all about understanding how the lead melts and knowing when to move. 


Cindy's latest Pastel Unicorn features iridized glass with a painted eyeball.   These sell like hotcakes for her.  She also wrapped a pewter Mickey Mouse key chain fob in foil, cut some background glass to go around it and then soldered it all together to make a little Mickey Mouse Suncatcher. 


Sheri is hard at work on a double Sunflower Oval that she has an order for.   She's already got it all cut out so she's well under way on this project already.


Linda F is back after a bit of a 'vacation' (that's definitely a bad word for it) and although I was unable to spend any time with her (this week) she was able to get really far along with her Birds On A Wire Window.   There are a lot of tiny pieces on this but Linda is just looking at them as bird parts and not being daunted by their size.


Susan R has her large Frog Lawn Ornament all  cut, ground and wrapped.  She even used yellow globs for the eyes (which I thought would be the best choice) all on her own before I could even mention it to her!   She'll easily have this finished next week which means that the one loose front leg is going to be put into its correct position and the frog will then look complete.


Let has begun a Geometric Window of her own and was surprised to learn that the only paper pattern pieces that she needed to make this were for the four pieces that make the center geometric shape.   From there on out we just cut glass into rectangles and fit it all together.


June's Sewing Machine Window is really moving along.   All of the subject matter (the machine) has been cut and she's been working on grinding the sewing machine to fit before she decides on the clear glass that will become the background.


Lara wanted to open up her Peony Window a little bit and make it a little less crampt.  To do that she's removed the flower bud  and the branch with two leaves springing from it in the upper right of the window.  This gives the large Peonies some breathing room and also shows off the gorgeous pink streamer glass that she's filled in her background with.


Betty is also making a Hummingbird piece for someone and got the humming bird ready to be tacked together.  The most observant of readers may have spotted that she's building this on the pattern to her Blue and Clear Abstract Window that we looked at earlier.


Kerry has his second Umbrella Lady ready for the rain to begin.    She's been all cut and ground and just needs a some wrapping and tacking before Kerry cuts out the seven remaining background pieces that will be cut from glass that resembles rain.  


MiMi's repair work is teaching her just how great a glass crafter she is because by disassembling this window she sees first hand just how awful other people's cutting and grinding can be!   The gaps are grating on her nerves but they are smaller than what they originally were since we've shrunk the pattern by almost a quarter of an inch. 


Barbara's Cottage Window has been cut out and completely ground and wrapped.   There's a deadline on this piece but I can safely say that there's no doubt that she will have this finished when she leaves class next week because she's already sent me a picture of it all soldered and just needing a brass channel to finish it off!


Judy's Winnie The Pooh Window got its border attached and then she soldered the front side.   After that there really wasn't much time left in class but she still managed to flip it around and work a bit on the back side.   With about a quarter of the second side soldered I'd say that it's safe to say that she'll have this completed upon her return.


Ann's Wrought Iron Cross is very near completion at this point in time.  All this needs is a little bit more solder and then she'll be able to take this along home with her. 


Susan D, in keeping with the 3D motif, has another Beveled Star under construction.  It's hard to believe that this assortment of triangles can assemble into something so elegant and beautiful.


And that's it for this week!

Paul

Bayou Salé GlassWorks


Monday, September 12, 2022

My Hive Has A Bee Hole

Kerry's Umbrella Lady certainly steals the show.  His border glass mixes the two dominant colors in the window and just ties it all together in the most perfect way.  Jeanne has posted pictures of this while it's been under construction and Kerry is all set to begin another Umbrella Lady with a different color scheme as a custom order when he next returns.  It's always nice when your hobby can help pay for itself!


Barbara has her first Panel Lamp finished and it looks amazing.   She found an antique base that has a unique look to it which matches the copper finish that she applied to the lead of the lamp.   The end result is beautiful and Barbara says that she may make another panel lamp sometime in the future.


Susan D is now a Bevel Queen.   Here we look at her 3D Star which creates a sparkling swirl of miniature rainbows when the star is spun in direct sunlight.   As with all 3D projects this can be tricky to make but Susan handled it wonderfully and it is rock steady.


Now, if Susan just made a beveled star we wouldn't be calling her a 'Bevel Queen' so to ensure she deserves the title Susan D also made a Linking Beveled Spinner.   I've animated it slightly so you can get a pretty good feel for what this actually looks like.   Because it's made of bevels this also throws off a multitude of little rainbows when it's in the sunlight.  3D is IN!


Cindy's Pair of Wood Ducks have been completed and Cindy 's modifications to the original pattern fill it in it out with more greenery.  After it was finished and we took this picture Cindy said, "Okay, it's on to the next window!!" 


Do you remember that Faux 3D Cross that Annette began last week?   Well here it is all completed and looking spiffy if I do say so myself.   Annette also almost had her Butterfly Mobile finished but the fishing line we were using to suspend the Butterflies wasn't working so she's going to bring in some fine chain next week that should do the trick.


Linda L has two more Santa Panels completed just as I said she would in our last post.   With three Santa's now out of the way Linda has moved on to three more panels featuring a different scene (which you will see later on in this post).


Cindy also got another Bowl made this week and she's at the point where she can make these in her sleep.   There's no pattern used to make this project-- just a little artistic vision.  It may sound scary but more than anything it's liberating to create.


Susan R is working on a Frog Lawn Ornament with a front leg that will stand out to give it a slight 3D effect.   Her green mottled glass choice is perfect for this application and the frog already has a realistic effect whether its leg is three dimensional or not.  I wonder if she'll use glass globs for the eyes...


Melissa decided that her house needs an Address Window in front of it so I drew up a pattern that she liked over the weekend.  When she came in on Wednesday she traced it all out but ended up deciding that she couldn't quite make up her mind on a color scheme.   She did know that she wanted dark (black) numbers on a light (off white) background so she cut out the center oval where the numbers reside.   She'll be going through all her glass that she has at home to see what she might already have that can be usable in this window.  Next week we'll see some color to this!


Here are three Reindeer that Linda L is making as the third panel for for three Christmas Lanterns.    We've also agreed on a specific Christmas Tree as the fourth and final pattern so once these cute Reindeer are finished Linda will move onto Christmas Trees.


June's got her Sewing Machine all cut out and is ready for the surrounding glass to be cut into place.   She's making short work of this window and it's already drawing attention from students in other classes. I guess it's true that you reap what you sew.  :-/


Cheryl's got all of her Cardinal Window cut out and is now ready to head on over to the grinder.  I have to hand it to her because her cutting is getting better and better especially with this window.  It's looking good already even if she thinks it looks like a red hot mess.  We're always our own worst critics.


Judy finished wrapping all of her glass and then tacked her Winnie The Pooh together.   At that point in time class had just about ended and Judy was ready to call it a night.   She'll be well rested when she returns again next week to get her border attached and then begin soldering her window.


Shawn is REALLY on a roll here because she's completely cut out the top 1/3 panel of her Hera Flag Window.  Next she'll wrap this and tack it together which will then allow her to get to the final section of this sweet window.


Jan has her Plate Window all soldered and ready to get a channel attached so she can then wash and wax it.  It's safe to assume that this will be finished when Jan returns next week.


Let managed to get her Bathtub Lady all tacked together and by the time class was over she's gotten two borders attached as well as almost completely soldering the front side.   I love her thin accent border-- it's perfect for this window. 


And this is one of the Unicorn Suncatchers that Cindy makes and sells as fast as hotcakes.  There's only six more pieces of glass to wrap and then she can solder this.


Martha has the top of her Wedding Box 100% completed and has the sides to the box part all cut ground and wrapped.  There are essentially 8 lines of soldering left for her to do and then she'll be able to call this completed.


Sheri  has her colors figured out and is now getting ready to begin cutting glass.   She's started cutting out her paper pattern one section at a time and as you can see she's going to be working on the glass for her top Peony first.

 
And that's what's been happening here in the shop
 
Paul