Monday, March 31, 2014

Mickey The Pooh

We've noticed a few students in the past few weeks have had more trouble than usual when it comes to cutting their glass.  In each case it turned out that the cutter was problem, and by cutter I mean the tool and not the human!  Oil fed cutters will last a good while before they need to be replaced ( I usually get a good six to eight months out of mine) but it all depends on the amount of wear and tear you put on your cutter.  If you consistently run your cutter off the edge of the glass you are cutting you'll find that the head won't last as long.  An easy way to determine if your cutter is bad is to place a drop of oil on the wheel and then run your cutter over a long piece of scrap glass (about 18 inches long or more) at a fast but steady pace.  Listen to the sound the cutter makes.  If you hear or feel the wheel skipping then it's time for a replacement.  Remember, changing your cutter head will easily save you money by making tough cuts less susceptible to breakage. 


So let's start off this week off with Becky who has completed the first of her two rose windows which is every bit as beautiful as I suspected it would be. A simple bud done to perfection with a strong choice of colors. I see a lot of stained glass that's 'overdressed' with too much color and extra frills that steal the focal point of the window, but that's not the case with this window. A simple red and two greens are all it takes to make this window stand out.


Next we have a much larger window similar to the one that Terry made last week but with a few subtle differences. Brenda's work is top notch and yet she still finds faults in her projects, this one being no exception. I like that she's always trying to do better but I can see no wrong in her latest window. It's perfect.


And Linda F wrapped up the work on her Ladybug Suncatcher and brought it in for it's closeup. She found the pattern online, fell in love with it and knocked it out quickly and efficiently. Her soldering has improved immensely and Ive found that quick projects like this really help with a student's confidence levels. Truth be told, confidence makes cutting glass go so much easier. I can't tell you how many students I've had tell me that they'll never be able to cut something and then fail at it. Without confidence you set yourself up to fail without a doubt. But then there's Linda who didn't stumble at all on this project.


This week Bonnie got the first of her two candle holders put together and although she had a few problems with the soldering she was able to fix it all herself. A 3D object is never easy to solder but Bonnie managed to complete the job and that's what I like about her-- she never gives up. She'll be working on her second Candle Holder this coming week the only difference being the color. Her glass is in so she'll be all set to get to work.


This is Terry's latest Cut Glass Vase Window. This one is done is blues rather than clears and it was originally done with 3 different textures of the same blue glass, but in the end Terry recognized that the differences weren't showing near enough. Without hesitation Terry re-cut a number of the pieces in a lighter shade of blue and now her vase has depth. I love the texture on the lower large section of the vase. And Terry gets kudos for changing glass when she realized that the effect she was striving for was beyond an arm's length away. It hurts to have to change things, but its better than living with a bummer of a window.


Becky B has all of the glass cut for her Fleur De Lillie window and she has it all ground as well. That means she's begun wrapping her pieces which in turn means that she'll be cutting the background for her window when she returns. Becky has made one of the Stylized Fleur De Lis Windows before but not quite in the same way that she's going to be finishing this one. She's about to learn the ease of cutting your background glass using the focal point (in this case her Fleur De Lis) as a pattern itself!


Ok, I feel like such a heal about this next window. After starting off the last blog entry explaining how I sometimes misattribute windows to the wrong students I ended up doing far worse last week. I completely skipped our newest student, Paula's Iris Window! The picture on the left is what you should have seen last week. Paula had all of the Iris portion of her window cut out and did a wonderful job with it. When she returned this week she began cutting all of her clear background pieces. I had steered her wrong the week before by recommending a light green for the leave flips but the contrast was far too great (as you can see in the first picture) so I recommend that we change it. And that we did. Paula now has two similar greens for her leaves but when they light up you'll see a color difference to denote the back side of the leaf. Paula has already begun grinding her window and will certainly begin wrapping it during her next class.


This week Betty added a final green border to her Lillie Window and is ready to get that tacked together and soldered. She also cut out the leaves for a new Iris Window that she began working on as well. She's using the same green throughout the leaves but is utilizing the natural color differences throughout the sheet of glass to achieve the shading for the flips of her leaves. You can already see how nice this effect looks in the picture..


Brenda worked on the pattern to this Oval Framed Fleur De Lis Window while she was at home and did exactly what I do when I draw up patterns--she mixed and matched! She saw a window that a previous student (Sheila) had made with a bordered oval and then redrew the oval to her size. Next she added a Fleur De Lis that she liked. And then she cut it all out, ground it all, wrapped it, tacked it, and started soldering it! This window will easily be completed by the time we post our next update. I'm becoming a little worried about Brenda, I think she might be addicted to stained glass!


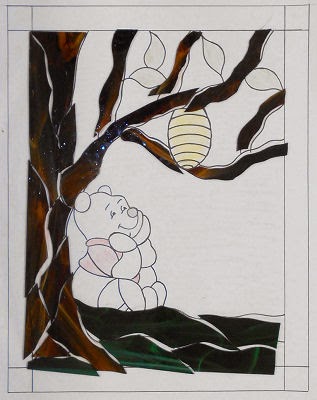
Carol is one of our newer students but you certainly can't tell that from this Winnie The Pooh Window that she's begun making. Two weeks into it and she's already got it all cut out! We're leaving the backgound sky section around Winnie's face for last because we want that face to line up PERFECTLY. Once the face is ground and tacked Carol will cut the sky section to fit around the head which will ensure that there are no gaps or heavy lead lines . This will make a perfect bear window. My only problem with Carol's project is that I can't stopping calling him Mickey!


Cindy is certainly making progress on her life-like Bentley the dog window. I'm still amazed at how wonderful he looks--his eyes really appear to have soul. Cindy is working on the lettering for his name and is almost finished because she's been grinding as she cuts her pieces. I'm predicting that borders will be cut for both of her dog windows before you know it.


Susan is wrapping all of the tiny pieces to her Abita window. She just about to the point where she has more fill-in's than regular pieces left to cut. We've discussed the border situation and have decided that a double border is going to look best. I feel that a window of this size needs more than a single border. It's a preference thing but I'm the teacher so she has no choice. :-) And since Susan was unsure what color she was going to use for her border we've decided to use a thin accent color and then use the background glass as a thicker outer border to finish it off. I know this is going to look great.


Janet is another newer student that is moving along quickly. She added the border to her third Fleur De Lis window using the same jig method that she used on the last two to make sure that the size is perfect. There's barely any lip at all on the antique wooden frame it's being made for so sizing is extremely important. If she's off just an eighth of an inch the window won't fit properly. Once she got her border attached she worked on cutting the background glass on her fourth and final FDL. I'm guessing she'll be needing some border strips when she comes back in next week.


Jeanne returned this week and has found the perfect glass for the background of her Horse Head Silhouette Window. The graying blue certainly personifies a night sky and puts no doubt in the viewers mind as to whether the horse in in front of a moon or a sun. Jeanne will be adding a border to this when she returns.

 
Jeannette came in with the cross that she had cut and ground last week all wrapped and ready to be tacked together. She decided to go with a beveled border so once she tacked her cross together she wrapped all of her bevels and assembled them to form a rectangle that she then cut a piece of RainWater glass to fit in to. Finally, she traced the cross on top of the glass, got it cut and began grinding. Look for this windows final border to be applied when she comes back in.
  

Linda F got considerably further along on her Christmas Wreath Window (which doesn't look like a Christmas wreath). Last week I mentioned to Linda that the yellow 'triangles' in the center of the 'wreath' reminded me of a biohazard symbol. We laughed a bit and that was that. This week I noticed that the yellow glass had been replaced. She said her husband saw it and the first thing he said was that it looked like a biohazard logo. I agree with Linda on this-- it's fine to make a Christmas Wreath window that doesn't look like a Christmas wreath, but it's not cool to make a window that inadvertently reminds people of biohazards. And with her background glass pretty much all cut out I'd say that Linda's bio-wreath will be gaining a border upon its return.


Our newest student, Rowena, had taken a weekend workshop with us back in February so when she started regular classes this week we decided to just have a quick glass cutting refresher lesson and forgo the butterfly that most new students make. After doing spectacularly well on her cutting lesson Rowena began working on this large cross window. Her cross is cut and ground so she took it home with her to wrap which means that she'll be cutting out background and wrapping bevels before you know it.


And Linda L began working on a window that she's been looking forward to starting for some time now. It's a poodle in a dress and she's got all of the black fur sections cut out already. The eyes and mouth are going to be a bit tricky on this but Linda is going to manage just fine. And the overall effect will be wonderful. Just wait until you see this start to come together.


So this week marks the end of cutting for Mary Grace. Everything is ground, wrapped, and attached which leaves just the final zinc channel to attach to the four sides. And once that's done she'll begin soldering her super-sized Fleur De Lis. One of the lessons we learned this week is to never mix up your border pieces-- they are custom fitted to each side!


Myrt finished her Fleur De Lis window last week is almost ready to begin a long, beveled transom window, but before she starts that she's going to work on this Cross Window. Is it square? No. Is it round? No. Is it oval? Nope. I don't know what shape this is but it's been a VERY popular pattern here in class and Myrt's rendition of it is shaping up to be every bit as nice as the cross windows that came before it.


The glass for Shelly's Flower and Bird Window still wasn't in by the time class rolled around but she was able to make her time in class more than worthwhile by grinding the pieces that she already had cut out. With most of it ground (and her replacement glass now waiting for her in the shop) I think she'll be wrapping this completely cut window when she returns.


Ann made great progress on her Fleur De J Window this week. With her background glass and the border all tacked into place the only thing she has left to do before she starts soldering is to cut out the 8 fill-in sections between the FDLs and the border. And you don't find cuts any easier to make than those. So it looks to me as though Ann will get a channel added to this and then start soldering when she returns. 


Lynn's begun cutting glass for her Black Swan Ballerina Window. The clothing of the ballerina is cut and ground as well as her legs. We both thought it best to tack together the ballerina so nothing will shift as she continues cutting. Lynn managed to add a swan in the lower corner of her window and I have to say that she handled the addition perfectly. I'd originally omitted the swan because it would have been too small to work where she initially wanted it, but moving it to the corner of the window also moved it into the foreground which means that it can be made larger and easier to manage in glass. Great designing, Lynn!


And we're going to wrap this up by bookending our update with a look at the second Rosebud Window that Becky S is working on. With just the final border to attach and a little soldering to go I have no doubt that this will be completed when she comes back into class.


That about sums things up for this installment of BSGW's On The Cutting Table. Russ pointed out to me that we now have 22 active students which certainly keeps us busy. I have to say that all of the classes are fun and we look forward to seeing our students each week. Between all the glass cutting and all the cutting up I don't know a more fun way to spend a night (or day).

Paul
Bayou Salé GlassWorks

Tuesday, March 25, 2014

Tofu, Heartworms, and Jalapeno Cheesecake

We always have a lot going on in class with so many students bringing in so many projects.  By the time I start sorting through all of the pictures I've taken it can be difficult to identify who's doing what, especially when students are making similar windows.  Lately I've been needing to verify and re-verify the artists of the windows that I post on here each week.  Sometimes I make mistakes and accidentally give the credit to someone else but I promise that if you tell me about it I'll make things right.  It's happened before and I have a feeling that it may happen again.  The mind is the first thing to go, right?  With that out of the way I'll leave you with our tip of the week:  Don't cut yourself on the glass.  :-)

Okay, so Martha has officially completed her Humming Bird and Fuchsia window!  Her border matches the glass used in the bottom section of the fuchsia which is a trick I like to do--  Take a color that was used minimally in a window and then use it as the border color.  It ties everything together perfectly as you can easily see below.  Next up for Martha is an Octagon Iris Window.


Wow, Terry's Rose Window turned out to be nothing short of amazing.  Everything from the detail of the pattern, to the colors, and the glass textures is spot on. Terry's been working on larger windows at home and bringing them in for photos when they are completed and this is a window that she completed at home.  I can't wait to see what her next big project is.


Linda L finished her two Pink Teddy Bears and I think she did a fantastic job.  The mouths were made from 12 gauge electrical wire and applied in two sections.  First the bar coming off the nose was soldered into place and then the curved section was attached to the bar bottom.  I've done plenty of these over the years and those smiles aren't going anywhere!  We also used a Stained Glass Paint Pen to apply the eyes.  I love that instead of making two identical windows Linda decided to make mirror images. It's always a nice touch.


Betty has her Cowboy Window completed and she assures us that she's only making one of these.  Not because of any difficulty but because of her sports loyalty.  So there.


And Bonnie has put the finishing touches on her LSU Tiger Claw Window and it's a looker.  Nice straight lines, perfectly fitting pieces, and smooth lead lines.  You can't do any better than that!


Myrt's completed her Beveled Fleur De Lis and did something a little different with it.  Most people use bevels for the inner border but Myrt wanted just a hint of color and ended up using a beautiful brown/amber that gives the window a completely different look.  I've always liked this window and I really like Myrt's choice to a little color to it.  


This is the second (of this set) of Betty's Stylized Fleur De Lis Windows.  I'm starting to think that Betty is trying to memorize patterns so she won't need them to cut her glass.  One thing is for sure though, she's certainly got this design down pat!


Next we're taking a look at three different projects in the homes that they now reside in.  First up is Brenda's Beveled Fleur De Lis Transom Window which I think suits the room perfectly.  Brenda completed this window at home so we never got a completed picture of it (until now since she sent me this from her cell phone).


And here's the Fleur De Lis Transom Window that Janet made.  It's the first of four and I have a funny feeling there might be a second one installed before you know it.  This is another cell phone picture that was sent to me.


And here's a look at Lynn's two Panel Lamps in her living room.  I have to hand it to her, the bases match as beautifully as the lamp shades themselves.  I'm not sure if Lynn took this picture on a cell phone or not but I found it on her Facebook page and decided that it fits into the blog perfectly this week.


Becky B has all but the background glass cut for her Stylized Fleur De Lillie Window.  I just knew I was going to like the color scheme of this.  Becky's window is a great example of how colors can really change the look and feel of a window.  But most of all, I love how Becky B took a pattern and made it all her own my using a completely new palette.


Becky S now has both borders cut for one of her Rosebud Windows and the second Rosebud has its background all cut and ground into place.  That means that she's only got two borders to go (and her strips are already cut ).   Once her background is tacked to the Rosebud she'll be adding her borders and soldering (although she's been soldering the front side as as she's been going along to help save time).


Bonnie got a quick lesson on using the strip cutter this week and then set about making two Candle Holders.  This is one side of the Amber Candle Holder that she's working on.  All four sides are cut and ground and she's taken them home to wrap during the week.  Alas, the second one isn't started yet because we didn't have the glass she was looking for (she's matching one that she already made).  I think we'll see this completed next week.


This is Brenda's version of the Rose window that you saw Terry complete up above.  The patterns are VERY similar but with subtle differences.  The colors are completely different though, and I can't wait to see what this looks like when it is lit from behind.  The only way you can get a good feel for a window is to see it lit up but I have no doubts about this project.


Carol started her second project with us this week and if you don't recognize the pattern then I hate to have to be the one to break it to you but you've had a horrible childhood.  Winnie the Pooh looks great and Carol's work is top notch already.   I can't believe how far she's gotten along with this in one short day.


Just look at the coloring in Cindy's Dog Window (which we will now be referring to as Bentley).  The shading of the fur and the look in his eyes make this window a standout and it isn't even finished yet!  Cindy will begin adding the name to the bottom when she comes back in and then she'll decide on a color for the borders of both her Dog windows.


Janet cut out even more of her third Fleur De Lis Window and added the border to her second window.  With the border all cut, ground, wrapped and tacked I have a feeling that she'll be soldering this while she's at home.  And her forth window will see the light of day quicker that ever at this rate.


Ann has got all the pieces she's cut and ground tacked together on her 'J' Window which means that she's just twelve scant pieces away from finishing the cutting on this project.  When she comes back in she'll start with the four pieces that make up the background and once they're tacked together she'll cut and fit the final border.


Look at all those pieces across the bottom of this Abita Window.  I don't want to jinx anything so I won't mention dropping this and having pieces all over the floor.  Oops!  I think we're getting to the point where we want to tack some of this together, just for safeties sake.  I'd hate to see Susan cry!


Jeannette started work on her 16 x 20 Cross Window.  It's the same design that Martha has worked on in the past, just done on a grander scale.  Jeannette has this almost completely cut out (just four background pieces left to go) so she'll be completing this window real soon now.  But we're going to see another of these started next week when her friend, Rowena, comes into class and begins working on the same window in different colors.


Shelly has her Bird and Flower Window really close to being all cut out.  The only think that stopped her from finishing her cutting was that she ran out of the glass she's using for her background.  We have the glass ordered but it won't be here until the following week so Shelley's going to begin another project that she ALMOST dropped this one for last week.  That means that we'll see something new for Shelley next week, but this one will return shortly.


Dashing through the snow, in a one-horse, open sleigh!  Yes, with Christmas almost upon us I can say that Linda F's window is really bringing out the Holiday cheer in me.  Wait, you mean it ISN'T Christmas?  Come to think of it, this doesn't remind me of Christmas at all and we still can't figure out why it's called a Holiday Christmas Wreath Pattern.  However, as a non-seasonal design it's beautiful and Linda F is making great progress with it.  I love how she's stayed away from the standard Christmas red and and green combination.  :-)


Mary Grace has all of her window cut and tacked together save for one small spot.  The horizontal band of her Fleur De Lis ended up being a little short she we've decided that it would be best to re-cut it.  But that won't take any time at all to fix and then she'll add a beveled border to it and then follow it up with one more clear baroque border.  I see soldering in Mary Graces future!


Next up we take a look at the pattern that Jeanne traced out and picked colors for as well.  She has her Horse Head all tacked together (I forgot to snap a picture before she left) but she can't settle on a color for the corners of  it so she's moving along to this project until the right color strikes her fancy for the horse.  This one looks like it should certainly keep her busy, but it's a repeating pattern so it won't be nearly as difficult as you might think.  I have a feeling we'll see some glass cut for this when she returns.


And lastly we look at the project that Terry is making in class this week-- another cut class vase, but this time cut in blue.  She's using three different glasses that are the same color but with different textures so when this lights up you'll see surface differences rather than color.  I like how she's thinking with this, it's a very artistic way to make her window stand out without relying on desperate colors.  This is another window that I can't wait to see lit up.


In closing I'm going to tell you that we have a new student starting next week but since she's already taken a weekend workshop with us we aren't going to  have her make a butterfly.  Instead, she'll be starting on a large Cross Window so expect to see that and a whole lot of other things when we return.

Paul
Bayou Salé GlassWorks

Monday, March 17, 2014

Otra Vez

There are a lot of things to learn when you start taking stained glass classes.  There's a lot of terminology that's very new to people and one of the things that I've noticed is that a lot of people (students and not) seem to think that the phrase is 'Stain Glass' when it is, in fact, 'Stained Glass'.   I've heard plenty of other Faux Pas which include the following off the top of my head:  It's not 'Flex', it's 'Flux' that you apply to the foil with a brush before you start soldering .  And even though we pronounce the word as 'sodder' it's actually spelled 'Solder'  (and I've seen this mistake made over and over on a dedicated stained glass web page-- Yikes!)  And the last one I can think of is Whisper Glass.  A lot of students love it but it doesn't exist.  It's actually Wispy Glass.  :-)  And BTW, bonus points will NOT be given when someone says one of these terms correctly but I will laugh at you if you continue saying them incorrectly.  :-)

This is Carol's first project with us and let me tell you here and now that she has what it takes to make some stunning stained glass.  From start to finish Carol made making this Stylized Fleur De Lis look easy.  I can't wait for her to start her new project next week!


Susie brought in her Shoes Window so I could post a completed picture of it.  She made this 100% on her own and I'm thrilled at how wonderfully she did with the construction of this stylish window.  I may be wrong but I think that's a Manolo Blahnik on top of a Louis Vuitton there on the bottom.  Or do I have them reversed?  (Who says you can't learn anything by watching Sex and the City?)


Our newest student's name is Paula and she put together this beautiful Gold Butterfly.  She managed to cut this out easily and efficiently so I can't wait to see what she decides to make for her first window.  Trust me when I say that we'll be seeing more from Paula.


Ann is really flying through her 'J' Window.  All four of her corner Fleur De Lis' are ground and fitted to the pattern, and a lot of the J itself is ground as well.  I think she'll be wrapping glass when she comes back in and then Ann will be ready to cut her background.


Here's a look at the two Rosebuds that Becky S is working on.  With her second bud ground and wrapped, Becky tacked it together and then worked on cutting and grinding the background glass for both of her buds.  She has her dark green inner border strips cut as well, but as regular readers know, she won't cut those strips into border pieces until the background is firmly tacked into place.


Betty has her Cowboy's Star window just about completed as well as her Stylized Fleur De Lis (which I somehow forgot to take a picture of).  We also get to see all the work she's done on her Lily Window.  With all the glass cut and ground I suspect that her newest window will be seeing the light of day shortly!


Bonnie's LSU Tiger Claw Window is almost completely soldered after she worked on skimming, wrapping, and tacking together her final purple border.  She added a brass channel around the edge for protection and now all she needs to do is complete the soldering job.  There's no doubt that this will be completed next week so expect to see this lit up in our next post.


Janet completed the first of her four Transom windows and continued working on her second and third windows.  Both Janet and her husband loved the first one so much that they installed it immediately.  She's promised to send me the picture of the installed window which I was lucky enough to see already and all I can say is that it looks fantastic.  Look for the completed picture next week!


Linda F brought in her LadyBug Suncatcher and it was all ready to be wrapped.  She just wanted me to look it over before she committed to foiling her pieces.  After looking it over all I could say was,'Go for it!'  Linda decided to wrap it at home and instead began working on an oddly named window that she found online.  For some reason it's called a Wreath--  I just don't see that name fitting very well so from here on out we'll be referring to it as Linda's Classic Geometric Window.  And Linda got really far with it as you can see in the picture below.


Linda L's two Pink Teddy Bears got their borders applied and then she started soldering this pair.  With these so close to completion I have no doubt that Linda will begin her next window shortly.  (Rumor has it that it will be a Poodle Window.)


Martha has the front side of her Humming Bird Window completely soldered and I have to say that Martha has officially got the soldering process DOWN!  When I looked at this window at the end of the night I was extremely impressed with the quality of work that Martha accomplished.  She's come a long way from the night she walked in the door and she has a lot to be proud of.


Mary Grace began wrapping her Super Sized Fleur De Lis.  She's still missing a few pieces but after this is wrapped she'll tack it together and get her last four pieces cut.  The finished size of this portion of her window is VERY important because the first border is going to be bevels and we can't alter the size of bevels.  I was impressed with how easily Mary Grace handled the wider foil on this window (she's using quarter inch foil) because most people have a tough time keeping that wider foil even on their pieces.


With almost all of her hops wrapped, Susan continued working on her berries.  There are only a few spaces left open and somehow she also managed to get her Pecans in the lower right ground as well!  Susan really got a lot accomplished this week and is considering making windows with no more than 12 pieces in them from here on out.  :-)


This is Terry's latest pattern.  Her Rose window is stunning and, having just started it last week, she's possibly moving through it faster than any other window I've seen her make.  She's only got the border pieces left to add to this and they're already cut and ground.  And to top it all off, she has the front of it soldered already!  I'm just blown away.


And wrapping things up we move on to Brenda who has her Beveled Fleur de Lis Transom almost completed.  It's tacked together and she's already begun to solder it.  And then, just for good measure she cut and ground the lion's share of her version of Terry's latest Rose Window.  There are a few differences between the Terry's version and Brenda's but I'm far too wise to say that I prefer one over the other.  All I'll say for sure is that the work on both of Brenda's windows is amazing.


And before I go I will leave you with one last mispronunciation that we always hear.  You slump glass in a 'Kiln' not a 'Kill'.  And that's it for this week! We'll catch you all again at another time.

Paul