Tuesday, June 30, 2020

A Meeting Of the Lines


Our tip this week is about watering your grinder.  Yep, you must feed it water every now and again and 99.9% of the people reading this already know this fact but what numerous people don't know is that the sponge behind your grinding head needs maintenance also.  As you grind your pieces the sponge becomes infused with ground, powdered glass that needs to be cleaned out from time to time so water can flow through the sponge freely.  Simply remove your sponge, immerse it in clean water and keep squeezing it until it easily compresses.  Also, when I add water to my grinder I always pour a little onto the sponge itself.  It may not do much but I feel it primes things and helps get water flowing more freely onto the grinding wheel.


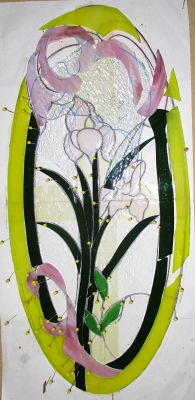
Okay so our first completed project this week is Belinda's Oval Iris Window.  Look at how smoothly that oval flows!  Her cutting is wonderful and her colors make this a strikingly eye catching piece.  Impressive indeed but Belinda made it so why would we be surprised about how wonderful this is?


Melissa finished her Ribbon/Cross Suncatcher which is a symbol for Hope and if you look very closely you'll notice that the cross itself is actually the letter 'T' which stands for the last name of the family it was made for.   It's a very clever mixing of symbols that Melissa designed herself. To top it all off Melissa had the words "Power Of Prayer", "God Watches", "God Listens", and "God Answers Prayers" fired onto the cross so they will always be remembered.  Inspirational indeed!


Linda F put the finishing touches on her Butterfly Panel and walked out the door with it ready to slide into its metal frame which resides in her yard.  She's making a lot of these for all of the seasons and for both herself and others that have the same frame!


Angie's newest Cross/Heart Panel was done quickly and succinctly.  Those reds are so very vibrant and they are proof that you can mix textures within the same piece.  Yep, the red in the heart is different from the red that makes the border.  I usually try to match the color but change the glass when I make borders for my windows.  Not always, but a lot.


Ann is back!  It's been a while but Ann came into class this week with a pattern in mind and has proven that taking two years off doesn't mean that you'll forget anything.  Yes, in just one class she managed to cut, grind and wrap a full sized window.  When she returns next week she will surely have her double borders attached and start to solder this.


Betty got all of her Address Window cut, ground and even tacked together for the most part.  She only needs to attach the final border and then this will be ready for solder.  Although you can't see it in the picture she's mixed different blacks between the border and the numbers in this window.  Variety can make some wonderful pieces, don't you agree?


It's a me, Mario!  Shawn is making this Mario Window for her son, Parker and I think it's going to be stunning.  Cartoon characters always work exceptionally well in stained glass as you can already see just by looking at the pattern.  This is going to be a fun window indeed.


Tracey's latest Cardinal Window just has about 5 pieces of background glass and 2 pieces of black to cut out and then she'll be ready to begin grinding.  Those yellow flowers contrast perfectly against the bright red bird.  Tracey is the Cardinal Queen for sure!


Jeannette has her latest Wine, Grapes and Cheese Religious Scene Window all tacked together and even has 98% of it soldered.   She'll without a doubt be coloring this when she comes back in so expect to see this completed in our next post.


Linda F is already making another widows for the Iron stands that decorate her yard.  You saw her completed butterfly in the beginning of this post and this is her Sunflower design.  These panels are easily slid into place allowing her to change up her yard by simply changing the stained glass panel within it.


With her borders attached and the front side completely soldered, Annette's Cross and Dove window is also very nearly completed.  This is another window with a 'broken' background (not literally broken!) that is becoming VERY popular in our classes.  It's a very antique looking effect.


MiMi's Combat Vet Window only needs to have its letters cut out and then she'll be able to move on over to the grinder.  Talk about fast work!  This is going to make an old combat vet VERY happy.


Our Wednesday class was so very nice even though it rained most of the day.  Why?  Because Linda L spent the day making Mixed Drinks for us!  Do I even need to point out just how GREAT these look.  I just wish they'd been real!


Roxane's Angel Window is taking shape quickly as well.  She finished cutting out the dress of her angel and has the head and the wings are ground already.   Once this is tacked together we're going to make it the center piece of a rectangular window so there will be some background glass and border(s) involved later on down the line.


Jeanne L has her fruit officially wrapped in foil and now you are beginning to see some of the definition that this window consists of.   Once the brown basket itself is wrapped you'll see all of the work that Jeanne has invested into this project.  Gorgeous.


Mary's Magnolia has been completely cut out and if you look carefully you'll see the heads of pins lining numerous pieces in this project which means that Mary spent her night standing in front of the grinder.  This looks like it will be completed before you know it.


Speaking of completed before you know it, Shelley's Titus Window will surely be finished when she comes back in.   She's not adding a border to this so a simple black zinc channel will surround this stained glass interpretation of a painting.   If there weren't two lead lines extending to the each side we'd have to put a border on this for structural stability but it meets the requirements to skip a border.


Next up we look at Lisa's Butterfly Emergence Window which is all soldered and just needs to be washed and colored.   Since she's using black patina  we like to leave the patina sit on the window for about 45 minutes to allow for a nice solid,even coloring.  Even then I still like to wait 24 hours before waxing it.  That said, you can wax it right away if you use VERY little pressure with a thorough amount of wax.


Kerry's working on the back side of his LSU Window now and that means that the end is near.  He's got about a quarter of the back side soldered so he's probably got at least one more class to go before he gets to wash this off, patina it and hang it up!


Martha has one of her street lamps ground and fitting together perfectly.   I forgot to ask her if she's reducing the size of the overall window or not.  That I will find out and reveal when we come back again next week.  If you look closely you can see the red outline that perfectly surrounds the lamp and will mark the edge of the window if she decides to make this smaller.


And lastly we look at and empty frame that Cindy hollowed out which will soon contain three birds.  You'll see just what that looks like next week when the pattern is officially drawn up.


And that's it this time around!

Paul

Monday, June 22, 2020

The Drunk Of Cocodrie

I promised a tip this week and I actually have two of them which may seem simple, but numerous students over the past 2 or 3 weeks have said that I never specifically stated these important issues:

1)  If a piece is hanging over the line on the pattern you MUST grind it so that it stays within its lines.  Once one piece is off it can cause other pieces to stray over the lines which in turn causes others to do the same.   The lines on the pattern are there for a reason.  Follow them.

2)  When you are at the grinder you get to control how much glass comes off of the piece you are grinding by adjusting the amount of pressure you apply to it.  The harder you press, the more you grind off.  Learning how to utilize pressure is the key to grinding quickly and efficiently.

Ok, with that out of the way let's look at the biggest window we've seen completed since we re-started  classes.  Yes, it's finished!  Susan R's Seafood Window has seen the light of day and it looks stunning.  This is the largest Window that Susan has ever made but she never gave up and rushed through it.   She wanted this to be a showcase piece and it surely is.


Susan D put together this 3D Fairy and figured out how to tack the wings on all on her own.  The hardest part in making these is that if the wings are off it will hang crooked.  This one, as you can see, hangs perfectly.


Angie finished up the work on her first Dragonfly Lawn Ornament and it's a fine piece indeed.  She used a lot of clear glass in this but kept the body solid which helps hide the stake that supports this in a flower pot.


Also, Linda L finished 4 more Bird Lawn Ornaments, two of which are pictured here.   The lead beaks these birds sport may be hard to see but when you see these in person they really add an extra bit of charm.


And Betty wrapped up another Mary and Child Suncatcher.  These go very quickly for Betty which is a good thing because she can't seem to make them fast enough.


Melissa is back and she cut out the arms of her cross which had inspirational phrases fired onto them, and then ground the entire cross before calling it a night.  Who wastes time?  Not Melissa!


Mary's back and her round Magnolia Window made huge incredible strides towards completion this week as she was able to cut out all of the leaves and the petals as well!  All that's left to cut out are about 11 pieces of clear background glass after which Mary can begin grinding.    


MiMi has begun working on a Combat Vet Paratrooper Window and in just one class she managed to first trace and cut out her pattern pieces.  Once that was done she cut the background and the parachute cords out of actual glass.  I have a sneaking suspicion that this will go pretty quickly for her.


Jeannette began work on this Cross Suncatcher and she already has it ready for solder.  This is probably the most popular Cross pattern that we have and Jeannette can knock it out as if it were just four pieces of glass rather than 15.


Roxane is also moving briskly through the creation of her Angel Window.   With just a few pieces left to cut out in her robes, this will undoubtedly be ready to be grind when she comes back in.


With all of her glass now ground and fitting together Linda F is ready to begin wrapping each of the pieces that make up her latest Butterfly Window.  Look at all of those pins.  It's a glorious sight!


Lisa's Butterfly Emergence Window has all of its glass cut, ground, wrapped and tacked together.  She's all set now to solder this piece and then hang it up!  You've got to love how perfect that circle and the border is.


Belinda is almost finished with her Oval Iris Window and as you can see it's fitting together wonderfully.   She doesn't have the actual Iris petals cut yet so she's begun grinding from the bottom up.   I think we'll see those pretty Irises get cut out when she comes back in.


Susan D got four of the Fish for her Pelican piece just about finished while she was here this week.  I may be wrong but I think she only has to wash and color these now.  Next week I'll show you the Pelican itself and get ready to be impressed-- it's a biggie!


Kerry's LSU/Tiger Eyes Window is another project that only needs to be soldered now.  You can't see the pupils in the eyes right now but when they have light behind them they really come to life.  I'll explain how we do that when you see the finished piece.


Shelley's Titus Window is sooooo very close to being completely ground.  I love the red sunglasses.  They bring Sally Jesse Raphael to my mind when I see them!  She may very well get this tacked together when she comes back in.


That's not one but two(!) Franklin Street Lights that you see here.   Martha needs another pair and she's making them the smart way-- by cutting the two out at the same time.  She may be cutting down the overall size of the window as well, but we'll see what she decides in our next post.


Tracey  began work on a completely new Cardinal design and she's decided to leave off the branch in the upper left corner.  With her colors all picked out and some of her pattern pieces traced out Tracey will begin cutting glass when she comes back in.  And just in case you missed it, she already cut out the brown branch pieces that the cardinal is sitting on.


Lastly, we look at the bevel layout for a Bevel Cluster Window that Barbara H will be start when she comes back next week.   She's taken these home with her to wrap and next week I think she'll manage to get the center all cut out.  These beveled windows get made quickly!


And that wraps things up this week!

Paul
Bayou Salé  GlassWorks

Monday, June 15, 2020

A Feeling of Liberation and Release

We're just jumping right into things this week and all I can say is WOW! At almost 4 foot tall Cindy's Sunrise Scene is impressive.  Look at the way those sun rays line up so perfectly and how the mixed greens in the tree blend in so well together.  Having the border match the tree truck added so much color balance that this window couldn't help but turn out fantastic!  This is another example of a window coming out of our shop that the creator should be exceptionally proud of.


To many people this is 'just' a street light window but if you hail from Franklin, LA this is a VERY iconic symbol.   Martha did a marvelous job on this with symmetry working on her side.  The colors, well, it's a shame that they don't make that background glass any more because it is perfection rolled out into a sheet of glass.   Martha will be making this again but in blues next time around and I can't wait to see her make new choices.


Speaking of great colors, I'm so glad that Shawn decided to follow up her bevels with a thin final border.   I feel that using a beveled border around the final edge of a window prevents the bevels from truly shining. Shawn went with a vibrant red for her final border and it not only matches her numbers perfectly but it allows the bevels to stand out.   Also, this color scheme of red and amber (AMBAH!) make up one of the most popular color combinations used in old stained glass windows.  That alone gives this Street Address Window an antique stateliness about it.  Job WELL done!


Angie completed her Peacock Window this week and, as always, her window is superb.  Utilizing only two colors this window shows how less can be more.   True she's used different textures throughout but the colors remain the same.


Tracey made this Sunflower Panel look easy from start to finish.   The rounded corners sometimes make this difficult for people but everything here lines up perfectly.  You can see that Tracey utilized the same trick that Cindy did by making the border match something that's already been used in the window but not focused on.  In this case it's the flower center.  It's a great way to make your borders match perfectly.


Belinda has begun her new window and this very elegant Iris Oval is already taking perfect shape with Belinda being just one class in to it.   Belinda only has the Iris petals and the background to go before she starts grinding this.  She's a fast worker!


Angie started a Dragonfly suncatcher and got everything cut and ground this week.   I like that she decided to make this a multi-colored piece and just ran with her own color choices.  Mark my words, when this is finished and posted online someone out there will see it HAVE to match these colors because they will believe this is the way it HAS to be done!


Roxane began cutting glass for her Angel Window and has decided to use a dark blue glass for the trim of the Angel's robes.   Interestingly enough, the picture that she saw had this done in all clear glass but I colored the trim on her pattern in blue so she could differentiate between the robe and the trim and she liked it so much she changed her original color choice!


Annette's Cross and Dove Window is all ground, wrapped, tacked together and even has its first border cut out which Annette is wrapping at home.  She picked a wispy white glass for the thin inner border and a medium green wispy glass for the outer border.  I have no doubt that we will see these attached next week and guess what?  She already has the front side that you see here soldered!  This is VERY near completion.


Susan D is making another LARGE 3D Garden Ornament involving a Flamingo Pelican and some assorted fish.  It's turning out bigger than expected but this is one of the fish that will be mounted below the Pelican in the wire structure that I will show you soon.


And Susan R hit a milestone this week as she has turned her Seafood Window over so she can solder the second side!  Look out, this is very, very near completion.  She plans to solder some of this while at home during the week which will even make this go faster.


Lisa's Butterfly Emergence Window (I think I like that name best) has its background all cut and ground and as you may (or may not) be able to see, she's decided to make it circular.   Next week she'll tack this together and then easily add a border to it so that she can begin soldering!


Linda L got 6 Bird Suncatchers cut out and then had them all ground and mostly wrapped as well.  Linda learned that sometimes, not always though, a good solid grind at the grinder will get you most, if not all of the way home.   By grinding all 6 pieces of these birds at once and THEN fitting them together she was able to speed up her grinding process 10 fold while achieving the same accuracy.


Jeanne actually got all of the pieces cut and ground for her Fruit Bowl Window while she was in class-- I just took this picture a little too early for you to see it all.  She's taken this home with her so she can hopefully get some wrapping done during the week and once she has this tacked together the background glass will be cut and ground quickly enough.  It will soon be time to start thing about border colors.


Speaking of missed pictures, this is leftover glass from Lara's border for her second Flower Window which we will see completed upon her return.   This week she finished grinding, wrapping, and tacking her window as well as getting the border cut, ground, and attached as well!


And that's all he wrote this week!  I promise to have a tip in our next post-- I'm just a tad bit behind and a little out of sorts today.

Paul and Nikos
Bayou Salé GlassWorks