Monday, January 28, 2019

Fresh Step-Ins

Aspect ratios tend to throw our students off so I'm covering this to help explain how resizing a pattern works.   When selecting a pattern for a window you have to keep the proportions similar to that of the window you will be making it for.  If you have a window that's three times as tall as it is wide you should pick a pattern with a similar size and not one that is much wider than it is tall.   Let's use this circular pattern as an example.


If you want the circle in a window that is taller than it is wide you can only really center the circle which leaves gaps at the top and bottom as shown in the picture in the lower left.   If you want the circle in a window that is wider than it is tall then the gaps will appear on the left and right of the circle.


If you stretch the circle to fill these gaps then the picture loses its aspect ratio and the circle becomes an oval.   In a window made up of shapes this may not mean much but you certainly wouldn't want to change the aspect ratio on a pattern that has flowers or birds or people in it because they would look VERY unnatural.


So when choosing a design for a window be sure to pick something that comes close to matching the shape of the window you are trying to fill.  Aspect ratios are VERY important as you can see below!


OK, with that out of the way let's start things off by looking at our finished projects this week.  Jeannette made short work of this Compass Rose Window, that's for sure.   Everything about it looks great and her work is top tier.   Me, I personally love the fact that she left this circular.  We've been seeing more and more round windows being made here in our classes and this one should surely inspire at least a few more.


So then, let me tell you that Lara's Wedding Box turned out to be very beautiful indeed.   Everything fit together wonderfully and I felt the need to take a few extra shots of it so you can see how the top opens.  I have a sneaking suspicion that Lara will get invited to a lot of weddings once word gets out that she gives these as a wedding present!


Betty finished her Fleur De Lis Window and hoped to start working on a repair but she had brought the wrong glass along with her.  :-(   Nonetheless, this window is the bee's knees.  There's just something about it's simplicity that I find very attractive.


Angie had almost finished this Fleur De Lsi Window while she was at home during the week.  She wanted something quick and simple and apparently she's struck a chord with the other students because she had me scan the pattern so I could print it out for everyone in the class!


Susan D's Cactus Nightlight was finished before Susan started on her next project (which you'll see a little later) but I wasn't able to get a picture of it with a light behind it.  Why? Because the nightlight bulb burned out just as I was snapping the picture!  How's that for bad timing!  Nonetheless, the picture looks great even if it is only front lit.


Our final completed window this week was done by Jeannette (yep, she has two finished projects in this post) and it's the first of many of these that we'll be seeing.   I love the way Jeannette made sure that the center of the rose/heart has a more orange color to it.  It's all been cut from the same glass but Jeannette is using the glasses natural highlights to make her window stand out in a crowd.


Susan D has started an Owl Suncatcher that everyone loves and wants to make until they see the number of pieces in it.   Susan, never one to back away from a challenge, is already at about the halfway mark.   This is a great project to make if you want to get rid of some scrap glass.  The best part about it is that when it's completed you'd never know that it's a scrap glass project.


Next up we have Roy who is making steady progress on his extreme multi-piece Cane Field Window.  When this is completed I think we'll all being softly saying, "Wow!"


Rowena started this LSU Window while she was at home and now it only needs some solder on its back side to finish it off.   You just can't lose with an LSU window around here and that's all I'm going to say about that.


Jeanne M came in ready to start grinding all of the pieces to her Geometric Window and did she ever take to the grinder.   In just one class she got all of her pieces ground and ready to be wrapped!


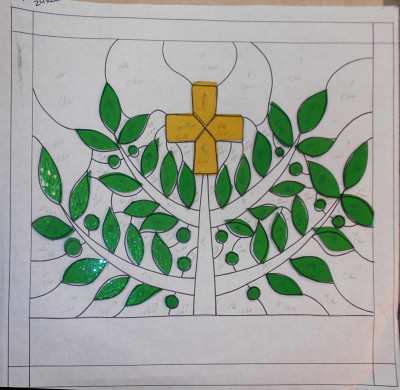
This angled view of Jan's Jesse Tree shows how much of the clear background glass she managed to cut out this week.   She's only got a handful of pieces left and then she'll be able to slide on over to the grinder to get this all fitted together.


Terry came in with her Spiraling Flowers Panels all tacked together and ready for channel.  Once the channel was attached she finished soldering the back side of the bottom window and took both of the panels home to wash and color.  These won't be coming back into the shop since Terry is finishing them at home but I'm sure she'll be able to send me a picture of them once they are installed.


Kerry's Cross Window saw all of its pieces get foiled this week and that means that when Kerry returns he'll tack this together and then pick out some glass to border it all with.  I'm thinking that Kerry may very well begin soldering when we see him next.


Jeff's begun work on two cloud panels that will be mirror images of one another.   These will be more complex than the first panel that he has cut out but as he showed us in class this week, he's got this covered.


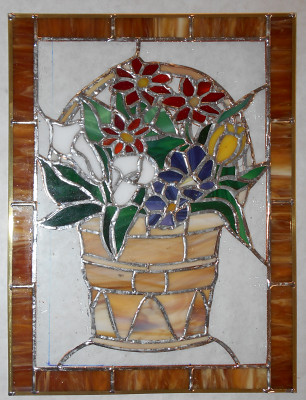
Linda F made a huge amount of progress on her Flower Basket Window as she cut out her background, attached it, cut a border and attached that as well. The channel has also been added to this complex and deceivingly small panel which leaves only the soldering left to go.


In just two weeks Tracey managed to cut out and then grind all of the pieces to her Eagle and American Flag Window.   Just look at how wonderfully it all fits together.   Tracey has taken this home with her where she hopes to get it wrapped during the week.  Who knows how far along she'll be on this when we next see it again.


Linda L's Houston Astro's Window is an impressive piece of work.  Her circles are each perfect without any wavers and the text is equally as impressive.   We bent a zinc channel to fit this during class and it's 100% tacked together now.   This is very near completion.


With everything ground and wrapped, Patrice is eager to get to the border of her Ragin' Cajuns Window.    I have no doubt at all that the border AND the channel will be attached on this when Patrice returns to class next week.  Get that soldering iron ready!


MiMi's Industrial Fleur De Lis has its channel attached.  That means that all the glass has been cut, ground, wrapped and tacked together.   Not only that, the front side of this has been soldered in its entirety along with most of the back side!  She's very close to finishing it and when it's hanging up I know that it will be the talk of the town.


Sheri's Poppy Window only needs some solder on its back side and then this will be out the door for the last time.   She did a beautiful job soldering each of those glass globs into place all on her own and her soldering is spot on.  Look to see this completed real soon now.


Martha's Cardinal's may be in Limbo, but her Butterfly Lawn Ornament is just about ready to fly.  She's got this ground and fitting together wonderfully  which means that the next step is for it to be copper foiled.


Here's yet another project that needs no more cutting.   Brenda's Salon Window just needs two coats of solder and some channel and then she'll be moving along to something new.  The end, as they say, is near!


Barbara's Santa Claus is about 2/3rds of the way ground now.  She's a little concerned about how much snow there is in this window so if she still has enough night sky glass left she'll be replacing two pieces of white glass which will lover the snow level considerably.


Cindy's been busy assembling six more Flower Suncatchers.   The problem with these are that Cindy needs to draw up new patterns for each suncatcher since they aren't all the same size.  I think this is the last of them though so Cindy is more than likely relieved that all she needs to do now is solder them.


Lastly, Melissa's next window is in the works and it's one of my favorite subjects.   Based on Michelangel's La Pieta, Melissa is focusing mainly on the face of Mary due to the aspect ration restrictions of the subject matter.  There's a lot of background work in this piece but when it's done it will indeed be a work of art.  


That's it this week, take care everyone!

Paul
Bayou Salé GlassWorks

Thursday, January 24, 2019

She Had An Epiphany


It's been a long time since I've posted the progress of our Weekend Workshops but my New Years Resolution for 2019 is to post each and every workshop that we have.  Last week Tessie, Angie and Roxane spent two days with us making three windows that all turned out to be nothing short of spectacular.   Here's how all that was done.

It takes 2 copies of a pattern to make a window.   The first is drawn on regular paper, the second is traced from the first pattern onto poster board using good old fashion carbon (tracing) paper.  The poster board is then cut apart into all of the individual pieces that make up the window.  Below you can see the pattern pieces (grouped by color) on top of of the pattern that we build our glass on.


The pattern pieces are then laid out onto the glass and traced using a permanent Ultra Fine Point Sharpie Marker.  


We then separate the pieces of glass using a glass cutter and when that's been completed we cut along all of the lines we traced.  As the pieces are cut out of glass we lay them on the pattern allowing us to see the project come together.


Once all the glass has been cut we put a Square in the lower left corner and begin grinding each piece so that it matches the pattern perfectly.   Glass cutting is not an exact process and every piece must have its edges ground whether it fits or not.  In the image below Tessie has the bottom half of her Fleur De Lis ground and fitting together wonderfully. 

 
Once everything fits together each glass piece is 'wrapped' with a copper foil that surrounds the edges and overlaps onto the front and back side of the glass.   Lead won't stick to glass and it's the copper foil that allows us to melt and affix lead to the window and hold everything together.  You can see that Angie has all of the colored pieces of her Mask foiled.   The clear background pieces have yet to be wrapped.


Here's a look at Tessie's window with all of the pieces wrapped and ready to be soldered.  There are still no border pieces cut because we do that AFTER the main window has been soldered (or tacked) together.   Doing a border this way ensures that everything lines up perfectly straight.


With her border attached and the front side of her window all soldered, Roxane moved along to the back side of her Address Window.  Yes, both sides need to be soldered or the window would eventually flex and fall apart. 


After everything has been soldered we wash the window and then go over it with a chemical called Copper Sulfate (sometimes referred to as simply 'patina').  The patina reacts with the lead and causes it to change from silver to a copper color as you'll see in each of the completed projects below.

Here's Tessie's Stylized Fleur De Lis.  No bad at all for a beginner or even a seasoned glass cutting professional!   Tessie made cutting glass look easy but it's her soldering skills that really impressed me.   


Next we look at Angie's Mardi Gras Mask Window.   Her symmetry in this is spot on and in a window like this it's really what either makes or breaks the design.   In this case the design is perfection as is Angie's work.


Last but not least we look at Roxane's Address Window.  Of the three windows made  last weekend, this is the one that shows how much of a difference having a little light behind the window can make.   While it was on the table the colors were muted and cold.  Now that there's a little light behind the window you can truly see the colors come out.  And just for the record, Roxane finished this in record time!


So there you have it.   Three windows, from start to finish in two 8 hour sessions.  As always, taking time out to eat was fun as well!  We'll be having a Fusing Workshop in February where a Mardi Gras Plate will be made so expect to see a post about that in 3 or 4 weeks .

Paul
Bayou Salé GlassWorks

Monday, January 21, 2019

She's Got Head Lice

Drawing a pattern is usually more complex than people believe.   This is because although lines are added to a pattern to allow the use of more colors, line are first and foremost used to make cutting pieces easier.  In the pattern below the 2 thin vertical blue lines show where a lines SHOULDN'T be placed in this pattern.  The red arrows point to two very small pieces that would be extremely difficult to cut, grind or wrap.


Next we've slid the blue lines a little further away from the center of the window which removes the small problematic pieces that we encountered in the first drawing.  However, we now have four small pieces (although slightly bigger than the first ones)  along with points coming off of the bottom of the Fleur De Lis that will need lead lines running from them.


Finally, we have some great line placement.   All the pieces are of an easily workable size and extra lead lines aren't needed for the bottom legs of the Fleur De Lis.    All of this should be worked out BEFORE any glass is cut which is to say, don't start cutting glass until you have a pattern drawn on paper.  It's the only way to ensure that you won't need to work harder than necessary.  Make sure you scroll further on down to see what this pattern looks like when it's actually cut out of glass.


So let's get into this weeks windows.  Angie completed this Cross/Rose/Heart Panel and as soon as I saw it hanging I said that I have to make one for the next show we do.   Her glass choices are perfection and the pattern has already been scanned and handed out to four different people!  This one's a winner for sure.


Becky S put the finishing touches on her second Butterfly Lawn Ornament and it's turned out to be just as nice as the first one that she made.  I'll say it again: The addition of a body in the center really adds so much to these!


Cindy is on a roll making these small circular Flower Suncatchers.   They measure about 5.5 inches in diameter and this is one of two that she completed this week.  The center sections come from a broken lamp that was beyond repair but she's cut the six painted panels into circles and is bordering them with blue glass.  Now that she's got two of them completed the rest will go quickly for her.


Here's a look at a small Peacock Panel that I made.   These have always been popular through the years and the are great 'attention getters' at shows.   Planning ahead, my next one will have a more amber color scheme.


As a sort of 'bonus' this week we take another look at two of the windows that MiMi has made now that they've been installed.   They certainly brighten up the room, that's for sure!   And don't you agree that the similar images look better than mirror images?   The matching color schemes and identical sizes are all these windows need to pair them together.


Jan began cutting glass for her Tree with Leaves Window and although it's inspired by an icon she found in a prayer book, we aren't exactly sure about its representation.   If anyone out there knows please be sure to tell us.  Regardless of the meaning, this is looking very nice indeed and Jan's cutting has never been better.


Carol began working on two Mardi Gras Masks and as you can see she's almost got both of them ground already.   Once the eyes are cut into these you'll really see the masks in all of their Mardi Gras glory!


Betty's project may look a little familiar to you because it was the example used in the tip at the start of this post. This panel uses 5 different types of glass including a Fleur De Lis Bevel cluster.  Look to see this completed when Betty returns.


Jeanne L is making a Humming Bird and Flowers Panel which she's figuratively flying through!  With just the flowers and a few background pieces left to go on this I'm thinking that she'll be looking for a new project to work on before you know it!


Jeff started his first project this week and the only thing that he has left to do with this is to add a border!  This panel will be just in a 12 piece set which will fill in one of the openings of a three by four window.  We will reveal what the other panels look like in the weeks to come. 


Jeanne M has all 29 pieces cut out for her Geometric Window!   This is her first project and believe it or not this was accomplished in just one class.  I guess you can say that she's focused. In fact, she's all set to begin grinding already!


Kerry, like his wife Jeanne M,  also managed to cut out all of the glass for his Cross Window in just one class session.  He's already begun to grind his glass and I'm sure he'll finish the rest when he comes back in.  It would appear that our new students are unstoppable!


Lara's Wedding Box isn't starting to take shape-- it HAS taken shape!  Her colors are vibrant without being too splashy and her choice of Baroque Glass for the border is as elegant as can be.   This will surely be completed next week as she only has to assemble the box bottom which is only 5 pieces of glass.  Gorgeous indeed.


And speaking of gorgeous, just look at Susan R's 1920's Woman.   This week we see that the pearl necklace has been cut into place along with all of the background glass.  I can't wait to see what Susan decides to do for a border on this.   I was already loving it but those pearls just added so much to this design!


Roxane is symbolizing family through the use of Penguins in her newest window and it's already shaping up to become something new and striking. I believe that these are the first penguins we've ever seen done in class but according to Roxane they will certainly not be the last ones!


I jokingly took 13 pictures of Susan D's Cactus Nightlight and would you believe that not one of them came out either blurry or overexposed!  I've adjusted this one as best I could and although I think you can get the picture as to what her nightlight will look like I'll be sure to get a GREAT picture of it next week.   Even the angle is off on this picture.  :-(


Flags are in (as you're about to find out.)  Here you can see Tracey's Eagle/Flag Window which was practically all cut out in one class .   The only reason the few remaining brown pieces aren't cut is because Tracey left that glass at home.   She'll be grinding this before she knows it!


Next we have Shelley's American Flag/Peace Sign window.   Shelley has never made a round window before  and this is going to be a good one to start with.  Leaving it round helps to 'flesh out' the peace sign so I advised her NOT to square it off.   Shelley hopes to enamel the stars onto the blue glass to avoid all of the lead lines that cutting would create, but since the blue is dark I don't feel that the lead lines would be distracting to the window at all.


Our last window involving a flag is being made by Mary Grace.   As you can see it is VERY similar in appearance to the window that Tracey is working on with the big difference being that this one has numerous clear stars sprinkled throughout the design.   You'll see those better when this is completed and hanging up.  


Rowena worked on this clear textured Fish Suncatcher and all it needs is a little solder to finish it off.   She cut it, ground it, and wrapped it all in one three hour class.   I need to hire this woman!


Let's face it, sometimes it's hard to tell what a project is before it's ground but Mary's Rose Window already looks exactly like a rose and she hasn't even begun grinding it yet.   This is one of those windows where Mary will grind the flower and tack it together before cutting any of the background glass.  Once the flower has been assembled she'll trace it onto a single piece of glass which she'll cut out and have fitting together instantly.


Wow, isn't Patrice's Ragin' Cajuns Window looking great!  What I like best about this is that Patrice isn't afraid to challenge herself with each new project.   Then she just stands her ground and whips the glass pieces into perfect shape as though she's bending them to her very will!   I can't wait to see this with some light behind it. 


And here's Terry's 2 Panels that make up her Spiraling Flowers Window.   Since the size has changed since she began this project she'll be adding a row of diamonds across the top of the upper section and across the bottom of the lower section.  We'll see how that looks when Terry returns.


Brenda's Salon Window is all cut and ground and ready to be wrapped.  She's already made some progress on the foiling process while she was in class and before you know it, this will be a finished piece of art.


Sheri's Poppy Window is nearly finished serving time on the work table as it's about to blossom into a window that hangs in the sunlight.   With all of her class cut out and just the border needing to be tacked together, this will be completed before you know it.


Linda F's Flower Basket is all wrapped and ready to be tacked together.   She was hoping that she could get that done at home but the near freezing temperatures we've been experiencing probably put the kibosh[1] on that idea.  Nonetheless, you'll be seeing this tacked together when you next see it posted here because we'll easily get that done during class when Linda returns.


With all of the glass officially cut for her Industrial Fleur De Lis Window, MiMi is ready to begin soldering the back side of this impressive Window.   The end is near and I suspect that a VERY large smile will be on MiMi's face when she completes this.


Jeannette's Compass Rose Window is so close to being finished that it must have hurt her to walk out the door with only a small amount left to go on it.   The good news is that she'll have this completed during her next class and she'll be able to take her time washing it and coloring it.


Martha finished everything but the soldering on her Pair Of Cardinals Window and they look great.  She plans on soldering this at home during the week between classes so this may very well be completed when she comes back in.


Barbara is grinding away at her Santa Claus Window and although you can't really see it, there's actually been a lot of work done on this.   The problem is that all of her white snow looks like the white pattern paper so you can't see all of her work-- or at least not yet. 


And to wrap things up we leave you with a look at Martha's  latest creation, a Butterfly Lawn Ornament.   She did a wonderful job cutting this out and I know this will go quickly for her.


Lastly, no one has head lice!   You just had to be there...

 [1]  Many words in English have obscure origins, particularly those that first appeared in argot, cant or slang. None is more mysterious than kibosh, which is most commonly encountered in the phrase to put the kibosh on something, to finish something off, put an end to it, decisively dispose of it, or reject it.

Paul
Bayou Salé GlassWorks