Tuesday, February 28, 2017

Solder In The Hole!

As we discussed last week, keeping things lined up is a very important aspect of making your glass look good.  Before I make a cross I draw a vertical line and then place a square against it to get a right angle out to the right.  Then I just extend my horizontal line so that it reaches to the left as well.  These red lines are what the cross will be built upon to make it symmetrical.


With a Fleur De Lis you'll need two horizontal lines to ensure symmetry.  If you use guidelines while drawing your patterns things will always work out well.


OK, I'm pleased to announce that Brenda has finished her Mardi Gras Comedy and Tragedy Masks and what a wonderful window it turned out to be.   The intricacy of the pieces (especially the beads atop each mask) make this an advanced project to say the least.   Brenda followed her pattern flawlessly and the results are spectacular.  I couldn't be happier with this window if I'd have made it myself (which I just might do).


Rowena's Olivia Window is also perfection.  Her straight lines are right on the mark and the text itself is plainly legible with  downright beautiful penmanship.


Tasha made her own Mardi Gras Comedy and Tragedy Mask Window and did she ever do a great job with it.  Tasha is learning that slow and steady always wins the race when it comes to soldering.  This pattern is based off of a painting that she had discovered on the internet and it proves that inspiration can come from just about anywhere.


Cindy completed three more of the Curved Beveled Crosses and, as always, they look marvelous.  You just can't lose with this pattern. (And they all line up!)


Carol has started a wonderful Water Lily Scene and what you are looking at below is just the bottom section.  Her window is very tall so she's working on it in two separate sections to make it easier to transport back and forth to the classroom.  Once this section is ground Carol will be able to tack it and then move on to the top portion of this pattern.


Becky S now has all of the border cut for her Cheetah Window and all I can say is, Wow.  She'll begin soldering this shortly but you can already see how good this is going to look before  it even gets lifted off of the work table.


Ann got all of her Fancy Fleur De Lis Window traced out and the pattern pieces cut.  When I looked up and saw that Ann was trying to find the best way to fit the border pieces onto the sheet  of glass I quickly reminded her that borders are never cut by hand.  I've colored the double border in with orange in the picture below to show you the sections that shouldn't be cut until the inside of this window is tacked together.   It doesn't matter if other pieces cut into the border, we always cut borders with a strip cutter.


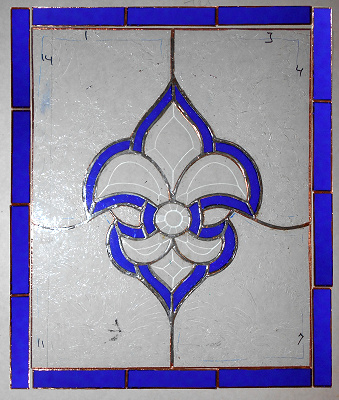
Judy got all of her Seafood De Lis Window tacked together and she has the two top halves of the background cut and ground.  There were some intricate cuts in those two pieces but that's all behind Judy now. The rest of this should be very easy to do because the bottom is pretty much a piece of cake.


Myrt is ready for the final border in her Cardinal Window.  There a piece of branch that she has to add near the top right corner but that will only take a minute to fit into place.  This is already a very successful window for Myrt and I'm sure that Tracey will love it when it's complete.


Jan has her baseball field all wrapped and what a great job she did on that.  I can safely say that Jan has the art of foiling down pat now because all of her pieces are even and concise.  This will get a background next week as well as possibly a border.


Jeanne is making a Stained Glass Box out of a textured clear glass and it's just about ready to be soldered.  She thinks that the top may be a bit large and I originally said that it wasn't but then after looking at it the next day I have to agree with her.  I always use opaque glass which hides the overhang but since Jeanne is using clear glass I completely agree with her reasoning for trimming down this box tops width by almost a quarter of an inch.


Susan R got her Mardi Gras Mask all tacked together and then she even got her border attached.  Although this piece wasn't completed when she left she did get the brass channel tacked on as well so that the only thing left to do is solder it.   I'd go so far as to consider this project finished and I hope we get to see it completed when Susan returns next week.


Tracy got all of her Mardi Gras Jester ground and while she was working on it I drew in a blue teardrop under his eye.   After looking at it a while Tracey decided that she might actually want a glass teardrop for her window.   I cut it out for her, ground it and then placed it on top of the stereo for safe keeping.  Since Tracy managed to leave without my taking a picture of her window this tiny teardrop is the best I can show you.
 
Mary Grace got her Rainbow Kaleidoscopic Window all tacked together and is already about to start soldering it.   Her border was made by cutting long glass strips at random angles and then cutting the next piece from the previous piece.   It was entirely random and it's absolutely perfect for this design.


Mary came in and got a quick lesson on skimming pieces of glass on the grinder which is about all she needed to do with her six background pieces.  Once that was done she was able to wrap them and tack the center of this Fleur De Lis Window together.  She then cut and skimmed her blue inner border which she has taken with her to wrap at home throughout the week.  Expect to see the final border of this window get cut out and tacked when Mary returns next week.


Barbara's Autumn Train scene is looking WONDERFUL!   She's arranging the glass colors perfectly and really getting some depth to show in all of those pieces.  I can't wait to see this window completed because it's going to be a show stopper. 


Jeannette got all of her Mermaid Window cut, ground, wrapped and tacked!  I put on a channel for her just before she left and I can honestly say that there's no doubt that this will be completed when Jeannette returns.


Lara got all of her Parishes ground and tacked together and then moved on to cutting out background glass.  Lara came up with the idea to use blue along the bottom to represent the water that touches Louisiana.  I guess it's safe to say that there isn't very much left to go on this window before she can start adding borders.


Martha has her newest Fleur De Lis Window well under way as the background has been tacked together and her first accent border has been all cut and ground.   Look to see this window being soldered when we see it again.


Susan D forgot to bring the pattern for her next window along with her but she did have the patterns for the flowers that she used in her flower cornucopia extravaganza a few months back.  Since she's making a second one she got four flowers cut and and ground rather than wasting a class.   Next week I think we'll see her fireman window get started and just wait until you see that.


Terry is on a Butterfly roll and this is either her third or forth in the series.  Now that Terry is cutting her own borders she's been going a little crazy with the double borders which is something I ALWAYS do myself. 


Shelley has got the front side of her Stormy the Three Legged Cat Window pretty much soldered and will be flipping this over before you know it.  The only thing left to do is to add the pink sections of the ears (which Shelley accidentally left at home).  This cat is about to walk out of the door.


And here's a look at Cindy's next Curved Bevel Cross Suncatcher.  I'm not sure of this is here last one or not but she certainly makes quick work out of these.


Brenda not only completed her Mardi Gras Tragedy and Comedy Masks this week-- she also started to work on this large Cross Suncatcher that her sister has drawn for her.  We'll get a better look at this when she returns


And Bonnie started working on a new Butterfly Lawn Ornament but I never got a picture of it.  Here's the pattern that she used to get one of two butterflies cut out.   You can fill in the missing colors any way you want to!


Now we're here at the end I'll tell you that Linda L worked on the letters on her Welcome Windows but left class early due to illness.  Thankfully she's feeling 100% better now but we won't be seeing her for three weeks due to Mardi Gras obligations, a cruise(!), and our cancelling classes the following week for our own annual Stained Glass Class Cruise.

And that's it in our last post for the month of February.  Where is the time going????

Paul 


Monday, February 20, 2017

My Face Needs Work

Crosses and Bevel clusters share somehing in common: a demand for accuracy.  The patterns that come with bevel clusters should always be checked for 'squareness' because most times what you've received is a photocopy of a photocopy of a photocopy of a photocopy etc.  Each time it's copied more errors are introduced.  By 'squareness' I'm actually referring to the degrees in a circle (360), or in layman's terms, the numbers on a clock.  When you make a cross it is very important that the top points at the 12, the right arm at 3, the bottom at 6 and the left arm at 9.  If you are off it will look crooked and even worse it will hang crooked.

Here is a bevel cluster design that's centered perfectly.  Notice how the points hit the border breaks perfectly.

Next we have the same bevel cluster that was put together by eye rather than with a template.  Look at the red circles and you can easily see how this window does NOT line up at all.  Next week we'll see how easy it is to avoid this common mistake.


Betty completed her Industrial Fleur De Lis and it is a absolutely beautiful.   The thick leaded lines in this always draw attention because they fit in beautifully with the design on and they have a unique look that no one else uses in stained glass.  Now that the window is off of the white paper we've always seen it resting on top of you can see that the two amber colors compliment each other perfectly.  Betty's decided to hang her window in portrait form unlike the last two of these we saw.  And that's more of the beauty of this pattern-- it can hang either way. 


Paula's altered the design of this lamp so it isn't nearly as busy as it initially looked.  The end result is a stunning Traditional Tulip Lamp that Paula can surely be proud of.  I love the look of this and the work  she did on it is without a doubt top notch.  Everything went smoothly on this and Paula has once again proven her skills at working on 3D objects rather than just flat windows.


Cindy completed this beautiful Easter Egg Suncatcher and went all out by grinding holes into the right-most egg and then filling them in with yellow circles so the egg appears spotted!   This is no easy feat and Cindy did it all on her own even figuring out how to get foil inside the small circles.  Amazing.


Jeanne put the finishing touches on her three Beveled Cross Suncatchers and hey turned out absolutely perfect.  She was concerned about one very minor inconsistency but when you're talking about only 1/16th of an inch it's just not worth losing any sleep over.  I defy anyone to find a problem with any of these.  If by chance you do have a problem then come talk to me and I'll set you straight!

Carol completed her two Owls and they both look wise than me.   From the precision cutting all the way to her professional soldering job Carol took her time and got these two Owls looking perfect.  There's no work needed on these faces.


Martha finished her Clear Textures Cross Window and  did quite a bang up job on it.  She always manages to spot an area or two that she's not happy with but as I tell all of our students, that's the way it ALWAYS works.   No one is ever 100% happy with their work and I am no exception.   Myself, I think this is beautiful.  Martha even helped to get the channel on this window which is a very big deal. (I'm sorry for the visible flash in the photo but the other view without the reflection didn't show any of the glass textures.)


 Bonnie worked on and completed another Cardinal Suncatcher.   I think it's safe to say that she's mastered this pattern.  I'm not sure what's next for her but I know it will be good!


Susan D finished her Santa Lawn Ornament this week and it's another winner.   Her attention to detail in the face of this Santa is perfection itself.  Faces are easy to screw up and twist out of shape since the pieces are so small (especially the eyes) but Susan handled it perfectly and has a beautiful Lawn Ornament ready in time for Christmas this year (February is almost beyond us already so Christmas will be here before you know it!)


About two weeks ago Cindy send this picture of these five Business Card Holders that she completed at home.  I promptly saved the picture to my computer but it somehow got lost on my desktop which I cleaned up the other day.  So, now that I found them I thought I should share them with you.   These are far trickier to make than you might think but Cindy makes them look easy.


This week we saw Sheri complete her mystery Window but I still can't show it to you.   Sometime mid March we'll give you a good look at this GREAT window that she made in record time.   Sheri will be undergoing a bit of surgery so we're going to be missing her over the next few weeks but she'll be back before you know it.


 Now we move onto projects that are currently works in progress.  Judy got all of the center Fleur De Lis section of her window foiled and then cut out the trim that surrounds it.  She tried various colors but in the end she's decided to use the leaded border technique that Betty used in her window.  Judy has the trim all cut and ground and she's even covered the top and bottom of these pieces in sheet foil already.   It looks to me as if some background glass will happen next.  Oh and trust me, this window is MUCH bigger than you think when you look at the picture.


Jeannette started working on a Mermaid Panel which is going to end up fitting into a frame that she picked up.  Because of this, exact sizing is going to be very important especially since the frame has less than a quarter inch lip to hold the window into place.  Jeannette has almost completely cut and almost completed grinding her work already and I know that this won't be a challenge at all for her.


Mary Grace got all of the colored sections cut out for her Beveled Pinwheel Window and then after it was tacked together she placed it on a square of glue chip glass and traced around the cluster.   Once her background glass was cut it only needed a quick skim to get things to fit together.   That's why Mary Grace has her background cut, ground, wrapped, and tacked together already!   Next week she'll see how easy it is to make her random angle cut multi-colored border.


Linda L started working on three Welcome signs and is doing it the best possible way-- by cutting them out all at once.  Cutting one, grinding it, soldering it and then moving along to the next one is the slow way to handle multiple versions of a project and it also wastes a lot of glass.   Linda's doing great here because, as you can see, she's put a major dent in the amount of glass that she needs to cut for these three complex patterns.


Terry's latest project is another self designed Cross suncatcher.  Since this won't have any background glass the arms of the cross would normally prove to be a weak spot in the design but Terry has handled that by soldering re-strip into the center rounded section of the cross which them trace along the centers of the arms.  It's all buried under the solder so you don't even know it's there.


Becky S got to see the fruits of her labor when she came in and we showed her what her spotted pieces look like after they spent a night in the kiln.  Two weeks ago we scanned the spotted pattern pieces that Becky had drawn into the computer and then added a blur effect so that the spots wouldn't have such sharply defined edges.These were then printed out as decals that were applied to each piece of glass AFTER they had been ground so that everything fit together. Next the glass pieces were fired in the kiln overnight to get a permanent marking on the glass.  Everyone agrees that they turned out wonderfully and that they add so much more realism to the window.  Becky got this tacked together and now her background is all cut out and ready to be ground.  


Mary finished the thin blue trim on her beveled Fleur De  Lis and then wrapped the pieces and tacked them onto her bevel.   Once that was done she learned how to use her new, wider Fleur De Lis as a pattern.  She got her background cut from one single piece of glass, traced the FDL onto the center of it and then separated the pieces.  Next all she needs to do is to skim those background pieces on the grinder for a perfect fit and then she can wrap them up.


Tasha has her Comedy and Tragedy Masks all tacked together complete with the border as well.   She's taken this home so she can work on it throughout the week and I think there's a great chance that we'll be seeing these finished when she returns.  Tasha has her next pattern picked out and we'll see that right after we see this hanging in the light next week.


Linda F is very close to finishing up the work on her latest Wise Men Window.   With only the soldering left to go on this I'll say that she moves along to a new project during her next class with us.  She had to leave early this week and because of that I'm showing you the same picture that you saw last week.  Look for a big difference in this when we return next week.


Tracey is doing marvelous work as she finished cutting out all of the glass for her Mardi Gras Jester and then moved over to the grinder to get this fitting together.   She's learning good work habits by grinding one piece from another neighboring piece which is the quickest and easiest way to get things to fit.  Tracey is doing great and will resume her grind when she comes back in.  There's not much left to go so she may be wrapping this before you know it.


Lara has the center sections of her Louisiana Parishes all wrapped and tacked together.  When she returns she will slide this to the left, add two parishes and then slide it to the right to add the other five.   After that it's all about the background and the border(s).   


Myrt has her background all cut for her Male and Female Cardinal Window and she's just about  ready to add her first thin accent border.    After that she'll add a final larger border which will match the background glass.   Myrt will be soldering this before you can say, "Can I get some brass channel on this?


Our second Cardinal Window is being made by Roxane who amazed me with how quickly she got her Pair Of Cardinals ground.   She did an excellent job and the only thing we need to add are the cuts that run through branches and the upper bird's body (which will give him some support and stop him from looking like he's just floating there in mid air.   By grinding everything first we ensure that the thin lead line branches line up perfectly.  If they don't line up they would just look like breaks in the glass that we were too lazy to re-cut.  


Susan R now has all of the glass cut for her Mardi Gras Mask and she's already about halfway through the grinding process for this project.   Susan excels in working with small and thin pieces of glass so she's pretty quick on the grinder.   This is another Mardi Gras Project which will likely be completed before Fat Tuesday gets here.


Rowena tacked together the center section of her Olivia Window and the measured and cut the background piece to the left of the 'O' and to the right of the 'a'.   It may seem silly not to just cut all of the background at once but since this had to fit within a beveled border that can't be altered this is the only way to assure that the final size will fit within the bevels correctly.   Once that was completed Rowena got all of her borders cut out.  She was even able to attach the bevels because she was able to wrap them while she was at home.    She's on the home stretch now with this window.


Brenda is soldering her Mardi Gras colored Comedy and Tragedy Masks now that her foiling has all been completed.  With the front side soldered and the back side more than halfway done I suspect that this gorgeous piece of work will be completed with time to spare for Mardi Gras.  And that double border that you see was all cut out by Terry and Brenda themselves!


Cindy liked Martha's clear textured cross window so much that she decided to do a small version of her own.  She's made quick work of this project because the only thing left to do is solder it and add a hook to hang it by.  And the nice thing is that Cindy's cross is lined up beautifully.


Barbara began working on this window which will look odd until it all comes together.  This is actually an Autumn Mountainside which, after it's all fitted and tacked together, will gain some impressive wire work that will create a railroad train track bridge complete with a train traveling across it.   Remember that a project is the sum of all of its parts.  Right now it may be hard to see what it will look like in the end but I do believe that this window is going to be spectacular.  (If you look closely you can see the penciled in sections of the bridge.)


And lastly, Ann began working on her next window which, as you can see from the pattern, is intense!   She spend the night tracing out the poster board pattern pieces for this intricate Fleur De Lis and will most likely start cutting glass when she returns.


Time is moving quickly and so are our students with their projects.  It amazes me how many pictures I end up with at the end of the week.   It's when I work on this blog that I really get to see what everyone has accomplished during the week and I hope everyone else reading this out there gets the same feeling of wonder that I do. 

Paul