Monday, December 27, 2021

You're A Clean One, Mr. Grinch

Here's a quick and simple tip to celebrate the end of 2021 and the start of 2022.  We all know that we have to foil our pieces of glass after they've been ground but did you know that the starting point for your foil matters?  As a rule of thumb you want to begin (and therefor end) your foil on the straightest side of the piece you are wrapping.   You also want to start near a corner rather than at the center of the side you are starting on.  Most importantly, you NEVER want to start your foil in the center of a deep curve.

In the picture below the red arrows point to where you DON'T want your foil starting and stopping.   The   yellow arrows point to an area where it's safe to begin foiling and the green arrows show you the best place to start.  All of this helps to stop your foil from splitting while going around curves, and to help make the trimming of any foil misalignments (otherwise known as stair steps).

So first up this week we have Melissa's incredible complex Kaleidoscope that she made as a gift for a friend who has lost someone.   Melissa knew that the rainbow images that this creates might help bring about a smile.  She also had the idea of using one of the three sides to show a cloudy day with a second side showing the same scene but with the sun shining through making the world bright again.   Then, as the icing on the cake, Melissa had the lyrics to the song 'I Can See Clearly Now' printed onto the glass on the third side of the triangular Kaleidoscope.  The three sides come together telling the viewer that although things look bleak now, they will get better. 


Here's a look at the underside of the Kaleidoscope so you can see the lyrics on it.  Yes it starts off a little tiny but in person it's easy to read.  I also tried to take a picture of the view through the Kaleidoscope.   The image doesn't do justice to the actual shifting colors and textures but at least you get an idea of what happens when you look through this piece of art.  Lastly, Melissa incorporated twisted wire legs onto the front of the scope (which she loved learning how to do).


Susan D says, "Just say no to letters and numbers, especially small letters and numbers!"  but this turned out so very well for a 7 inch wide window.   Working on something this small requires patience and even though Susan says she doesn't have any, she's proven here that she does. 


Cheryl got her Grinch Window completed and it's a doozy.  Her soldering was so very good on this that I just have to give her a pat on the back in public!   With all the Grinch items having been made in the shop people who are not familiar with the book, or cartoon, or even the movie have asked why someone would want to make something so---un-beautiful.  Well, this quote by the Grinch sums a lot of the answer up for me:   
 
“Maybe Christmas (he thought) doesn’t come from a store. Maybe Christmas perhaps means a little bit more.” 


Next up, Kerry came into class hoping that he could complete the Grinch hand that he cut out last week and he also finished his Grinch inspired suncatcher with plenty of time to spare. 


Ann's final four Christmas Ornaments were also finished just in time for Christmas.  I guess I need to say that everything which NEEDED to be done in time for the 25th was completed.   Although Ann may make more of these I believe that won't happen for at least a few more months!


Like I said, Mr Grinch was very popular this year.  Our last Grinch Hand of the season was made by Betty who actually walked out of the door with five of these.   I guess you could say that they're always nice to have on hand...


Susan R has begun working on a Wine and Grapes Hoop.   This one will incorporate a lot of wire work and the end result is going to be stunning for sure.   I'm expecting Susan to start a trend with this project.


Steve sent me a picture last week saying that he was going o do a door and to be honest I thought that we was going to be making an insert for a full sized door.  Nope, not the case.  This window is a stained glass representation of the full door from his grandmother's house.   As you can see below, he's already nailed it!


Judy spend her last class of the year beginning a Wedding box.  She's got the top completed and that means that she'll easily finish this when she returns because there are only five pieces of glass left to cut and that will happen using the strip cutter for four of them so, hey, she's got this!


Lisa was as busy as a bee making a Honeycomb  with honey dripping all around it.  What makes this different is that it will be mounted into a wooden plank.  It already fits into the routed out section of the plank and what you are actually looking at below is the back side.  I have a sneaking suspicion that we'll see the front of this in completed form when Lisa returns.


Martha has her first Franklin Lamp Post all ground and fitting together perfectly.   Next she'll wrap and tack these together and then hopefully cut her background from one piece of glass (which should go quickly!)


With all of the glass cut for her latest Beveled Window, Barbara has only two sides of her final border left to wrap.  Once that's done she can solder this and then take it home.  These beveled windows always go quickly and I must thank Barbara for proving my point!


Here's my latest artsy photograph of MiMi's latest Octagon Window Insert.  There are a sea of pins involved in this and that's why MiMi gets these to fit together so perfectly.  The less things move, or slide around, the easier things will go when you tack your window together.


Linda's got her four suncatchers just about foiled and ready to be tacked.  Also, Linda has her mind made up on the size and design of her beach scene window.  It's almost completely drawn up at this point and surely will be upon her return so she's going to want to finish these up quickly so she can start off the new year with a new window.


Lastly we see that Shelley began working on a Christmas Ornament of her own.   She really just came in to see all of her stained glass friends and wish them all a Merry Christmas and a Happy New Year (as well as  partake in some Christmas Food).  A little while after class started she thought she'd do a little something and it didn't take her long to get her ornament this far along but then the S..L..O..W and somewhat depressing classic Christmas music that was playing put her to sleep so she ended up taking this ornament home to finish there.  Needless to say, we ended up switching the music for some faster paced dance tunes to liven things up!


And that brings us to the end of our final Blog entry for 2021.  We won't have a post  next week but we WILL be back the following week with new projects AND new students!

Paul


Monday, December 20, 2021

That Calls For A Drink

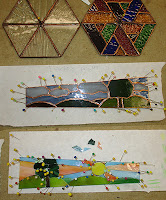
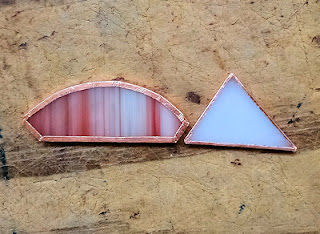
All of our students know that there are three main foil sizes that we use:  3/16 for small pieces and bevels, 7/32 for most pieces, and 1/4 for large windows.   We generally don't use much 1/4 foil so we're going to forget about that size for now and just concentrate on the normal 7/32 foil and the smaller 3/16 foil.  Below we see two different pieces of glass.  The piece on the left was wrapped in 7/32 foil and the piece on the right was wrapped with the smaller 3/16.  You can plainly see that the is considerably less foil covering the triangular piece of glass as compared to the piece on the left.  There are times when we can use this for our advantage.


It doesn't matter how good you are, we ALL cut (or even grind) pieces smaller than they need to be from time to time.  It happens and we deal with it.  Most times we re-cut the piece that's too small but there can be ways around that which will allow us to use the small piece without drawing too much attention to it.   When a piece is too small there's a gap which makes the lead line appear to be thicker around the problematic piece.  The triangle in the center of the both circles below is a perfect example.  There's a lot of space around it because the piece has been cut too small.  When wrapped in the standard 7/32 foil the lead line will be much thicker and noticeable.   However, for the circle on the right (which is actually the same exact pieces of glass) I've wrapped the too-small triangle in 3/16 foil.   That means that less foil is covering the glass which also means that less lead will surround that triangle when it's soldered.  It will still be a slightly thicker lead line but it certainly won't be as noticeable.


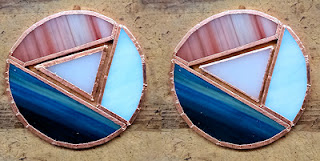
Always remember that the thickness of a lead line is measured by the end of the foil on the two connecting pieces of glass, not the gap iself.   If there's less foil on one of the pieces of glass there will be less lead on it.   This is a tip that can be used more often than you might initially think.

Okay, so first up we have Kerry's Santa Claus which was completed well in time for use as a window decoration this Christmas.  Had it been finished sooner I'd bet my bottom dollar that we'd have seen a few more of these smiling Santas being made.  Kerry's use of blue rounded gems with black pupils painted on the back side  give the eyes a very realistic depth.   What's not to love about this?


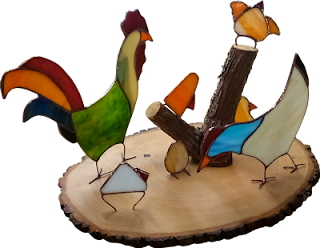
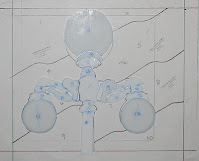
Now this is a first!   Steve created this Chicken Diorama that he and Lisa will be using a a table centerpiece for the holidays.  I have no doubt that it will certainly raise some eyebrows and make people smile.  That baby chick peeping away on top of that stump makes me almost laugh out loud!  And check out the moma and papa chicken's feet.   The wire work on this helps sell the entire scene.


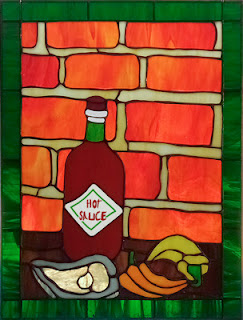
Judy finished her Louisiana Hot Sauce Window and it's the bomb!  The label itself is going to be painted on when Judy gets home but rather than show it to you blank I photoshopped an example of what it might look like when it's completed.   Pass me an oyster and some hot sauce- I'm ready to eat!


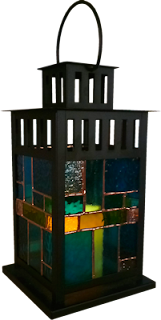
Lisa could very well start her own side business and I have a name for it:  Lisa's Lanterns.  Alas, it's one thing to make something for fun and another thing to have to make them because they are an order.  When you HAVE to do it all the fun is lost and it just becomes work.  I speak from experience.  That said, Lisa is making these with the greatest of ease but I think she's abut reached her limit.  Time will tell but boy, I think this one is actually her nicest one yet.


Annette made this delightful Female Gnome that she's named Simoné the Gnome.  She actually goes hand in hand with Gerome The Gnome who, as you might recall,  she completed last week.    And she also made a new Joy Suncatcher as well.  Interestingly enough, she had to redesign it a little bit to be able to use the small amount of glass that she had left over.   The end result is completely readable which proves that  she's done a great job on both of these.


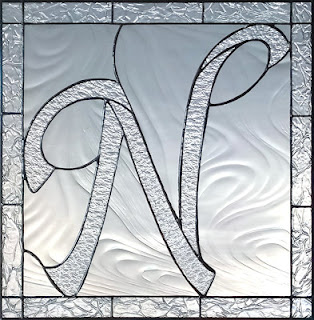
Betty made this N window as  custom order for someone who wanted no color in the window at all.  To achieve that goal and still make the letter legible Betty needed to pick at least 2 or 3 different clear textures that contrasted between each other.  In this case Betty picked a heavy (or tight) texture for the N itself, and a very light (loose) texture for the background glass.  Since the border touches so much of the background and so little of the letter she couldn't use a lightly textured glass for the border.  Rather than going back to heavy she went for medium which allows contrast between both the letter and the background.  Great job, NNNNNNNaturally! 


Susan R put the finishing touches on a pair of Poinsettia Flower Pot Decorations that she designed.   She said that these really stand out and that they are hard to miss when they are affixed in her flowerpots (by way of a stake that I cropped out of the photo below).  All I know for sure is that they are hard to miss even when they are laying flat on the table.  They're wonderful!


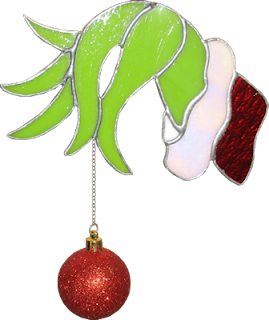
Sheri got six(!) Grinch hands made just in time to possibly get them sold before Christmas.   This week she learned how to attach the small  ringlets that go on each end of the chain that the Grinch is dangling the actual Christmas Ornament from.  Sheri's work was flawless on these and they all deserve to sell.


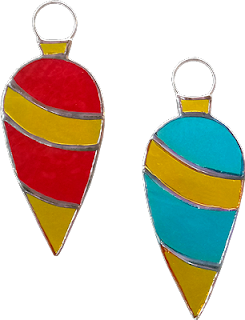
Mary Grace took a week off from her Peacock Window so she could start and hopefully complete three Christmas Ornament Suncatchers.  As you can see she got two of them finished but what you don't see is the third which MG was washing and coloring as I took the picture of this beautiful pair.  Let's just say, "Mission accomplished". 


Betty also finished up her Nativity Suncatcher as well as another Cardinal complete with curving wire work.   I'd say that she's a glutton for punishment with all of the wire bending she's been doing but each time she does it she gets better and faster at it.  Bravo.


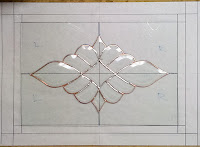
Barbara has begun work on another clear Beveled Window and with only four pieces of background to grind and tack together I'm thinking that it's safe to say that she'll be working on borders for this when she comes back in.  Beveled windows always look great and they go together fairly quickly once you understand the concept of making them.


Lara has been MIA for two weeks because she got married!  Congratulations are most certainly in order.  And somehow, with all of that going on she managed to get her Beach Sunset Window completely cut out and boy does it look great.   She's grinding it now and I absolutely love it already.


Martha has begun working an a pair of Franklin Street Lamp Windows and got the lights cut out for both of them.   She's put one away and will begin grinding this one when she comes back in.   Once it's ground she can wrap and tack it together because she will then set it on top of  her background glass which will then be cut into its nine individual pieces.


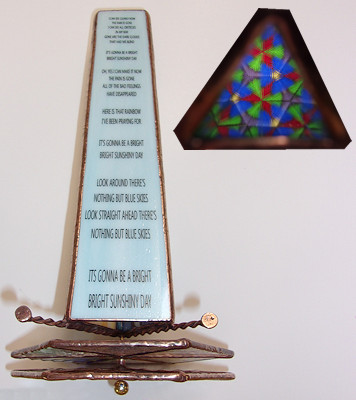
With the sunshiny panel of her Kaleidoscope all cut, ground and wrapped, Melissa is very close to putting all of her pieces together.  She'd like to finish this in time for Christmas and I'll be VERY shocked if it isn't completed when she walks out the door upon her return because she's planning on having both of the panels you see below soldered before she even walks in the door.   Putting this all together should go very smoothly.  Yeah, I'm certainly not going to make THAT statement, lol!  I wouldn't want to jinx this Kaleidoscope!


Linda F got her Victorian Window all wrapped and tacked together and then moved on to getting her border attached as well.   There isn't much left to go on this because we all know that Linda can solder with the best of them.  I expect to see this finished and pictured with some light behind it in the very near future.


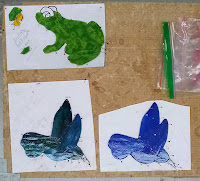
Linda L is in between projects right now but she pretty much knows what she'll be making for her next window.  Alas, until that pattern is all worked out she'll be making these two bird suncatchers and a very detailed frog suncatcher as well.  She's almost got the three of them ground already and only needs to grind 4 more pieces on the frog to have it ready to be foiled.  Look out suncatchers, Linda will finish you off quickly!


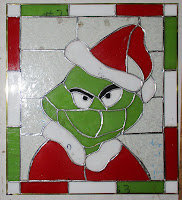
Cheryl is back from her ordeals which we won't even mention because some things are better forgotten.  However, this week Cheryl got her Grinch in order by cutting the pupils of the eyes into place, cutting out and grinding the multicolored border, and finally tacking it all together.  When she comes back in she'll start soldering this and with a little luck she'll take it home as  completed window.


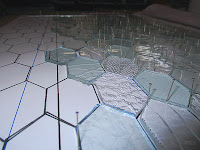
Follow the clear textured hexagons and you'll find another of MiMi's Cabinet Door inserts for her entertainment room under construction.  She's almost finished grinding her latest door which means that wrapping and soldering will be happening very soon.   Also, these are moving along VERY quickly for her now that the remaining inserts are about half the width of the others that she's made.  I know that 2022 will be the year MiMi gets to move on to something new!


Lastly, Ann worked on five new Christmas Ornaments and actually got one completed but my camera died (as you will soon find out it was a bad week for electronics for me) .  The lights in the front room weren't set up correctly for my phone to take pictures so I missed a completed ornament.  These are the four remaining pieces that just needing solder to complete and they WILL be finished upon her return just in time for Christmas.  Also,  Ann said that she'd bring the 5th ornament back so we could get a proper picture along with these other four.  (The new camera arrived just this afternoon so we're all set.)


Well, of all the blogs I've ever written this one will remain memorable.  I initially wrote it while in the car (yes, Russ was driving while I was typing) on my old tablet which has been having issues.  When I finished and saved the file an error flashed briefly on the screen and the tablet restarted.   Needless to say, I lost everything.  I figured that it would be easy enough to re-write it since I knew what I was going to say  but somehow the words just took me to different places for each and every picture.  That said, I will never use that tablet again to write this blog.   I will say that it was used hard and that it served me EXTREMELY well over the past ten years so I'm not complaining, just reporting.

Paul 

Bayou Salé GlassWorks

Monday, December 13, 2021

But I'm Never On Point

 In the past few weeks we've had a few issues with students having problems with their projects taking patina.  Largely this is due to people rushing to get things done in the last few minutes of class but the problem in each case has always been one of two bad conditions.  First, your window MUST be completely cleaned before applying the patina.  Use the scrubby side of a sponge and DON'T USE SOAP TO REMOVE THE FLUX!  Just use water.  Next dry the project thoroughly (we don't want excess water to dilute the patina solution) and remember to shake the patina bottle vigorously before applying it.   It may take some extra time to add these few  simple steps but it's sure quicker than spending a half an hour trying to get your patina to take.

So first off in our completed projects we see that Martha has finished her Build Your Life Window and I must say that her border glass is as beautiful as the  subject is.  She took her time on this and her attention to detail shines through, especially in her lettering (which is never easy to accomplish).  I know she found this to be hard work but her patience and perseverance have really paid off and she now has another big feather in her stained glass cap.


And now for something completely different.  This is Linda L's Flower Pot Succulent which was made in three layers and then tacked together to form one plant which resides in an actual flower pot.   The three layers were done so that leaves could be seen through any of the clear leaves in front of them to create shading that you'd never achieve by making this as a flat piece of glass.   The end result never needs water and sparkles in the sunlight!
 
 
 Here you can see how the layers overlap with one another.


Annette made this adorable Christmas Gnome (I think it's a gnome!) and it turned out better than I ever expected.  I also believe that I know of another student who might REALLY want to do one of these!


Lisa's Georgia Window was almost completed last week (it only needed soldering) but you couldn't see anything but a black border and some red in the center of if.  Now that it's off the paper and back lit you can plainly see the clear bevels in the outer  border and the wispy white glass that she used for the background.   "I said just an old sweet song keeps Georgia on my mind."


And here's Cindy's Fleur De Lis Panel.  It features the same black inner border that Lisa used but Cindy went one step further and made the Fleur De Lis itself out of the black as well.   This gives her panel a distinctive silhouette effect either with or without light behind it.  It's stunning and small enough to be covered by a single piece of paper.


Cindy also completed three Unicorn Suncatchers to which she painted eyes, noses, and mouths upon.  Made using a rainbow of pastel colors I'm thinking that these Unicorns are females because of the color choice. 


Cindy isn't the only person to complete multiple  projects this week-- Annette did as well.  Here are the two Angels and the latest Joy Suncatcher that Annette finished along with her Gnome Carrying a Christmas Tree.  She really knocks these things out quickly!


Our last completed piece of the week was done by me and since it's Christmas I thought I'd share it here as a little bit of inspiration for all of our students.     The holly leaves and berries were an afterthought and are actually overlaid on top of the panel but when I do this again I will surely cut it into the actual glass.


First up on out projects that are still under construction are Steve's 3D Chickens.  The legs are made out of wire and normally get a bend along with another wire soldered onto it which form the feet (or claw) of the bird and allows it to stand upright on a table.  Steve is going in another direction with his though.   He'll be mounting these on a board and I can't wait to show you what they will look like once all of his chickens are assembled and hatched.


With one side of her Kaleidoscope ground and wrapped in copper foil Melissa is ready to begin working on the second side of her three sided project.  The scene that you see below was done in darker, dreary colors to signify a stormy day while the second side will be the same scene with a bright sunshiny day all around it.  The third side will tie everything together and we'll show you that once Melissa gets to it.


Lisa also began working on a new set of panels for her next Lantern.  It looks like she's got three sides all cut out which means that someone (Lisa) was busy as a bee all throughout class.   She's quickly  becoming the Lantern Queen of New Orleans.


Susan D's got just about everything wrapped for her Establish 1965 Plaque.  In fact, she even managed to straighten out the E before she tacked her pieces together as originally planned.  I have a sneaking suspicion that this will be completed when we see it again next week.


Up next we see that Jan's Old Time Santa really looks like a Santa Claus now.  He's currently holding a staff and what appears to be a stick but that stick will turn into a Christmas tree once her few remaining pieces are ground and she grinds green leaves into the background and into Santa's body.


Mary Grace spent her time wrapping  the pieces for her Peacock so we could solidify everything by tacking it together (which she has now done).  This will help make fitting the remaining pieces easier since individual pieces won't be able to wiggle around.


Mary's back but on a new day and time.  Now that she's joined the Thursday morning class she's been reunited with Jan and Barbara, her glass friends from long ago (even though Barbara doesn't know it yet).  This week she resumed work on her pair of Christmas Ornaments and by the end of the day she had them both ground and wrapped in foil.   It looks like somebody will be soldering when she comes back in next week!


Susan R has one of her pair of angled Poinsettia Lawn Ornaments all soldered and is ready to begin work on the second one.   We only need to attach a stake to the back side of her top Poinsettia so it will be ready to head out the door and decorate her yard when she comes back in.


And here's Kerry's Santa Claus Face all ready for solder.   The eyes were the last thing that got tacked into position and since  Santa doesn't appear to be squinting or look cross eyed I'd say that this is as good as it could possibly be.  That said, it will look even better next week once it's soldered.


Ann is evening out things in her family by making five more Christmas Ornament Suncatchers to give to family members.  She's really gotten good at making these as you can tell by looking at all of the work that she accomplished in just one night.  It's hard to believe that she even left an hour earlier than she needed to!


With Christmas fast approaching we still have a few projects to get rushed out of the door but, as always, I know we'll get the ones that need to be finished completed before Christmas arrives.  It's amazing how quickly that holidays gets here though, isn't it?

Paul

Bayou Salé GlassWorks