Monday, August 25, 2014

The Day The Music Died

Skimming glass is what we do when a piece of glass already fits the patten without having been ground.  This happens mainly on border pieces but sometimes it also happens regularly when you become proficient at cutting glass.   Skimming itself it an art.  You want to press the piece against the grinder with an even pressure all around the piece.  If you don't press hard enough the glass isn't roughed up enough for the foil, but of you press too hard to can end up making your perfectly fitted piece of glass look, well, deformed.   The biggest problem students have while skimming is slacking off on the pressure towards the end of their glass piece.  This leaves little 'burrs' on the end that (on borders especially) look uneven and unprofessional.  Here's an example of a rectangular border piece that wasn't skimmed evenly on the right hand side and then the same piece after it's been fixed.


It's little details like this that further remove the novices from the professionals.  Remember, it doesn't matter how long you've been doing stained glass-- if you always do it wrong you're still a beginner.
Okay!  So we have another completed Grape Window to look at this week and it was done by Jeannette.  Her window is a little wider than the one completed by Rowena last week and some of that extra space is filled with a cluster of leaves and branches on the left side.  The outer border glass wasn't Jeannette's first choice of color but the glass she fell in love with is no longer made and all we had left was a small piece.  But as you can see there's nothing wrong with the replacement glass she picked.  In fact, there's nothing wrong with this window at all!


Martha has the first of her two Stylized Fleur De Lis Window finished with the second one not much further behind.  This one has a clear Glue Chip background which contrasts nicely with the actual FDL.  It's great work, but Martha is concerned about the length of time it took for her to complete it.  I say it's all about quality, not quantity.  Besides, we haven't seen Martha in a month so if we subtract her down time we have a very reasonable time frame for completing this!


And our last completed projects are Brenda's pair of Initial Windows.  They both share the same letter font as well as the same glass for the letters and the borders but her background glass is different.  I know that she'll be working on a B window when she returns and possibly one other that I can't recall to save my life!  (Sadly, my memory just isn't what it used to be.)


With the front side of her Abita Window completely soldered and just the back left to go I think that Susan will be finishing this up when she returns for her next class.  The washing and cleaning will take a bit of time so I don't expect a completed picture until the following week, but you never know.  I'll admit that we've held it up and it lights up wonderfully.  I can't wait to see it washed and colored for the full effect!


Shelley has made so much progress in her time with us.  I remember when a window like this would have easily intimidated her.  Now days she comes in and gets down to work doing one section at a time.  And now she's got it almost a quarter of the way ground!  I think she's going to see how far she's come when she hangs this window up which, at this rate, will be in just a few short weeks!


And Jeanne's Stylized Cross Window is looking better and better each week.  She's wrapping the pieces of the cross now that she's got it all ground and once it's tacked together she'll be able to start cutting out her background.  A stunning window is what this will be, without any doubt at all.


Becky S began working on the last three of her sunflowers this week and has decided to do something completely different with two of them.  She's making a full fledged window with a pair of her Sunflowers and has the background glass cut out for them already.  Some of the flower petals will actually cut into the border that surrounds them which will help hide the number of lead lines she'll need coming out of each of the flower petals.  I think the arrangement is perfect and the finished window will look wonderful.


And Paula's Wise Men Window is moving right along.  In fact, far faster than I thought it would.  It looks like she's only got about two dozen pieces left to cut and she'll be golden!  The deep blue night sky and the dark brown mountain in the background had her a little worried that the window would be dark but I think the contrast in the colors of the Wise Men's robes will balance it out out nicely.  Besides, it's a night scene so you wouldn't want it all bright and sunny!  Next up Paula needs to pick out glass for her unicorn.


Ann has two completely different Fleur De Lis Windows ready to go.  They're both set to be soldered and I have no doubt that she'll make short work of that process.  I have to admit that I like the alternating border colors on the FDL to the right.  Then again, I like the flowing colors of the border in the 'B' Window on the left as well.


Bonnie's Magnolia Window is ready to be channelized (I completely made that word up) and then soldered.  Leaving this window round was the best possible choice and when this is hanging up I'm sure Bonnie will agree with me.  And I've also talked her into using black patina when it's finished.  The black will really contrast nicely against the white Magnolia and match the color of the zinc channel once it's colored.


And Carol, wow, what can I say?  I'm impressed at how quickly she's moved through this window.  I know it isn't completed yet but when she comes back in she's going to be adding her borders.  That means that in one class she's managed to cut out her pieces, grind them and then start wrapping them as well!  If all of this progress in one short class doesn't make her feel great about her work then I'm going to say that she's un-impressable!  (Which she isn't.)  There's nothing cattywampus about this LSU.


Cindy's only got a few pieces of background to go and then she'll be wrapping and tacking her Calla Lily Window as well as adding a border.  She's got so much going on at home that she has only been able to work on this during class, but her progress has been astounding.  Don't forget that everything is already ground which means that she's going to head straight into the wrapping process when she has her last background piece cut.   I've got the pattern for her lamp drawn out now and I think she's going to want to get onto that ASAP.


Betty's Sunflowers are wonderful.  They're all ground and she's about to cut out her border already.  I love the design, I love her colors, and more than anything else I love the quality of her work.  She's another student who's come a very long way in the past few months.  Everything flows smoothly in this window and it fits like a glove.


Terry's Heron Window is all cut out and is currently in the process of being ground.  She removed a piece of sky before I snapped this picture because the grain of it was off  making the sky point slightly downward in the upper left corner of the window.  She plans on re-cutting that piece so it lines up perfectly and that's something I try to impress upon our students.  If you see a problem, don't let it slip by-- fix it.  Yes, there are somethings you can get away with but grain direction isn't one of those things.  


Janet had her Angel all wrapped and tacked together so she cut a piece of glass the size of her background, centered the Angel on top of it and traced around her.  Then she added lines that enabled her to cut out all of the pieces and within a half hour she was able to start grinding.  This method made the grinding process VERY easy since everything practically fit together with just a quick skim of each piece.  Then she wrapped her background, tacked it together and got her border cut.  I have a sneaking suspicion that this will be completed next week!


Linda F worked on her Birdhouse Window and it already looks GREAT!  A subtle use of glass shading is what gives the bird house a three dimensional effect.  With just flowers and background left to cut I suspect that Linda will be grinding this before you know it.  Oh, and we fixed the tail feather on the upper bird that I originally colored it to look like a branch!   You can also see that Linda has her Sunflower Suncatcher started as well as her birdhouse-- it's pictured in the lower left of the pattern.


So what's this?  Well, it may not look like much now but it's going to be a Cylinder Lampshade when it's completed.  Jane has all of the background cut out and is in the process of grinding it all together.   Once it's wrapped you'll be able to see the pattern she's cut into the glass and then she'll tack it and add the upper and lower borders.  


Myrt is another student who just seems to have the stained glass process down.  Nothing I've been throwing at her takes her long to accomplish and her work is always spot on.  Just look at this Single Sunflower Octagon she's working on.  Once this is wrapped she'll be ready for a border and I believe she just started this last week!  Amazing!  And I love her use of pins as she's grinding.


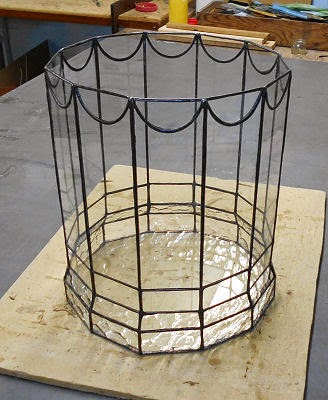
Lynn's Terrarium is so close now.  There's nothing I hate more than washing and cleaning a clear window, especially if the project is a terrarium.  It's so hard to get everything clean but as you can see Lynn had no problem at all.  Except, well, yeah, we found a cracked piece of glass.  Sadly, it took a while to repair so Lynn didn't get to tack the top of this project together yet but she will when she comes back in.  Mark my words, this is going to be stunning.


And this is the backside of Martha's second Stylized Fleur de Lis Window.  With the front all soldered I have no doubt that she'll be taking this home completed when she comes back in.  And then she'll be able to begin working on her Octagon Iris Window.   I know she's anxious to start it so I'm sure we'll have a picture of that next week.


Mary Grace wanted to make a Fruit Basket Window but she wasn't thrilled with the 'arms' of the one that I showed her.  After poking around the patterns a bit she found one that I had drawn a few years ago that I'd completely forgotten about-- WITHOUT the arms she disliked!  So here's a look at the pattern she'll be starting when she comes back in.


Rowena finished her Grape window last week and decided to start on a Deer window this week.  She traced out her pattern, cut it all up into pieces that she'll trace out onto her glass and even picked out most (if not all) of the glass she'll be using in it.  The actual glass cutting will happen when she comes back in o look out!
 

And that about does it this time around.  It's been a busy but very fun week.  I've learned a lot about our students and I know our students have learned a lot as well (but not always about glass!)  I look forward to starting our next session of classes tomorrow and can't wait to see everyone return.


Paul
Bayou Salé GlassWorks


Monday, August 18, 2014

Looking All Cattywampus

Curves.  Almost every window made consists of a curve or two and for the beginner they can be a sticking point.  Curves need to flow gracefully and they shouldn't have bumps, angles or divots in them.  Here are some graceful curves:


And these are, shall we say, NOT so graceful:


The biggest problem I see students face in getting a curve to flow naturally is understanding that the entire curve shouldn't come in contact with the grinder (after the initial skim)--  JUST THE PROBLEM SECTION OF THE CURVE!  In the picture below the only the only part of the glass that should touch the grinder head is marked with a red line.  


Once students stop grinding the entire length of a curve over and over they'll discovered the secret behind smooth flowing lines.  In layman's terms:  Only the problem sections need to be ground.  Sections of a piece that fit within your pattern's lines should never come in contact with the grinder head again.
 
Now let's get on to our student's projects.  We have a total of nine completed windows to look at this week along with 17 windows that are currently under construction.  That's a lot of work happening in the shop!  So let's take a look at all these projects starting with (as always) the completed windows first.

In no apparent order, we're going to start things off with Rowena who finished her Grape Window this week and I think I can safely say that it's everything that she'd hoped it would be.  Her soldering was superb and her colors are perfect.  It took a week of work for each cluster of grapes, but the end result makes it all worth while.  A beautiful window for sure.


I remember when Linda L came in for her first class.  When she completed her butterfly and I asked her what she'd like to make for her first project she told me that she planned on making a Mickey Mouse Window but that she wanted to get some experience under her belt first.  And now here we are looking at her Mickey Mouse Window.  She combined her love for mice(?) and cruising into this wonderfully relaxing window.  A job well done.


Then Mary Grace put the finishing touches on her Iris Window and it's another beautiful project.   The design on this has been tweaked from the original pattern and it flows so much better.  Mary Grace has been taking her time and not rushing things which shows in her final project.  We want quality, not quantity!


Becky S's Autumn Leaf Window was also completed this week and the colors are all about Autumn.  Becky picked all Cathedral glass for this window so it lights up brightly but not vividly.  There's nothing worse than a window with too many bright colors.  They always scream, "HET! Look at ME!"  All in all this is another window that Becky can be proud of.


Betty's Octagonal Iris Window has left the building.  Yep, it's officially complete and looking great.  She changed a few things from the original pattern and I love when students do that.  When people first start doing stained glass they think that the pattern is something that can NEVER be changed.  They think the same about colors as well.  And then they finally get comfortable and say, "I don't like the way this looks here" and they change it.  That's what this is all about-- making a pattern your own!  Change it up a bit, make it with different colors, add another border or even change the shape!  Have fun with it!  And that's just what Betty did.


Next we're going to take a look at Paula's Parrot suncatcher.  It's a LARGE suncatcher and in the end she decided to leave it as is and not turn it into a window with a background and a border that surrounds it.  And in this case I think it was a wonderful decision.  Her color choices are flawless and her workmanship is the same.  Paula's on a roll!


Carol worked on her two small butterflies while she was at home during the week so when she came in all she had to do was wash all six of her butterflies, color them and then add the chains that they all hang from.  Now she has two sets of three Butterflies.  Her work has really come a long way since she started with us and the soldering that she did this week deserves a special round of applause.  I think she's really got the hang of this!


And here's Terry's latest window, the Humming Bird and Hanging Fuschia Panel.  She's swapped out the bird for one that she saw in a book and then changed the overall appearance by using a completely different shade of green.  The end result looks completely different from the ones we've seen before and as always, Terry did a stunning job on this through and through.


And rounding things off in our completed projects section of this update is this Ribbon Heart Suncatcher that Linda L designed and made while at home during the week.  She had an issue with the bottom left ribbon being weak but we shored that up by adding a length of wire around the outside perimeter of the suncatcher which was then hidden in the lead bead that surrounds it all.  Linda has another of these to finish so we'll most likely see that one next week.


Ann has made major headway with her 'Fleur De B' Window and a second Fleur De Lis of a completely different variety.  She told me that she's going to be doing at least two more of the Lettered Windows so my heart goes out to her.  I think doing all those little corner FDL's  would just about drive me crazy!


Becky S has a number of these large Sunflower Suncatchers cut out and she's grinding them pretty quickly.  And you may be able to see in the picture that the red one is already wrapped and tacked together.  She's really on a roll with these.


And speaking of Sunflowers, Betty has started this double Sunflower Window and only has the flower petals and the border left to go.   She would have started cutting the yellow leaves but her glass didn't manage to get delivered in time.  But it's here now so she'll be cutting the leaves for her sunflowers when she comes back in.


Bonnie got her Magnolia Window tacked and her background pieces cut and wrapped.  I think she's going to add a final border and keep the window round which I think is the best choice largely due to the fact that the leaves are cut off to make the window round.  Adding corner pieces will just make the cut off leaves look odd.  At any rate, I know this is going to turn out just fine because Bonnie isn't afraid to ask for opinions from everyone else in class and then go with the majority.


Carol finished her Butterflies and then began working on an LSU Window.  There are a lot of straight cuts in this window and Carol has decided to use the pistol grip cutter to make sure that none of her straight lines have wavers in them.  She's already had her cutting lesson and did great cutting all of her test pieces. When she returns I think she'll have this all cut out and then move along to working at the grinder.  And she'll be pleased to know that this is an easy window to grind.


Cindy's Calla Lily Window is moving right along.  Her leaves are all almost all cut and ground, and two of her Calla Lilys have been cut as well (they're just hard to see because they've been cut from white glass).   I have a feeling that this will be done before we know it and then Cindy will be moving on to a panel lamp.


With just a few final left side pieces left to go on her Stylized Cross Window, Jeanne is making great progress.  Once this is tacked together she'll just add a center and then begin the task of cutting out her diamond top and bottom borders followed by her background.  After that she'll be home free!  This is really looking great and I dare anyone to say otherwise. 


Jeannette is so close to completing her Grape windows that I can almost taste the wine.  With the front completely soldered and the back about halfway done I have no doubt that she'll be taking this home next week.  It's an amazing looking window and you'll see it lit up when we return.


Lynn's Terrarium is nearing completion as well.  She has the bottom completely soldered now and will wash and color it when she comes back in.  I have a dollar bill taped to it so you can get a feel for how large this actually is.  Once this bottom section is completed Lynn will quickly tack the lid together and then rest it on the top of the bottom to ensure a nice fit.  (I'm purposely trying to be confusing there!) I think this is going to be a standout project.


Myrt has dropped yet another project and has now begun working on this Sunflower instead of her beveled window.  Just how many irons does this woman have in the fire???  All kidding aside, she knew  that she was going to be making this for someone but didn't realize how quickly they were going to need it.  I don't think this is going to take her long at all and then she'll get back to her Beveled Transom Window (and her Outhouse Window).


Terry's latest panel (again of her own design) is looking stunning already.  The feathers in this Heron looks amazing and it's largely due to the placement of them on the single sheet of glass that the bird has been cut from.  Terry just seems to understand everything about drawing up patterns for stained glass and knows how to hide lead lines and (even better yet) avoid the superfluous ones altogether.


I'm impressed at how quickly Shelly has tore through her Mermaid Window.  She has everything but the bubbles all cut out and she's begun grinding already!  This window just screams double border to me so I want Shelley to begin thinking about what she may want to do for a border color.  I have an interesting idea in mind but I'm not sure how it will look until I lay some glass down next to the window  and actually see it.  And I think we'll do that when Shelly comes back in. 


Who was that strange woman who came in this past week with two semi-completed Fleur De Lis Windows and tons of food?  Rumor has it that it was Martha, but we haven't seen her in ages so I'm not really sure.  She also had these amazingly thick eyelashes and I don't recalls Martha's lashes being that voluminous but everyone said it was her so I guess I have to believe it.  At any rate, she's ready to solder these bad boys now and she can't wait to be finished with them.


And here at the very end we take a look at the birdhouse pattern that Linda F is starting.  I discovered a problem with her pattern that I need to fix when she comes back in, but it's a tiny one and easily remedied.  Whoever (me) drew it up for her (me) must have fallen asleep at the wheel (me).   So guess who has to fix it now?  ME!  But it's still beautiful, don't you think?


And that about wraps things up this week.  Come back next week to see what our newest projects will include!

Paul
Bayou Salé GlassWorks