Monday, February 24, 2014

Massage In A Bottle

Borders.   In the past few weeks I've been asked numerous times how to figure out sizes for borders on windows.  While there are no carved in stone rules there are a few things that I always follow so I'll list some of them here for you.

1)  The length of the border pieces on the top and bottom should be similar to the the pieces running up and down the window.  In other words, if your border pieces are 5 inches long on the bottom and top they should be close to 5 inches along the sides also.  You'll rarely get them to match perfectly but they should be within an inch or two of the same measurement.


2) If you are adding a second border, its pieces should be cut in the center of the previous border's pieces (so the borders resemble a brick wall.)


3) If you are using 3 or more borders you should not use corner pieces.    Should you feel the window really needs square corners (like in the 2 examples above) then DO NOT USE ACCENT COLORS IN THE CORNERS!  If you do you will create unintentional diagonal lines that distract the viewers view from the actual design of the window.  But the sizing rule for a third border is to match the lines from the first border.  Again, this makes a brick wall effect which is what you are striving for. 


With all that said I've still skipped many issues to make things a little easier (HA!) to digest and remember.  Things like: Your end pieces will never line up perfectly after the first border row so just use your best judgement and make do of it; When using two borders make the first border thinner than the second (outer) one; When using three borders make the center border thicker than the inner and outer border; and when using three borders cut the inner and outer borders from the same color glass.

Remember that there are no set rules to borders.  What I've listed are just things that I think make a window look best to me.   Feel free to experiment because that's the joy of creating.

Well, alrighty then!   Now that we have that confusing issue muddled even further along by my poor explanations, let's see what our students managed to get accomplished this week.

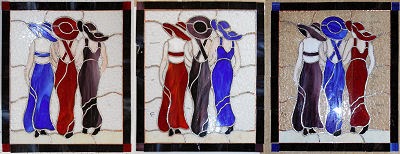
Becky's trio of Three Ladies are all completed.  Three separate windows all made from the same colors and pattern, but each one different from the other--  It almost sounds like a contradiction or puzzle of some sort.  Becky cut all of these out at once and simply cut out all three ladies in red, then another set of three in purple and finally a third set in blue.  When she started grinding them she just mixed them all up which gave her the three multicolored windows you see below.  And with barely any retouches on the soldering I'll say that Becky has this stained glass thing down pat. 


Shelly made a stained glass window with a single woman in it but I guess she couldn't decide on a color for the dress so she just removed all clothing from the picture!  LOL  Her window looks GREAT and I think it's tastefully done.  I believe she's making a flower window next but that may change when she comes back in next week.  At any rate, this one sure lights up nicely and I think her choice of color for the border is perfect for this window.


Jeanne's Beveled Fleur De Lis Window was completed this week and I have to say that she's also got a good feel for soldering now.  She had no problems soldering the front side of this project but the bumpy nature of the back side proved to be a little more difficult.  Nonetheless, Jeanne did a great job and both sides look fantastic.  Don't you agree?


Betty completed not one but two projects this week.  The first one being this wonderful LSU Tiger Claw Window.  Betty came very close to finishing this without any help from me and I suspect that she'll do that once I get around to showing her how to attach the finishing brass channel onto a window. 


And this is Betty's second window-- her Hot Air Balloon that I didn't get a completed picture for two weeks ago.  I can see so much growth in Betty's work from the day she first came in until now.  Look how nicely everything lines up in this window and then look at how perfectly symmetrical the balloon is.  Symmetry is always a problem that beginning students have but as you can see, Betty is no beginner student.


Remember that Duck Window that Susie started last week?  Well it's been completed this week!  Susie had it all ready to be washed and waxed when she brought it back into class and I was mighty impressed with what she'd accomplished.  There's no border on this window because it's going to be set in a wooden frame that I simulated for the picture.  My frame isn't as nice as the one Susie has but it gives you a good idea of what this final piece will look like when she hangs it up at home.


And the last completed project that we have this week is another by Susie-- It's a Fairy On The Moon Suncatcher that she came into class with all cut and ground.  When she got in she wrapped it, soldered it all on her own and then took it home after a hook was added to hang it from (which has been cropped out of the photo you see below).


Now that we've covered the completed windows let's look at what we still have under construction.  Brenda continued working on her Magnolia Window and has moved past the grinding stage and onto the wrapping stage.  There are a lot of delicate, thin pieces in this window which really adds to the beauty of it, but it's all so very hard to see at this point in time.  When it's completely wrapped all of the pieces will be easier to see because their edges will be lined in copper foil.  I suspect that all of the detail in this window will be visible when Brenda returns to class with it.


And Carol, our latest student, started her first true project with us this week and I must say that she's doing great!  In just one class she managed to get all of the glass cut for her Stylized Fleur De Lis Window.  That means that she'll be working on the grinder when she comes back in, and that part is easy compared to what she accomplished this week.


Cindy's Beau Dog is cut and ground.  Next up she'll begin working on the letters.  This week she spent a little extra time on Beau's eyes which involved cutting and grinding tiny little pieces of glass that are never easy to work with.  But they look great and so will Beau when he's completed.


Wow.  Let me say that I'm officially impressed with what Janet accomplished during the week.  She's started working on three Transom Windows, each of the same design but with a different colored Fleur De Lis' and accent pieces.  She has one cut and ground already and she started grinding the second one while in class.  I'm so thrilled to see Janet doing so well so quickly-- This is magnificent work!


Linda F has her Female Mardi Gras Crown completely cut now.  She only has to attach the last border and add some solder to finish it all off.  You can't see the colors that she used because they look black lying there on the work table but when it's held up you'll see that this is all Gold, Purple and Green.  And you may just see this held up next week.  (Note that her inner border is smaller than her outer border as I discussed in the beginning of this update.)


Betty has many fires going and this week she also has two Stylized Fleur De Lis' in the works as well as her Cowboys Star.  One of the FDL's just needs to be soldered while the second one still needs some background cut.  And the Star is now tacked together and waiting for some background as well.    These will be walking out the door real soon now.


Linda L repaired the break in her Breast Cancer Ribbon Box and got everything cut on her 'L' window as well.  She also brought in two pink Teddy Bear Suncatchers that she had cut, ground and wrapped while she was home last week.  She wanted to know what I thought of them before she tacked them together and I told her that I thought they looked great.  The only change we made was an additional piece of glass for the nose which will allow her use some wire to form the mouths.


Okay, I unknowingly told a lie last week when I told you that Martha had cut and ground almost all of the pieces in her Hummingbird Window.  The fact is that she only had the pieces cut, not ground, but they fit so well I assumed that they had also been ground.  My bad, but Martha's good!  When you can cut out glass pieces, place them on you pattern and have me believe they've been ground, well all I can say is, THAT'S GOOD CUTTING!  But it's official this week-- it's all ground and all of those yellow headed pins prove it.


Myrt said that she's been afraid to work with bevels but now that she has this window almost completed she's planning on making another beveled window shortly.  She has all but her final border cut now and is in the process of wrapping the inner black baroque border now.


With all of her hops ground, Susan decided to start working on the Strawberry section of her Abita Window.  And by 'working' I mean grinding.  She thinks that she wants to redraw the top center section and since she took it home with her I'm sure she will.  What will she come up with?  I don't know but I hope the pieces are BIG!  ;-)


Terry began working on her own L window this week which means that we now have 3 L's under construction.  And just to avoid confusion I'll state for the record that only one of those three people have a name that start with the letter L-- the other 2 windows are gifts.  At any rate, Terry's L is ready for a border and then some solder so I'm sure it will be completed next week.


Next up is Ann's version of an 'L' window which actually started the craze for all of these L's.  With all of her glass cut, and the soldering done of the front of this window, I'd say it's a safe bet the Ann will finish this when she comes back in.  I really do love the design and her color choices.


 Lynn's second Panel Lamp is very nearly completed now.  All she needs to do is attach the crown and it will be finished.  She did a great job grinding all of her pieces and getting them to fit together-- when we joined the last body piece to the first one everything fell in line perfectly (which isn't always the case with panel lamps.)


Mary Grace began working on the same window that she completed just last week with just one big difference--  This one is four times larger than the last one she made!  It's hard to see a size difference in a picture but I'll include something to help you see the scale of this window when you see it again next week.  I just didn't think of it this week.  Trust me though, it's big.


Holy crow we had a lot of projects this week.  With more and more students attending classes I'm going to have to start working on the Blog each night after class instead of doing it all at once.  All this typing is cutting into my internet time!  LOL


Paul

Sunday, February 16, 2014

The Broccoli Incident: A Nasal Assault

There are two rules that all students ignore for fear of causing problems later on down the road.  Those tough to follow rules are: 1) Cut the line off of your glass when you are cutting and,  2) SLOW DOWN while you are soldering.  Any lines left on your pieces when you've finished cutting need to be ground off before the pieces can possibly fit together.  Then you need to leave room for two pieces of foil between every two pieces of glass.  Never be afraid to cut your pieces 1/8 of an inch short-- it will all balance out in the end.

And ALWAYS move at a snails pace while soldering.  The lead will form a bead all on its own if you just allow it to completely melt.  When your soldering is lumpy and uneven it means that you need to slow down.  That's the only secret to soldering like a pro.  Anyone can do it, but so few do.

Mary Grace came in this week and aggressively re-soldered the front side of her Fleur De Lis Window that she soldered last week.  It wasn't bad, but it wasn't near as good as I knew she could do.  This week she went over it a second time, took her time doing it, and sat in her seat amazed and dumbfounded as this stunning window emerged from mediocrity!   I'll admit that the second side needed some touch-ups when she was finished but that's only because she used very bumpy glass for her background.  All in all I'd say that Mary Grace has got it--  This front side is all her doing and it is MARVELOUS!


And Terry does it yet again with another design of her own.  She started this last week and completed it this week so she's certainly not slowing down at all.  The conception, the colors, and the workmanship in this window are top notch (as always).  If a picture says a thousand words this one has that many as well as a thousand more.  She's already drawing up her next design and I can't wait to see it.  


Carol is our newest student and this is the Butterfly she made during her first class with us.  She certainly seems confident and has no problem wielding a glass cutter.  In fact, she had no problems with any of the many steps it took to make this first project.  She has a lot of ideas in mind for future windows and I suspect that it won't be long before they all become reality and we get to post their finished pictures here on the Blog.


Ann's 'L' window is really looking great.  She only has 8 pieces of glass left to cut and fit into place (inside the 'arms' of the FDL's) before she can start soldering this window and then move on to her next project.   I heard her talking about a big window like the flower window she made last year so I can't wait to see what she decides to do next.


Well, it's official-- Becky has all of the glass cut for her trio of Three Ladies Windows. She came in with the first black border tacked on to all three windows so she just needed to finish them all off with the final clear granite border.  She got those final borders cut, ground and mostly wrapped while she was in class and since she already as the front sides soldered I suspect that it won't be long until we see these ladies walking out the door for the last time. 


Last week I somehow managed to skip Bonnie in our weekly rundown of what's happening.  She had started cutting out one of the smaller Tiger Claw LSU windows and this was what she ended the night with two weeks ago.


This week Bonnie resumed where she left off and finished cutting and grinding all of the glass making up the LSU letters as well as the clear background glass.  Then she got them all foiled and cut out her tiger claws.  The hard part is just about over with and next she'll just add borders to flesh it all out ( or should I say 'fur' it all out?)


Brenda's Magnolia Window is really taking shape quickly.  I'd say that more than half of this window is ground and at the end of the night Brenda told me that she hoped to start wrapping it at home during the week.   I suspect this will be done before you know it and that it will be another student favorite.  At this point in time pictures just don't do it justice since there's a lot of clear glass in it so you'll just have to  trust me when I tell you that it's stunning.


And Beau the dog looks fantastic!  Cindy is working on this window and it's the spitting image of the picture that she brought in.  Even the color is perfectly matched to the real life Beau.  With just a few pieces left to grind and then just four background pieces to cut, Cindy will most likely have this completed faster than a speeding bullet.


Jeanne should be proud of the soldering that she did on her latest Beveled Fleur De Lis Window.  The front side looks great and although she had a little difficulty getting the second side to flow smoothly she did very well indeed.  And the only reason she had more trouble on the second side is because she used the same bumpy glass that Mary Grace used for her background.  Crinkle glass is very pretty but it can be a pain to solder.  Still, I have no doubt at all that she'll finish this one next week and then move on to her Horse Head window.


Linda L has started making her very own 'L' window and it's about half the size of the 'L' window that Ann is making.  She's gone with a nice easy pattern and is flying through it quickly.  Although you can't see it Linda has cut the clear glass that surrounds the L and forms the forms the oval.   Linda has taken it home with her to wrap so next week we should see her putting a border on this project.


Lynn has the bottom portion of her lamp tacked together now.  She constructed it upside down in a bucket to ensure that it was perfectly round an not oval. (Seriously!)  The spider is in place (the spider is what attaches the lamp to the base) and all it needs now is the crown that sits on top of it and a little solder to seal the deal.  This perfectly matches the lamp she made back in November.


Whoa!  Look at all those pieces!  You can't say that Susan hasn't been keeping busy working on her Abita window.  This week she's even positioned the bottles on top of the pattern so we could get a good feel for the finished project.  There's still a lot of grinding and wrapping left to do and that's the bane of working on a window with a lot of small pieces.  But in the end all that work shows and the window turns out to be spectacular.  Madonna sang it best when she sang, "You'll See!"


This picture of Myrt's Beveled Fleur De Lis Window makes me wonder just what I was thinking.   I had hoped to show Myrt how to cut the straight line through the center of the window while veering off  the straight line and then following the curved FDL.  For some reason I started breaking it from the wrong end of the glass and the cut decided to run straight instead of curving, thus ruining the piece.  For some reason I was thinking that the large piece was ruined but then when I saw this picture I realized that I'd screwed up yet again.  (Hey, I'm only human.)  Only the small curved piece needs to be re-cut, so that ought to make Myrt feel better about having me 'help' her.


And my hat goes off to Martha this week for cutting all of these pieces, grinding them and getting everything to fit so nicely, so quickly.  She only has 16 pieces left to go before she starts cutting her background glass (which will fit inside an inner beveled border).  I'm extremely impressed with her work this week!


Susie started working on her Duck Window while she was at home and she's got a major portion of it cut and ground already.  During class we got the eye cut and ground into place which only took 4 minutes at best to accomplish, but if you don't know how to do it you could be at it all day trying to figure out how to cut a circle of glass smaller than a quarter of an inch round.  With the majority of work done on this window I suspect Susie will complete it in no time.


And we'll wrap things up this week with he window that will surely be featured first on the Blog next week-- Shelley's Nude Woman with a Moon and Sun.  She soldered the front side of her window this week and will finish the back side when she returns next week.  When this window is hanging in the sunlight it is going to sparkle like mad due to her use of iridized glass.  Look for that beautiful view when we return...


That's about it for this edition of On The Cutting Table.  By now you should know that the fun never ends so join us again next week when the broccoli is fresh, the wine bottle never empties, and the solder all flows smoothly. 


Paul

Tuesday, February 11, 2014

Dry Erase Boards Are Remarkable!


There certainly are a lot of window to look at this week.  We have seven completed windows which added to the uncompleted windows makes for a total of twenty-one projects in the works with 2 others just starting. And next week we're adding another day class into the mix!  Calgon take me away!

Okay, first off  we have Linda L who completed her Beveled Fleur De Lis Window.  Linda is a newer student but her work makes it look as if she's been doing this for years.  I colored her window for her and said that I'd touch up her soldering but I can honestly say that I only touched up 2 lines on the back side of this window.  That means that Linda gets our new Solderer Of The Week Award.  She and her husband will be whisked away by Delta Airlines to Aruba for a week of fun in the sun!  And she can document all the fun with HER NEW DIGITAL IMAGING PACKAGE!  Well, maybe I'm lying about the trip and the digital imaging but she still gets the honor of being the best solderer of the week.  :-)


Next we look at our other Linda who has finished her LSU Tiger Claw window.  There's something ever so slightly different about this one from the others but unless I tell you what it is you'll probably never notice (and the difference does NOT make the window 'wrong').  So go ahead and compare Linda F's LSU Window to the one further down that Susie made and see if you can spot the difference.  The first person spotting  the deviation (aside from it's size) will win one hundred dollars!  (I have an abundance of Monopoly Cash I need to get rid of.)


And is it just me or does Costa looks like he's looking for his food bowl?  Martha finished him before she left class but she still needed hooks put on him which allowed me to take a picture with some sunlight behind him rather than fluorescent light.  I'm going to give a shout out to Martha for her soldering (which has greatly improved) and her use of shading on Costa.  He looks great.


Last weekend we had four of these Stylized Fleur De Lis Windows made,  They were all very similar and I thought I'd seen enough of this design for at least a few weeks but Myrt's take on it is so different that I can't help but love it.  Of course, my favorite color is blue so that doesn't hurt!  Myrt did a stellar job on this window and I think she should be very proud of it.


Susie completed her LSU Tiger Claw window and I feel that she's learned a lot while making it.  Excluding borders while making a project is a major part of creating a window that is perfectly square.  Figuring out what you should cut and what you should leave for the Strip Cutter is probably the biggest tip that Susie learned while making this.  Just look at those nice straight lines she has on this window.


Terry has certainly perfected her Fleur De Tiger that she first drew up last year.  This one, like the others before it, is design perfection (and Terry's workmanship is nothing to sneeze at either).  I wouldn't mind having one of these (hint, hint, hint!)


Janet finished her second Cowboys Star Logo and it's even better than her first one.  And I even got to take a picture of this one with some sunlight behind it so the colors look correct in the picture.  Janet is about to start working on 3 transom windows and I think she's really going to enjoy working on them.


Ann's L window is moving along nicely.  She's going to curve the lines coming out of the points of the four Fleur De Lis' since everything else about this window contains curves.  I think it will be a nice effect and one that we should see realized next week.


Wow, Becky is really moving along quickly on her three Three Ladies Windows.  And that's not a typo because as you can see in the picture she is working on three separate windows that contain three ladies each.  When she started cutting these she cut each of the three women out of red, purple and blue glass.  Once they were cut she was able to arrange them any way she wanted without repeating the color scheme.  It may sound confusing but even I was able to follow it so it really isn't that perplexing.  Anyway, she's about to add a final clear border to these windows.  Since she already has the front of these soldered we'll be seeing them completed RSN (real soon now).


Brenda has begun working on a Magnolia window and I love the pattern (which I believe Terry drew, but I may be wrong about that 'fact').   She has a good deal of the first magnolia cut out as well as half of the leaves and you can see already that it's fitting together nicely.  This is a perfect example of what happens when you cut the line off as you're cutting your glass.  If you follow that simple rule you get to simply skim your pieces and have everything fit together almost instantly.  Good job, Brenda!


Jeanne has added the final border to her Beveled Fleur De Lis Window and has it halfway wrapped. She's taken her window home with her in case she ends up with some free time during the week so she can finish wrapping it and then possibly start soldering it as well.  This will surely be finished soon  and I know it's going to turn out beautiful.


Betty is as busy as can be (what's new?)  and is working on four separate windows:  A Stylized Fleur De Lis, a Hot Air Balloon, a Tiger Claw LSU window, and a Cowboys Star.  The Hot Air Balloon window is pretty much completed save for a bath.  Hopefully she'll bring it back next week so we can see it lit up.  And her Fleur De Lis and LSU are just about ready for solder as well so it won't be long until we see them as featured projects.  I have to say that Betty's soldering on her Hot Air Balloon was pretty close to perfection.  I think she's got it!


Mary Grace has the final border on her Fleir De Lis Window and has begun soldering it.  There's even a chance that this will be completed when she comes back in. With only the back side left to solder it's certainly possible.  I'm not sure what she plans on working on next but I like the progress that she's made while working on this window. 


Terry's latest window is already more than halfway completed and she only started it this week!  Of course she's been working on it at home as well as in class but as you can see she won't have much to grind on this because her pieces already fit together nicely.   And again, that is the HUGE benefit of cutting inside the line when you cut your glass-- you only have to skim your pieces and then wrap them


Susan has a lot of her Abita window wrapped now (a lot of the small parts) and is following my advice:  Slow and steady wins the race.  Everything lines up even after she's applied the foil so things are still looking good (not that I expect that to change).  I can't wait until the bottles are in place so I can calm down about this window!  LOL (That ought to make her feel REAL good to hear.)


Don't you think this is THE perfect border for Shelley's (nude) Lady with the Sun and Moon Window?  When she said she wasn't sure what she (nude) wanted for a border I knew instantly what I would pick (nude).  And Shelley felt the same (nude) way that I did.  Now that everything (nude) is tacked together Shelly will begin soldering this (nude) project.  I guess it's time for her to start thinking about what she plans on doing next (nude). My, I find this window to be beautiful but (nude) distracting. 


Cindy did some repair work on her Texas State/Star window this week which met with a somewhat unfortunate accident.  But Cindy was able to fix it easily enough and even overcome a second unforeseen obstacle during the repair which she handled like a Pro.  Once that was finished she started working on the first of her Dog windows.  Very much like me, Cindy decided to start with the hardest part first and cut and grind the nose with its deep inset curves.  With that completed the rest should go quickly for her.


And lastly we look at the window that Linda F is starting.  Although she doesn't have anything cut out yet she does have numerous pieces traced out and onto her glass.  This Mardi Gras crown has a nice feel of femininity about it due to its open design and that's just what Linda was looking for in this window.


Wow, after a few weeks of having short and easy Blog posts this one has left me exhausted.  And classes start again tonight!  I guess there's truly no rest for the wicked!

Paul
Bayou Salé GlassWorks