Tuesday, June 28, 2022

Trottin' Around The Problem

Let's Hummingbird and Flower Window turned out wonderful!  For a new(ish) student Let has just jumped into the deep end of the stained glass swimming pool and started swimming with the best of them!  Beautiful work indeed.


Lisa's created two feathers using assorted colors which I suspect may very well be small scraps that she might have had just lying around.  Scraps or not the end result is splendid and Lisa's work on this pair of feathers is equally resplendent.


Robert is the king of the 'Transom Window' and this week he got yet another one completed (along with two others started.)  I will be downright upset if he doesn't manage to get at least one more of these completed when he comes back in.


Steve's got his first Mini Sunflower Suncatcher finished with another one pretty far along in the queue.  I've got to call out his excellent wire bending abilities as well as his skill at adding a solder drop at the end of the wire to cover any sharp ends.   He's easily got twice as much lead on his ends as I  normally apply and I like his look a WHOLE lot better than mine! 


To wrap up our finished projects we look at the newest 'Pendant' Fleur De Lis window that I made.   I made a very similar design way back towards the end of 2018 but this time around I enlarged the design by 15% and changed the color scheme to give the FDL a more 3D effect by utilizing three similar colors instead of two.


Okay so wait until you see this.  Cindy is working on a bowl design using a series of irregular shapes (and openings.)  She's using a stainless steel bowl to curve the design and in a complete stroke of ingeniousness she is building it inside the bowl rather than on the outside as one would 'normally' do when making something curved like this.  I've made so many lamps that my mind was stuck on building on the outside of the mold but Cindy's method is amazingly craft-- and so is her design!  I'm hoping this is finished next week because I can't wait to see it completed.


As I suspected, Judy has finished cutting all of the glass for her Teddy Bear Window and has moved along to grinding each of her pieces.   She's well under way and soon we'll see exactly what this Teddy Bear is going to look like.   She's worried that he might look a bit mean but I think it's only because the snout of the bear is black.   We're going to re-cut those two pieces out of a dark brown and I believe that color change will soften this bear up immensely.


June has the majority of her Nursing Window wrapped which means that next week she'll be able to get this tacked together and then get the background cut to square it all off.  With a little luck she'll also be able to get a border cut as well.  I certainly have my fingers crossed.


Susan D's Flower/Plate Window came into the shop completely ground.  That means that Susan put  her glass saw to work during the week because some of these pieces would have been a bit hit or miss had she tried to cut them by hand.  As you can see she has the center tacked together and her first border cut out and ready to be ground and wrapped.   The end is near!


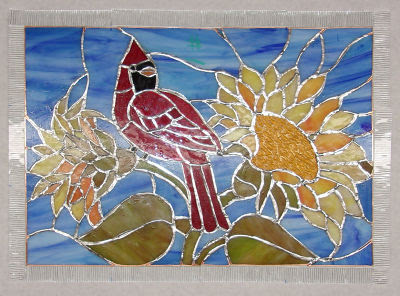
In a similar state of completion we next look at Mary's Cardinal and Sunflowers Window. She finished wrapping her pieces in class, tacked it together and then (like Susan) got her first border cut out.   Once her clear border is attached she'll move on to the second, wider border which will be cut from a darker blue glass.


Kerry has all but two leaves ground in his Circular Magnolia Window.  When he began grinding this I explained to him that the outside edge was the most important part of the pattern to follow and he obviously took my words to heart because this has been ground PERFECTLY.   Next week we'll easily see these pieces getting foil applied to them which will then lead to his tacking it together so he can fit the rounded border to it.  Circular windows are never easy but Kerry is making this one look downright simple!


MiMi has only one row of hexagons left to grind before she can begin wrapping the pieces for her final Hexagon Window.   When she began this project last year she cut out hundreds of hexagons in assorted textures so that she could just assembling everything without stopping to cut more glass (hopefully).  Well, it turns out that she only has around 40 extra hexagons which means that for a rough guess she did incredibly or downright amazingly  well!  I want her around the next time I see that old 'guess how many jellybeans are in the jar' contest.  


Barbara's Flower Panel Lamp got two more panels ground this week leaving her with only two more to go before she can assemble this.   The assembly will go fairly quickly so I'm thinking that she has only 2 or possibly 3 weeks worth of work left to go on this lamp before it will be ready to light up a room.


Lara has the first top most flower of her Peony Window all cut, ground, wrapped and tacked together.   By working with just one flower at a time she's reduced the complexity of her pattern and made the grinding of the leaves, branches and background pieces much easier to fit into place when she begins grinding them.


This might look familiar.  It's Betty's rendition of my 'Pendant' Fleur De Lis pattern only this one has been cut out of two shades of blue.  She started making this using just one piece of glass for the blue but when I showed her how much better it would look adding a second similar color she agreed to re-cut 7 of her pieces using a darker blue.  The end result has much more depth and Betty was happy to make the somewhat time consuming change.


This week Cheryl tacked together her Tree Of Life Window and then traced it all out to create a new pattern so that she could fill in the pieces that were missing.  We've changed things here and there so her original pattern pieces no longer fit into place but now she's right back on track to getting this bright and colorful window hanging up! 


Cindy's Landon Blue Angels Box is so very close to being completed.  It only needs some solder on the back side of the lid and then Cindy will be able attach the hinge, wash it and call it complete.  To achieve the lettering we simply printed the word LANDON onto a special decal paper, affixed it to a piece of glass and then fired it in the kiln over night.  She had hoped to use an iridised white but the lettering flat out refused to adhere to the iridised coating.  Luckily we suspected that might be the case so we had also fired the lettering onto a plain piece of white as well.   Plan ahead!


Here's a look at Martha's version of the Cardinal and Sunflowers Window.   She got everything ground while in class and hopes to wrap it  between classes but she's gone on vacation for a weekand I really don't expect her to come in with this all foiled and ready to be tacked.   Vacations are supposed to be for relaxing, not wrapping glass!


With almost all of her Peacock foiled I believe that it won't be long until we see Mary Grace getting some background cut for this second Peacock Window.   And when I say that 'it won't be long' I'm thinking that it might even begin happening next week.  Time will surely tell...


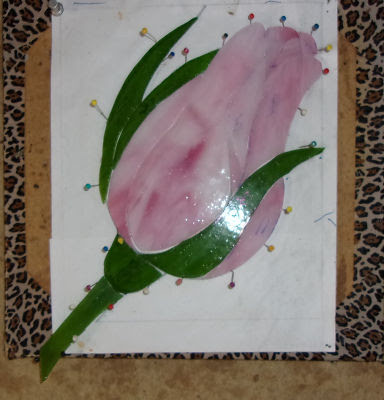
I had no clue how close to completion Susan R was on her newest Rosebud Ornament.   I thought she only had it tacked together but she's got it all soldered save for the final edge work which involves the 'tap tap' method as our students like to call it.  This will surely be completed within minutes when Susan walks back in the door next week!


And to wrap things up here we take a look at the Peony Window that Sheri has begun working on.   Like Lara, Sheri will be working on this one flower at a time and we'll see that first flower get some glass cut out for it when we return in our next post.


And there you have it.   Although this has been posted on time I have no way to send out the notification email because my computer died during a Thunder Storm last night and I can't access my email addresses.  Hopefully the new power supply will arrive Thursday and I can get things back to normal because working on this laptop is killing me.  Nothing is set up the way I'm used to and I'm having to locate and type in passwords for everything I do!
 
Paul

Friday, June 24, 2022

Grinding Smoothly


I hear people complain  about their glass getting caught on the grinder bed which makes it hard to grind smoothly.   Sometimes it's because the plastic grid that the glass rests on is worn and uneven.  However, other times it's due to the fact that the glass being ground is heavily textured.  The sharp 'points' are actually getting caught in the grid which causes the piece to jam and stop moving instead if sliding across the grinder.
 
 
If you are using glass that's heavily textured (most times this is clear glass) as shown below, try placing the glass upside down on the grinder surface.  This will allow the smooth side of the glass to glide easily over the surface resulting in smoother passes!

Paul


Monday, June 20, 2022

MiMi's Gonna Measure

Cindy's Heron Window came together this week in a stunning way. She utilized an old trick of mine by matching the border to little used color that the window already contains.  In this case it was the glass that she used for the Cat Tails.  You have to admit that her border choice really pulls this all together.


Martha's latest Franklin Street Light Window utilizes a Black and white motif  with just a hint of brilliant yellow thrown in as an accent color.  Her use of black Fractures and Streamers Glass allowed her to make a black and white window without having it appear oppressively dark.  Sometimes you just have to think outside of the box.


Check out this Vase of Roses and Rose Buds that Susan D has assembled.  Presentation means so much and these four flowerpot ornaments as single entities would surely be beautiful but arranged together inside of a mosaic vase they become a whole new sensational entity. And guess what?  No water required, no green thumb necessary.  (Just some stained glass talent.)


Cindy put together this abstract Geometric Teardrop suncatcher using scraps she had on the table.   It was a spur of the moment project and she's created something from essentially nothing that will most likely sell in the very near future.  Her edge work and the way her pieces fit together are beautiful on this.


Susan D also finished another Bird on a branch.   That window of hers is filling up quickly now!


Mary began work on her Cardinal and Sunflowers Window that someone else saw the pattern for when it was on the wall.  Mary got all of this cut out and most of it ground entirely at home in just one week.  That's impressive!


Here's the second version that Martha was busy working on while at home also!   It's amazing how much similar progress has been achieved on these two separate windows.  Martha and Mary aren't even in the same class so neither of them knew that they would both be working on the same pattern with just slightly different color schemes.


Barbara now has four panels ground for her Flower Panel Lamp which puts her at the halfway point. These are simple to solder so once she has the remaining four panels ground she'll easily be able to put all eight panels together to form her lamp.


Judy has most of her Teddy Bear cut out and she's flying through the creation of this window.  She doesn't waste time that's for sure and I have little doubt that when we next see this she'll be ready to begin grinding all of her glass.
 
 
Check this out!  June has the center heart and all of it's 'accessories' cut and ground.   She's taken it home so she can wrap all of the pieces and hopefully get it tacked together upon her return.  If that happens she'll easily get the 5 background pieces cut out and possibly even some or all of her border glass.  Yes, June is well past the hardest part of this window.


I'm falling in love with Melissa's Heron Window.   The colors that she's used all throughout this are spectacular.  Sadly, you can't really see that in the picture because there's no light behind it but when this is hanging up in a window-- oh my, it will take your breath away!


Here's another window that's come together practically overnight.  Let has used a nice mix of clear textured glass and Fractures and Streamers to make up the background of her Hummingbird Window.  She then matched one of the borders to the pink that she used in the flowers and finished it off with another border done in a textured clear glass.   This will surely be completed when we next see it again.


Susan D has designed her own Plate Window which looks like Flowers on a Vine.  All of the pieces have been separated but not cut out perfectly.   Some of the pieces have deep cuts along thin edges so Susan is going to use her glass saw to get those out.   Part of the problem Susan had with this is that he background glass is heavily textured so she couldn't simply cut the window out in reverse since she couldn't score on the textured back side.   However, we came up with a solution and it's working.  I can't wait to see what she comes in with next Wednesday.


With all of the glass cut for her second Peacock Window (save for the background) Mary Grace has begun wrapping all of those pieces in copper foil.  Once they are wrapped she'll tack this together and then she'll cut out the background which will ensure a nice, perfect fit.


We're at a bit of a standstill here with Cheryl's Tree Of Life Window.  Due to a series of unfortunate events she's missing pieces of glass and no longer has paper pattern pieces that match what remains to be cut out.  Sooooo,  she's wrapping and tacking together what she has completed and then we're going to trace out a new set of paper pattern pieces.  It's by far the easiest and quickest way to handle this situation.


This week Kerry worked on Grinding his Circular Magnolia Window and he's already at about the halfway point.  Based on what he accomplished this week I'm going to predict that he will have the rest of this ground by the time his next class ends.  And for the record, he's really taken his grinding skills to the next level on this!


Shawn's got about five pieces of background glass left to cut but we're going to have to get them from a second sheet of glass since all her remaining scraps from the first sheet are small pieces.  This week she got her thin accent border cut and ground which was made out of Fractures and Streamers.   Yes, everyone loves this glass and as you can see, this window is nearing its completion.


MiMi's last (yes, it's the LAST one!) Hexagon Window is WELL under way.  Look out because I suspect that there will be curved pieces of glass in MiMi's near future!  I'm pretty sure she's anxious for that...


Susan R started working on a second large Rosebud Flowerpot Ornament only with a different color scheme.  Wouldn't you know it, by the time class was finished with she had it all cut and ground.   This delicate design is proving to be very popular indeed. 


And here's Roberts latest Window all cut out and being foiled as I type this.  I have a sneaking suspicion that this will be another completed project that we get to look at next week because by my count Robert only has 18 pieces of glass left to wrap before he starts soldering this-- and he's taken those pieces home to foil at some point throughout the week.


Now who could be making a Bird on a Branch?  Yep, it's Susan D!  This one is all cut out so it will be in her window along side all of the other birds that Susan has made before you know it.


To wrap this all up I'm posting a picture of Ann who's currently fulfilling a 'bucket list' item way acroos seas in Spain.  She's taking part in the The Camino de Santiago (The Way of St. James) by walking Europe's longest and most storied pilgrimage route, staying in historic monasteries and centuries-old paradors along the way. It's been a dream of hers and now she's living the dream!  We all wish her the very best!
 

Just because this post is finished it doesn't mean that we won't be back soon.  Remember to look for a new stained glass tip before the week's end! 
 
Paul

Friday, June 10, 2022

Pattern Maintenance

Every once in a while students will trim the 'excess' paper away from the edge of their pattern.  This is something you should never do.  The pattern on the left has a lip of paper surrounding the entire pattern which allows you to secure a carpenter's square on it which in turn will help keep your four corners at nice right angles.  The pattern on the right is a perfect example of what you shouldn't do to your pattern-- it's trimmed too close.  Avoid this problem at all costs.


 Here are a few more patterns tips that you should always follow:

  • If you are tracing your pattern to make a copy, trace it with a colored pen rather than the standard blue or black ink.  It makes seeing what you've already traced much more apparent without having to look under the carbon paper.
  • Dry your glass thoroughly when grinding so that your pattern doesn't get wet and become wrinkled when it dries. 
  • Never solder on top of your pattern.  Once the front of your window is all tacked together remove the pattern and replace it with blank paper.  This will prevent pattern burning.
  • Always keep paper under your window especially if the second side isn't soldered (and NEVER solder your second side until all of the glass that makes up the window has been attached and the front side is COMPLETELY soldered.)

These are just a few tips that will help keep your patterns looking their best for re-use further on down the line.


Paul

Bayou Salé GlassWorks

Monday, June 6, 2022

I Accidentally Made A Second One

Annette's Transom Window was completed this week and although it took some time to make, the end result proves that the time was WELL spent.  Interestingly enough when I drew up the pattern it only had two borders on it.  Annette loved the three tiered beveled border that I surrounded my Parrot Window with and she wanted to know if she could do the same on her window.   Changing it would add less than 3/4 of an inch to the overall size and there was more than enough room in the opening that this will reside in to accommodate that added size.   Note Annette's use of white iridized glass behind the black central M.  The black is an absence of color while the subtle shifting colors of the iridized background help to offset the negative space.  Pure excellence all around!


Last week I shared the story about Judy's unfortunate incident with her Plate/Teapot Window.   The reason I pointed it out was so that I could highlight that even when things are at their 'worst', we can work around those problems and end up with a finished project that shows no scars.  This week Judy's plate window is finished and it's perfect.  We simply knocked out the broken plate and soldered a new one into its place.  Gorgeous!


Let finished her Margaretta quickly indeed.   She began it just last week and here we are looking at the completed window with light behind it already.   She's also taken more glass home with her so she can work on another window before she comes back into class.  I guess you can say that Let has got stained glass fever!


Robert came in with the center glass and all of the border bevels foiled for four windows!  By the time class ended he had all four windows completely soldered.  Since we won't be having any classes next week  Robert will use the free time to work on the doors that these will reside in.   Time should waste for no one!   Although I only have two windows pictured Robert as made two of each of these sizes.  That's what you call a production!


Susan R's Rosebud Flowerpot Ornament is actually going to be used as a decorative memorial piece at a grave.   It will be out of reach of the general public so she's hoping it will be safe.  From what she tells us you'd need a ladder to reach it so this Rosebud should last for quite some time...  The bud itself is downright stunning largely because of the red water glass that she used to make it.


Shelley's Circular Mermaid has been completed and I really like the way she used the background glass for the border as well.   The mermaid herself flows almost completely around the window thus acting as a border of sorts.  Finishing it off with the same blue that was used for the water opens up the design of the window rather than confining it inside a new color choice.


Lisa completed four Initial Panels while she was in class and they all came out perfectly.   You might think that there's not much to making letters but you'd be wrong.   It's all too easy to have bad penmanship due to poor cutting and/or grinding but Lisa gets top marks for each of her four panels!


Susan D was busy using her Kiln during the week  and managed to make a picture frame (on the left) as well as a light switch face plate (on the right).  I love them both and am always thrilled to see her using her kiln.


Here's Linda L's second Beach scene all ready for display.  The blue water and the white sand  highlight the tropical feeling that the palm trees bring to the finished product.  But it's that cute little crab with the big wide eyes that really grabs your attention, doesn't it?


Here's a look at the latest Bird on a Branch that Susan D made.   It's always nice to get a picture of a project that has been  installed so we can get the full effect.  Keep your eyes peeled and keep on scrolling because there's more to come.


MiMi's number 13 window lived up to its name in full because in the end she had to rout out the opening in the door that this was going in to make it fit.  Much like Judy's Plate/Teapot Window, MiMi persevered  and everything is fine now.  But the most exciting thing about this window being completed is the fact that MiMi is about to start on her last window in the HUGE set of 14 windows!


Kerry has got all of the glass cut out for his Circular Magnolia Window and is ready to begin grinding.  The big question on circular windows is: Where do I begin grinding since there are  no corners to place a square against?   The answer is simple: Anywhere you want.   You can start from the center or you can start from any outside piece.  It really doesn't matter-- the only thing that matters is that you follow the outside circular curve perfectly.


Lara has begun her Peony Window and has used a mix of light pinks and iridized whites for the top flower.  She's still undecided on what will happen for the bottom flower but I know that whatever she chooses will be perfection.  She's only one week into the creation of this window and she's already made a ton of progress.  She's also talking about using Fractures and Streamer for at least some of the background.  Look out because I think that this is going to be stunning!


Somehow Steve managed to turn up enough pieces to make a second Sunflower Suncatcher.   The first one is essentially completed needing only one more piece of wire  to be attached before he can wash and hang it.   The curves he's achieved on his wire work are mighty impressive especially when you take into consideration the fact that this is actually his first Wire Rodeo.  He's even added lead accent ends to the wire which provides even more character to his sunflowers!!


Linda F started her Birds On A Wire Window and boy is she flying through this.  All of her birds have been cut out  and her color balance is perfect.   On a window like this it's possible to have too many 'heavy' or dark colors on one side which can throw the piece off balance.  Not so here because Linda's birds look very proportional and level to me.


Betty is working on what I call the 'pendant' Fleur De Lis pattern.   It's really got a distinctive look about it that was actually inspired by a piece of jewelry that I saw on the internet one day.   I added some inside cuts for some character but what really catches everyone's eye is the angled crossbar near the center which holds the three pieces together.  It adds a definite flair of elegance to the design.


Stained glass feathers are an excellent way to use up scrap glass while making something both colorful and attractive.   The real beauty of feathers is that you really don't need to follow the pattern 100% since it doesn't matter of they're 'off' a bit from one another.  That said, Lisa's pair of feathers are indeed perfect mirror images of each other because she's following the pattern ever so precisely.


Mary has her Cardinal and Sunflowers Window well under way with the Cardinal all cut and ground.   She'll be working on one of the flowers next and is using a technique I swear by to make this window.   Instead of cutting out all of her paper pattern pieces she's only cutting them out one section at a time.  In other words, so far only the paper pattern pieces for the cardinal have been separated.  Now that the cardinal has been cut Mary will cut out the pattern pieces for one of the flowers and then trace them onto her glass.  This is the best way to maintain organization and be able to move efficiently. Look closely to the right and you can see the uncut pattern pieces for the flower that will reside to the left of the cardinal still completely attached together.


Susan D has two more small projects almost wrapped up.  This week she's cut and ground both a miniature Rosebud and another Bird on a lead branch for the her window.  Apparently 'never slow down' is Susan's motto.


And look at what I just received in my text messages!  Susan has completed the bird that she ground while in class and already has it hanging in the same window that her two other birds reside in.  Stunning!


June has only a piece of two left to grind and then she'll be able to cut the final ECG lines into her Nursing Window.  I have no doubt that June will be wrapping this when se returns because the final cuts are all straight lines that won't require any real grinding, just skimming, to get them to fit.  That's the beauty of working this way.


Now here's something that you don't see every day-- it's the third and final Beach Scene with the crab tacked together but resting (floating?) on top of the water.  You can see the opening in the sand below it where it will eventually reside. It already fits into place which means that the only thing that Linda has left to do for this is to wrap a few more palm fronds, tack this together, and then cut out her sky.


And again, the proof is in the pudding (so they say).  Mary Grace's second Peacock window is moving along at breakneck speed since she got it almost completely ground in just one class.  The second time always makes things go together easier!  This speed is also a testament to how important it is to take your time when cutting your glass.   Mary Grace will be wrapping and tacking this bird before you know it.


So then, we're going to be doing things a little different from here on out.  A lot of times we start our posts with a stained glass tip but I've decided to share them as separate blog posts so that they can be searchable within the blog.  It will also allows us to have a featured window on Facebook each week so expect a stained glass tip notification in your email inbox soon! 

Paul 

Bayou Salé GlassWorks