Sunday, May 17, 2015

Back Up, Back Up, Back Up!

Well, we're late again, but I can explain- really.  This post is a week behind due to a hard drive melt down on my computer  I lost about a months worth of posts including the pictures that you'll be looking at in this post.  Luckily I was able to recover them by running an un-delete program on the camera's memory card a few days after I got my computer up and running again.  So, without any further ado, here's what happened in the shop two weeks ago (not last week).

This is Betty's completed Geometric Window.  She loved the flowing design when she first saw the pattern but wasn't really thrilled while making it only because it turned out to be a bit harder than she'd thought it would be.  On a flower window it doesn't matter if a line moves up or down an eighth of an inch but in a window that's based on symmetry along 2 axes (yes that's the correct spelling-- I looked it up), well that's a whole other ball of wax.  Precision is the word when making a window like this and as you can see Betty did wonderfully!


Carol's Saint's Fleur De Lis Window may only symmetrical on one axis but it's perfect no matter how many different ways you look at it.  Lettering can be another problem to work out in glass because you certainly don't want sloppy hand writing in a window.  The Saints letters look great and Carol has walked out the door with yet another masterpiece.


Terry's Opposing Forces Window is finished and you're getting a look at it only because her daughter Rhonda happened to snap a picture of it and sent it to me so I could include it in this post.  Un-delete programs are apparently not perfect if you've taken other pictures on top of the old ones.  Terry did another great job with this window and we've come to expect nothing less from her.


Jeanne completed her Winnie The Pooh Window and it's certainly going to bring smiles to peoples faces when they see it.  Her extra leaves fit in seamlessly and Jeanne managed to made a perfect window even though she battled a bum knee throughout this projects entire creation. And the grain in her sky lines up perfectly all the way across.


Linda F's Celtic Knot Logo is even more impressive when you see it in person and realize that it's only 9 inches in diameter.  Small pieces are never fun but small symmetrical pieces are even worse.  But, like Betty, Linda managed to work through it and make it look easy.  She claims it's not very round, I say she's crazy.  :-)


Susan's American Flag Ornament is finished and ready to be staked in her garden.  Most people assume that a flag is easy to do in glass because you can make one with nothing but straight cuts.  But that would be a rookie mistake because straight cuts bend easily and fall apart quickly.  Susan avoiding that problem by making her stripes with curves so the entire flag is sturdy and ready for any punishment that mother nature dishes out on it while it's in the weather.


So next up we're going to take a look at Carol's next project.  We like to call this the Kaleidoscope Window (for obvious reasons).  Again, precision cutting will be extremely important to maintain  the mirrored view so it doesn't become twisted and distorted.  Carol has most of this cut and ground and will be wrapping and tacking her inside pieces before she resumes cutting the final background pieces and the borders.


Becky S's Irises and Dragonfly are really taking shape now.  The flowers are ground as well as the dragonfly so Becky has moved along onto cutting the green glass.  With her stems cut and ground she'll move over to the leaves next.  Becky will be doing something a little differently from the other windows we've seen made from this pattern but I won't tell you what it is until she begins cutting the glass for the newly changed section.  Are you curious?  Then make sure you come back to see what Becky has planned.


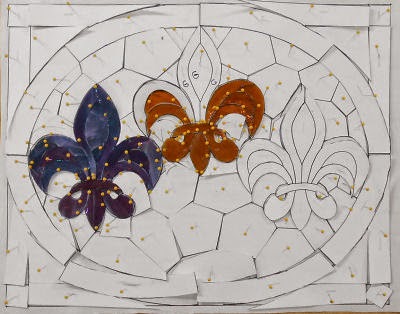
Cindy has three of her Fluer De Lis' cut, ground, and almost wrapped in her Tri De Lis Window.  She'll be working on cutting out her background next and then this window will fly!  I feel the need to state for the record that Cindy's cutting and grinding has hit a new plateau.  These are perfect.


And Becky has the center circular portion of her Bird Of Paradise Window all ground and ready to be wrapped and tacked.  Tacking the center circle section will prevent anything from shifting as she cuts and grinds the background pieces that will turn it from a circular window to a square window.  She's decided to take my advise and add a double border to make it look more complete and less empty around the edges.


With only five pieces left to go (and then the borders), Myrt's Outhouse is looking better than ever.  I know you can't see the detail of the wheelbarrow's wheel in the picture below but it worked out perfectly.  Oh, and the bottom strip of green is just a piece of glass that we're using as a straight edge to ensure that the border will line up nicely.  Just wait until the sky has been added to this.  It's really going to come alive.


Mickey Mouse is all tacked together and his front side is mostly soldered at this point in time.  And the best thing is that his lead tail turned out perfectly!  There's glass under that tail but it has been completely foiled over so we could solder over it without breaking that tiny, thin, long piece that would surely break if it were made the normal way.   Just wait until you see this completed and hanging up. 


With her borders attached Mary Grace is ready to solder her Fruit Basket that she's been threatening (and fearing) to make for the past few months.  We held it up and the color of the basket is much lighter than you'd expect when you see this sitting on the table (as Mary Grace already knew).  The inner, thin border is cut from red water glass and when this has light behind it, well, look out!


Now that's a lot of flowers!  Ann's Flower Bouquet Window is tacked and ready for its background.  This is a large window measuring almost three feet across but the background will cut fairly quickly since we've remade pattern pieces for them by retracing all the flowers onto some poster board.  And Ann will be cutting these pieces when she return to class.


Subtlety.  That's what Bonnie's Elsa Window embraces with it's two tones of blue which are VERY similar.  The lighter blue helps give the illusion that the 'cloth' is more sheer than the dress and that's exactly the look that Elsa needs.  When this is lit up the effect will be readily apparent.


Terry only needs to add some brass channel to the edges of her Geometric Window and then solder the backside before she can call this completed.  It's nearly out the door already and I know that it will be completed in our next update because I already have a picture of it on the camera!


Sue has both of her windows almost completely bordered now and will double check the measurements before we tack the side borders into place.   The most perfectly created window will easily be ruined if it's made to the wrong size.  But that won't be the case with Sue's pair of Feathered Windows. 


Linda L's Wild Things Window is almost finished as well.  She'll be working on the remaining background pieces that surround the green letters while she's at home and then she'll be ready for borders.  Pay attention to the dotted 'i' in the word 'Things' and note how there's no lead line running from it.  I'll point it out again when this is finished and explain how it was done as well.


Janet's got her Melon Window completely under control as the front side is all soldered.  And the good news is that the back side has not only been started--it's a good 90% of the way finished!  Janet worries about her soldering but I think she understands that slow and steady always wins the smooth soldering award because 99% of her soldering requires no touch ups at all.  Look to see this as a completed window in our next update.


Linda F has begin working on a vibrant Multi-Colored Pinwheel Design and is ready to begin grinding it.  We used Photoshop to see how to align the colors and this was by far the best variation of the color scheme.  This is going to be nice and bright (eye catching even) when it's finished.


Natalie's Crab Window is tacked and just waiting for a background to be cut.  She's going to add some air bubbles as well but that will happen AFTER the pieces are cut and ground into place.  Handling it one step at a time ensures that everything will line up nicely in the end the same way that Myrt's Wheelbarrow Wheel worked out.


And last but certainly not least we take a look at Brenda's newest creation, a Stylized Cross Window.  She'll be making this as a two color cross and will see when it's finished that there is no 'correct' way to color a window.  Wait until you see this when it comes back into the shop (I've already checked it out).  It's spectacular!


And that's that.  With classes starting again the day after tomorrow I'll need to shift into high gear to get this blog back up to date.

Paul
Bayou Salé GlassWorks

Sunday, May 10, 2015

Hot Dog, Hamburger, Sausage Egg and Cheese Biscuit

We had another of our quarterly Stained Glass Weekend Workshops last week and we're here now to show everyone what our newest batch of students accomplished in the short span of two days.  Two very FULL days I might add. 


We started Saturday morning with Angie, Cherie, Roxane and her daughter Erin.  Angie and Roxane are practically old pros at this since they've done weekend workshops before but Cherie and Erin were new at it.  The first thing we did was to have a cutting lesson where we covered the ins and outs of cutting glass.  Once everyone cut out their straight lines, curves, compound curves, circles and inside curves they moved on to their official 16 x 20 projects.  Below are the first actual pieces of glass cut by out students.


Since Angie had been in class with us before she wanted to know if she could make a Pelican Window instead of one of the stock patterns.  It didn't take long to draw this up and I felt that although it was a challenge Angie would be able to handle it since she'd done this workshop twice before.

 
Here you can see that Angie is well under way in cutting the glass for her project.  We always like to start with the easier cuts to help boost our confidence while getting our feet wet.  Not that this Pelican's feet are in the water...


Once everything was cut and ground we sat Angie down and had her wrap her pieces before she headed home for the night.  This is what was accomplished at the end of the first day.


Sunday started with everyone tacking their windows together with solder and then adding the final pieces of glass-- the border.   Once that was added we broke for lunch while I put brass channel around everyone's projects.  From there we moved on to the soldering process keeping in mind that slow and steady winds the race.  And here's Angie's completed window.  This pelican looks great and we already have regular weekly students looking at the pattern!


Next up we take a look at the work of one of our two new students, Cherie.  She decided that she wanted to make a Stylized Fleur De Lis so she could give it to her mother for Mother's Day.  The timing couldn't have been more perfect for that and by noon on Saturday Cherie had these pieces cut out and ready to grind.

 
By lunch time (which ran a little late) Cherie had everything but her border cut out.  the only reason that wasn't cut was because we don't do borders until the inside section tacked together.  She has her square in place and is ready to start grinding her pieces from the lower left on upward and out.


Next she wrapped all of her pieces with 7/32 copper foil after she had everything ground and fitting nicely.  It was a little after 6pm on Saturday when we called it a day. When Cherie came in the next morning she tacked her window together and began working on skimming and wrapping her final border pieces.

 
Cherie walked away with a beautiful Fleur De Lis Window and if you want my opinion I think she had fun making it (even though we punished her with long hours, and a nearly sleepless night).  She did a great job and I hope her Mother enjoys the fruit of Cherie's labors today on Mother's Day.


Roxane decided that she wanted to make the Pelican Window along with Angie and I saw no reason why she shouldn't  do it.   Here's her Pelican after she's worked out her first few cuts.  We took a shortcut by cutting the beak in one piece.  We split it into two very narrow pieces only after it was ground and fitting into place.  This made it much easier to cut and grind since she was dealing with a larger and more manageable piece.

 
Roxane is a natural at this Stained Glass thing and her cutting, grinding and wrapping went extremely well.  Not that it was a race, but she was the first person to get her window ground and there was nothing to adjust when she walked away from it at the end of the day.


After tacking her pieces together on Sunday morning Roxane then set to work on her border.  Borders are one of the easiest things to cut if you have the center of your window tacked together.  The strip cutter allows us to cut borders that are perfectly straight.  In the picture below all Roxane needs are four corner pieces and then this window will be ready to be soldered.

 
And here is Roxane's finished window.  The colors are slightly different from the version that Angie did, but not glaringly so.  Since I knew what I was looking for it was easy to sort out all of the pictures we took along the way respectively.  I think, or rather know, that Roxane did a wonderful job here.


Erin is Roxane's daughter and she decided to make the Stylized Fleur De Lis Window but she didn't want to make hers in the browns and tans that we normally see it done in so she went with a color scheme of her own.   I wasn't sure what colors were being used until she actually started cutting each color so I had no clue what to expect.  Sometimes I worry about things like that but it turned out that Erin has a wonderful eye for color.  Her window already looks great with just two colors cut.
 
 
With the remainder of her glass cut Erin was then ready to begin grinding all of her pieces.  It's a tedious process and Erin drew blood on more than one occasion, but she didn't let that slow her down at all as she quickly applied a band-aid and then grabbed for the next piece of glass.


Erin's border choice really makes this window stand out.  It's stunning, don't you think?  And it's not even soldered yet in this picture.


The end result is another gorgeous window whose border matches one of the accent pieces which changes the feel of the window entirely.  Erin was so sure she wasn't going to be able to solder her project but in the end she did a fantastic job and hopefully learned that there's more to her than she gives herself credit for. 


I want to thank Angie, Roxane, Cherie and Erin for a great time.  There was a lot of work involved but we all had fun making it through to Sunday evening.  Our next Workshop will be a Fusing Workshop and both Angie and Roxane will be joining us for it.  I'm learning a lot in those classes myself so I know I'm going to have a great time as well! 

Paul

Wednesday, May 6, 2015

She's Got a Tick In Her Eye (And She Don't Care)

We're late with this post yet again but this time I have a good excuse.  We had a Weekend Workshop which through Frisday, Saturday and Sunday out the window since we had some rather full days both prepping for and then actually holding the Weekend Workshop classes. 

Okay, let's just jump right into this and start with Rowena's variation of a Sunflower Lawn Ornament.  She took the butterfly from her Grapes and Butterfly window, shrunk it down, made it, and then attached it to her last Sunflower Lawn Ornament.  And the result is exactly what I expected--GREAT!


And here's a look at Carol's Sunflower Lawn Ornament.  Hers may not be swarming with butterflies but it's gorgeous just the same.  We've seen these done with leaves underneath them and they're nice as well, but you can't go wrong with your basic sunflower.


And Shelley did a GREAT job getting her Bird and Flower Window all ground. We did discover one unfortunate fact though.  It appears that one of her pieces lost a corner that is far too big to just fill in with lead.  I've highlighted it in red in the picture so you will be able to see what a wonderful job we do fixing it without re-cutting the large background piece (that we don't have any more of.)  The solution is really simple-- We're just going to add a new leaf.  Check it out next week to see how we alter patterns 'on the fly'.


Natalie's Crab Window is all ground and wrapped, ready to be tacked so she can get some background glass cut for it.  With the lions share of the work on this window completed I'm amazed at how quickly Natalie has pushed through it.  There's not much left to go before this will be completed.


Becky S's Octagon Irises are turning out beautiful.  The hardest parts are already cut out now and there's only one Iris left to grind.  After that the rest of the pieces just require simple, almost straight but flowing cuts to complete. And I know Becky is able to handle that without even breaking a sweat.


Betty's Geometric Window is moving along at a nice speed and her attention to detail is already paying off.  She's re-cut 2 pieces that most students would have considered to be acceptable but that I was on the line about.  Trust me when I say that Betty's willingness to re-cut a few pieces will make this a window of perfection.  It's always good to see someone put a few more minutes worth of work into something to make it correctly rather than always regretting small faults in the window.


Terry's Opposing Forces Window is tacked and ready for some background glass to be cut.  We've already laid out the two toned border pieces and have them cut to the proper width so again, Terry is ahead of schedule here.  


Carol's STNIAS Window is just about completed.  We've used a heavier Zinc Channel to ensure stability but Carol wanted to check out some more of her soldering and took it home to accomplish that.  Expect to see this window completed when she returns.  She also started working on a geometric window that I've made numerous times.  It's always been one of my favorite patterns and I have no doubt that Carol's will turn out just as nice as the others before hers.


Becky B's Bird Of Paradise Window involves a beautiful flowing secondary background which adds so much to the window (not that the Flowers aren't pretty by themselves mind you).  However, we may play with a border on this one.  I have idea's that I feel the need to share with Becky.


Mickey Mouse is all wrapped and fitted together.  That means that Jeannette will be tacking this and adding her border when she comes back in.  Mickey is going to have a lead tail and Jeannette will see how that's accomplished when she returns.  The tail is so thin that half of it will be covered in lead anyway, so why not go the distance and make it entirely out of lead.  Besides, it will be fun!


Brenda has one of her Fleur De Lis Windows completed (the one in gold) and another one started.  The completed window just needs to be washed and colored while the red one simply needs to be ground and then 'borderized'.  I wonder if anyone has noticed that Brenda can knock these out faster than most students can trace out the pattern onto poster board!


And Cindy resumed work on her Tri-De-Lis window and her colors are perfect.  I think that when this is completed Cindy will even impress herself with this one.  I love how perfect her grinding is which will make this window so impressive.  It's called flawless execution. 


This week also saw Linda L get a good portion of the clear water glass background glass cut for her Wild Things Window.  Looking at this picture shows me how far Linda has come since she first started classes with us.  Her attention to detail is wonderful and when she sees a problem with a piece she just sticks with it until the problem is gone.


Sue got the top and bottom borders cut for her Featherized Window and you can really see it taking shape now.  She decided to add little accent pieces within the border and once this is tacked together she'll move on to adding the border to her final section.


Martha ground and wrapped her Cardinal Suncatcher while she was in this week.  All he needs is a little tail and he'll be just fine!


Janet got the first side of her Melon Window completely soldered and then started working on the back side.   There's still some wire work to do on this but I don't think that will take long at all.  This project is the perfect companion to her Peach Window that she finished a while back.  And since they'll both be hanging in her kitchen that's a very good thing.


Rowena's Baseball Window is ready for solder.  Play Ball! All the glass is cut and ground with only the border left to be wrapped.  We'll put a heavier Zinc Channel around this window and it will be finished before you know it.


Susan's feeling very patriotic again and is working on a new Flag Lawn Ornament.  It's cut, it's almost completely ground, and it's almost finished!  Expect to see her working on a scarecrow after she completes this project next week.


And speaking of Flag Lawn Ornaments, Mary Grace has one under construction as well.  She's got hers all wrapped and now it's tacked together as well.  Then she also managed to get the background cut and tacked into place on her Fruit Bowl Window.  She has her first red border cut and will be adding a final clear border when she returns to class.


Look out, it's Elsa!  Even though she has no face (female Disney characters nowadays have huge eyes, extremely tiny noses, and even tinier mouths which make doing them in glass impossible).  But there's no doubt who this is and I think she's going to make someone very happy. We're even talking about getting a snowflake in her hand.  How cool is THAT! Get it?  Cool?  Yikes!


So as I said in the beginning of this tome, we've had another Weekend Workshop this past Saturday and Sunday.  Things went great and you will be able to read all about it in our next update sometime during the weekend

Paul
Bayou Salé GlassWorks