Monday, May 6, 2019

The Biggest Lessons In Glass Involve Bloodshed

Our tip this week involves trial and error.   I see this happen very often in class and hopefully this will help.  Sometimes a piece may look symmetrical but in reality it is not.   This is especially true with triangular and oval pieces.  People try the piece one way and assume it must be correct when often times they have the piece positioned either upside down or completely backwards. The three pieces below show are a perfect example of this problem  as they will only fit the pattern in one direction.  Note that the slanted edges on the top long piece do not match.  If this gets flipped upside down it just won't fit into the pattern and if you grind it to fit you'll leave gaps. The oval piece is also off and if positioned upside down it will not even come close to fitting.  Finally we have the triangle which is also asymmetrical.  In other words, it will only fit correctly one way.
Here I've colored the outline of the shapes in red and laid them on top of each other swapping the tops and bottoms.  As you can see nothing lines up.
 
What I'm trying to say is that you should ALWAYS revolve your pieces to see which way gives you the better fit.   Bad fits happen far more often than you might think and it really does make a difference in your finished pieces. 

Ok then, Angie's second Address Window was completed this week, as expected.   That leaves her with just one more to go and from what she told me it's mostly cut out at this point in time!  I guess you can say she's been busy crunching numbers.


Jeannette was so close to finishing this last week that I had no doubt at all we'd see her finish it upon her return.   Within minutes she was polishing this off (literally) and then she moved along to her next initial window that we'll see later on down below.


Well we haven't seen a Fan Lamp in a while so Linda L decided to remind everyone what they are all about.  The LSU Design  makes this a local favorite and reminds me that I have a quick LSU suncatcher to draw up for someone.  Geaux LSU!


Lara started this Teepee suncatcher a few weeks ago when she showed me the sketch that she'd drawn up. This week we got to see what she accomplished while she was home over our Easter Vacation.   The result is perfection with the design being equally as perfect.


Betty was someone else who didn't sit still during her week off from stained glass class.   When she walked in the door the only thing left for her to do was to add hooks and then color her three suncatchers.   And here they are, all ready to be gifted!


Patrice completed two more Fleur De Lis Suncatcher and I know I'll be making more of these myself because they sure sell quickly.   Again, the colors you use on these imply different significance as you can see by her Mardi Gras and Saints Fleur De Lis' suncatchers below.


Barbara H walked out the door with her first Butterfly Lawn Ornament after learning how to 'tap' the edges into a bead.   Curved suncatchers are always tough to do this with but it's like riding a bike-- once you get the hang of it you've got it for life.


And Tracey finished another Butterfly Lawn Ornament of her own.   Once this was done she began tracing out her next window- a new Cardinal design.


Martha's large tulip piece, mark my words, is going to be SPECTACULAR! Everything from the design to the shading of the colors she's chosen is perfect on this.   And look at how far she is with just a week's worth of work into it.


Carol is making either a Ladybug Suncatcher or a Ladybug Lawn Ornament although which one it is will only become clear when she comes back in with it next week.   What's the difference between a Suncatcher and a Lawn Ornament?  Well, very simply, there's either a hook on the back or a stake.   Any suncatcher can be a Lawn Ornament by substituting a stake for hooks.  Just remember that the suncatcher should be of a decent size (say at least 6 inches wide).


With only his lantern and facial features left to go, Susan R's Gnome Lawn Ornament is really taking shape now.   What you see below has all been ground and the remaining pieces should go easily for her.  This is without a doubt going to be a cute one!


Belinda  wrapped all of her pieces while she was at home and if that wasn't impressive enough, well she also ground out those deep cuts in the whites of the Sun and Moon's eyes as well!  After she tacked everything together she cut and attached her border as well which means that she'll be soldering this upon her return.


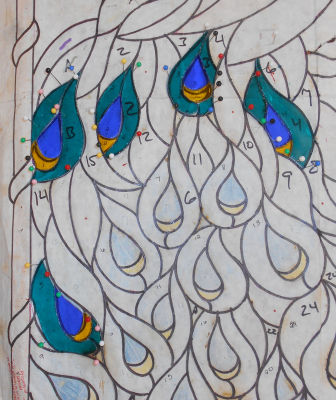
Lara's not only been working on Tipis (and yes, that IS the plural of Teepee), she's also been grinding the tail feathers for her peacock window as well.   She's got some of them foiled already and once they are all foiled she'll tack them together and then work on the long feathers that run between the teardrop feathers.  Working in sections is key when making large windows like this one


Mickey Mouse is back and I'll bet you can't guess who's making him.   Or maybe you can!   Linda L now has all of the glass cut out save for the border and her Mickey In A Pumpkin looks very nice indeed.  I just love that 3D pumkin and think it could make a wonderful stand alone suncatcher.


Cindy is ready to finish her Faux Mosaic Birds Window and will likely do that upon her return now that she has the front soldered and the border and channel attached.  The finishing touch will most likely be added next week and then we'll show you what this REALLY looks like.


Mary Grace is really going to town with her flower window.   All the grinding has been completed and now she's begun the wrapping process.   We've discovered three  pieces that got a little smaller  than we want so we'll be re-cutting them AFTER this gets tacked together so we can use the opening as a pattern to ensure a perfect fit.   Once you've started grinding it's best to not use  you old paper pattern to replace pieces as things change throughout the grinding process.


Just like in Mary Grace's Window above, Jeanne M has found two problem pieces in her Mother Mary Window.   She's also decided to re-cut the ground that Mary is standing , making it out of another color.  That will all be achieved next week since she was able to tack Mary together before she called it a night this week.  This is nearing the end but we still have a fancy border to add to this.


Remember way up top when I said we'd look at Jeannette's newest Initial Window?  Well here it is.   Everything's been cut, ground, and tacked together save for for final border (which HAS been cut) all inside of one class.   That's fast work and it insures the fact that this will be completed upon Jeannette's return just like her 'C' Window was this week.


Sheri got her background cut out her latest Butterfly Window and then she ground wrapped and tacked it together.   Her final border pieces have been cut and she's ready to grind them into a perfect fit.  Once that's done it's SOLDER TIME!


Kerry decided to add a second border to his Crane Window to both fill it out and to make it look like it has a frame around it.  He used a deep brown glass which certainly looks like wood and then when everything was tacked together he began soldering.   With the front side completed I see no reason why this won't be one of our featured finished pieces in our next post.


With her border attached, Melissa's Le Pieta Window only needs soldering and then this window will be completed.  She's taken it along home with her in hopes of getting a head start on getting some lead on it so who knows how far along she'll be on her return to classes.   I can't wait to see.


 Shelley's Peace Sign Flag Window is all tacked together and she even got a piece of zinc channel bent to fit this circular window.  She decided not to cut the stars into to blue section.  Instead, she'll use white vinyl cutouts that will adhere to the blue glass.


Mary's completed the wrapping phase of her Cross Burst Window and has begun tacking things together.   She's got 2 pieces to re-cut and then she'll decide what she plans to do about a border.   With all of those rays reaching toward the edges I don't think she needs one, but  I always feel that a border finishes a window off nicely. We'll see what Mary has to say upon her return.


Linda F's UK Window has its front side soldered and now she's preparing to flip it over to do the back side.   We had a broken piece of glass in the upper right corner but we were able to repair it easily and Linda is now able to solder the back side without worry.   Breaks happen but they're not the end of the world, just a slight inconvenience.


And with just the leaves and irises left to cut out for her Egret Window, Becky S is making incredible progress on her second panel.   Though not the same, nor mirror images, there's a theme that runs throughout her two windows that Becky has maintained by keeping the glass the same between the two.  These windows work just fine as stand alone projects but as a pair they really make a Southern Louisiana statement!

Betty's second Cabinet Door Insert got its background glass cut and ground allowing Betty to take the large eight pieces home to wrap.   That means that there's a border in her future and that future will start upon her return next week.   She's also working  on a unique 3D Flower design over the Easter week which may very well be completed next week!

 
And that wraps things up this week.   It's been months since I've posted our Blog Links on Facebook due to their weekly changing policies on picture sizes but I think I'm going to post this and see what happens this week.  Wish me luck!

Paul
Bayou Salé GlassWorks


Wednesday, May 1, 2019

A Gnome and a Leprechaun Walk into A Bar

Since we've had a week off and we're slightly behind I'm going to just jump straight ahead into our students' work this week starting with Jeff who put the finishing touches on all six of his insert panels.  Here they are displayed in a fake frame so you can see just how they are laid out in the window that he is about to install them in.  As Jeff made the repeating panels he figured out ways to make the creation process simpler.   This is what we like to see, students who not only learn what we teach but who think things through on their own.   Beautiful work!


Becky B put the finishing touches on her African Violet this week and walked out the door with a completed window.   Also, I always like to point out when a student designs their own window and this is 100% Becky's pattern.   Loosely based on a Magnolia, Becky made it all her own.


Betty finished the first of her pair of cabinet Door Inserts and it is spectacular!  When she started this project she was worried that the bevel wasn't long enough to cover the door.  The thing is, a door like this would look incredibly cluttered if the bevel ran the full length of the door.  Using two small accent bevels, one near the top and the other near the bottom was truly the way to go.  Pure elegance.


Take a look at Patrice's USA inspired Fleur De Lis.   The colors may change but the pattern remains the same.   This is an excellent example of how colors can completely change a window and how easy it can be to make a pattern your own just through the use of color.


Well now, this is embarrassing.  I'm pretty sure this is Tracey's finished Butterfly Lawn Ornament but the colors are throwing me off so I could be wrong.  If I had to put money down on it I'd say that this is Tracey's latest Butterfly.  At any rate, whoever made it did a beautiful job! 


In our last post we saw Angie's 4519 Address Window and this week she walked in the door with a 4523 window just needing two borders and a channel.   As you can see, Angie walked out the door having achieved her goal.  This will surely be finished upon her return.


Is it a Travelocity Gnome?  Nope, it's Susan R's latest Lawn Ornament and I have no clue why, when people have asked me what other Lawn ornaments they can make, I've never thought of a doing a Garden Gnome.   I have to say that this was a stroke of genius on Susan's part.


Jan is making a Wedding Box and she's got the top completed already.  That means that she only needs to cut 5 more pieces of glass to finish this elegant wedding gift! It already looks great but wait until you see it finished.


Annette is steadily working her way up from the bottom of her Cardinal Window and you can already see how the pieces are starting to fit together to form a finished piece.  Learning how to grind pieces can be tricky but Annette is working her way through her window at a nice steady pace.


Belinda got her Sun and Moon Window completely ground and has taken it home so that she can have it wrapped when she comes back in. The final border will only take a few minutes to cut and with a little luck she'll be able to tack it all together when she returns.


Next up we see that Carol has put her own spin on the ever changing Fleur De Lis  Suncatcher.   She cut one complete FDL out of purple glass and then another out of Yellow/Gold.  Then, by mixing up the pieces she ends up with two mirror image suncatchers!


This week Becky S made an extreme amount of progress on her Egret Window as all the feathers have been cut out as well as a good majority of the pieces in her tree and sky.   As she did with her last window she's taped all of the small feathers together so they won't fall out of place before she grinds them.


Cindy's Faux Mosaic  Birds are really coming together now.  Her background has been cut out and she's fast approaching an interesting aspect of this window that will be done after she gets both sides soldered.  I'd tell you what it is but I'd rather surprise you in the weeks to come!


MiMi's Seafood Window has big plans in store for it as she attempts to incorporate an interesting use of background glass.   It's not in there yet but before you know it we will see something spectacular happen in this very Louisiana window.


Jeanne M spent her night wrapping the pieces of her Virgin Mary Window and getting quite a lot accomplished.   This window will get a border attached to it very soon and then there will only be the soldering left to go.  It's already an internet sensation on Facebook thanks to her wonderful work.


Jeannette essentially made this window in one class.   She only had the beveled 'C' wrapped when she walked in the door and before we knew it this window was ready to be soldered!  I see that she has a beveled 'G' in her box of tools so I'm thinking that her next window may be very similar to this one.


Kerry's Crane Window already has it's border attached and he's moved on to the soldering phase.   The border color perfectly compliments the colors central to the design and that's exactly what you want from a border.   Look to see this completed before you know it.


As you might recall, Lara's been working on the bottom portion of her large Peacock window.   In a round about way she's reducing the amount of pieces in the tail feathers by grinding each of the four pieces that make up the teardrop portion of the feathers.  Once they fit she'll wrap and tack them together thus reducing four pieces into one larger piece.  Grinding the surrounding pieces will be much easier this way since there will be fewer loose pieces that could shift out of place.


Shelley's Peace Flag Window is nearing completion as she prepares to cut her border.  She had a little issue where her pattern pieces didn't line up with the actual pattern but we've solved that and are now moving along to the final stage of this project.


Mary is also wrapping glass and she's foiling her pieces in a very methodical way to allow for growth during the foiling process.   By foiling every other piece her window will stretch proportionately if it grows allowing her to skim pieces on both sides of the window to allow for perfect symmetry.


With most of her wrapping completed, Melissa is about ready to tack this Le Pieta Window together and add a border to it.  It won't be long now and you have to admit that the background looks stunning.


Patrice worked on another Fleur De Lis Window Using a black, white, and gold color scheme.  This is a pattern that can made so many different ways depending on the colors that you chose.


Shawn was so very close to finishing her colorful Flower Window and then we found a break which stopped her from achieving that goal.  We've already knocked out the offending piece (do you see it in the photo?) and next week this will surely go home with Shawn.


Sheri's got all of the actual butterfly cut out for her latest Butterfly Circle and it's been ground as well.  As you can see she's already wrapping it and once that's done she'll tack it together and then place it on top of her background glass and then use the butterfly as a pattern piece!


Speaking of Butterflies, this is Tracey's newest Butterfly Lawn Ornament (this one I'm sure about) all set to be wrapped and soldered.  It's departure is scheduled for next week!


Finally, we sort of take a look at Susan D's latest window.  As you can't see she's making excellent progress on it.   I love the way the Elephant's Ears-- wait... never mind.  Don't expect to see what it is until after it's been gifted.  :-)


And that brings this to and end.  We're a week behind due to Easter but this post actually brings us up to date because we took the week off to head out of state for a vacation.   We WILL be back next time same bat time, same bat channel, so we'll see you then! 

Paul
Bayou Salé GlassWorks