Wednesday, August 19, 2015

Turning Lead Into Gold

Accuracy is something that you should always strive for in your glass work.  Initially students believe that once a piece fits into place they are finished with it and ready to move on but this isn't always the case.  Remember that the window you are working on is a sum of all of its pieces and if they don't fit correctly your window will be off.  Sometimes the reason is easy to spot, other times it's just a general feeling because everything is off just a 16th of an inch.  Remember that even a a round peg can fit in a square hole, but that doesn't make the circle a square.
Below we have a basic octagon or 'stop sign' if you will.  If you cut it out and it looks like the image on the right (in blue) anyone will see that it isn't an octagon.  To make matters worse, it's not really off by all that much as you can see in the lower overlapping image.  Detail is an important key to making good stained glass.  Problems like the one shown below lead to windows that just leave the viewer feel as though the window is 'off'.  As I always say, if you're going to take the time to do the window you might as well make it the right way. 


If you want to see a window with all the right cuts you don't have to look any further than Rowena's Six Paned Falling Leaves Window which is officially completed and looking spectacular!  The patterns themselves were a careful mix of randomness blocked out within the confines of a structured theme.  I didn't point that out to Rowena but she picked up on it immediately and followed suit with her colors and her placement.   I must say that she handled it exactly as I would have which obviously proves that great minds think alike!


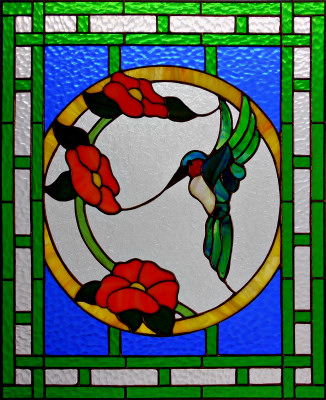
Gale's Humming Bird With Flowers Window is another example of stained glass perfection.  The circle is perfectly round, the straight lines never waiver, and the soldering is magnifique!  Gale has a penchant for perfection and her work clearly shows this.  There's nothing 'off' here.


The Flart has flown the coup!  Linda F's three Heart designs are all finished and don't they look great?  I especially enjoyed watching Linda make sure that her glass never left the outside lines of the pattern and never moved too far inward from those lines either.  It's what makes these three suncatchers look like hearts rather than a heart in need if a transplant.  Excellent work!


Natalie now has a Crab Window under her belt and it really did turn out to be a beautiful window indeed.  The red inner border was the perfect color choice and Natalie's soldering was spot on all the way through this project.  This was a very elaborate design but Natalie tackled it as though it was a beginner's pattern.  Natalie's been reading the blog and has been impressed with the Lawn Ornaments that she's seen so that's what she will be working on when she comes back in.


Linda L wrapped up the work on her last two Beveled Transom inserts and they look even better than her first one (if that's possible).  Some people say that you don't learn a lot doing beveled windows because so much of the window is already cut for you, but I'm sure that Linda will agree with me that there's more here than meets the eye.  Learning the best way to grind her background pieces is something that Linda will take forward with her to every other project that she makes with us.


Susan's got her two Scarecrow Lawn Ornaments finished and they look very cheery to me.  If I were a crow I'd land on these guys shoulders (as different as those shoulders might be) and try to be friends with them.  I love how Susan has taken complete control of her wire work and used her new found skill to add straw poking out of their hats.  It's just a little extra touch but it  adds so much more to these fun faces. 


Did I mention that we have some Lawn Ornaments because Paula's got a completed 3D Rose Lawn Ornament this week which is complete perfection.  She did such a wonderful job with this I forgot that she'd been out of our classes for a while now.  I guess it's just like riding a bike-- you never forget.  At any rate, Paula must really like the way this turned out also because she's started 2(?) more of them!


This is Carol's latest window and it's her rendition of the crab window that Jeannette had made a while back.  The colors are completely Carols and the work is flawless.  Carol had a bit of an issue with this when the biggest piece of the body needed to be replaced but you can't tell that there was once a time when this little crab was broken and causing Carol heartache.  Now he brings a smile to Carol's face. 


Here's Mary Grace's Pumpkin Lawn Ornament and even though it doesn't have a line running down the center it's attached to its post quite firmly.  Mary Grace is learning that if you just take your time you can make magic happen.  You get out of a project what you put into it and as you can see Mary Grace put a lot into this one.


A while back Vickie made her Butterfly Suncatcher but I had forgotten to take a picture of it.  She brought it back this week which reminded me of how wonderful her cutting and grinding was on this.  I guess that explains why her latest window is already looking so great.


Becky has moved back to the left hand side of her Flower/Initial window and that side features her Bird of Paradise.  This week she managed to get all of the background cut and ground.  You can't really see it in this picture (because it's all clear glass) but take my word, it's there and it fits beautifully.  Becky will be joining the two sides of her window into one big window and adding borders before you know it.


And speaking of background glass, Bonnie's Iris Window is ready for it's background to be cut.  The hard work is completed on this and since there aren't any borders that means that there are only 20 pieces left to cut and ground.  And those 20 pieces are very easy cuts.


Charlie's Clear Beveled Window is all tacked together and his front side is completely soldered.  With just the back side left to go I'd say that we'll be seeing this completed very soon now.  Charlie has come a long way from when he first walked in the door a few months ago.  He'll be started a second companion piece to this as soon as this one gets its back side completed.


Martha's first angel is completely ground and just awaiting foil now.  There's one very tiny piece that's missing but we're going to fill that in when this gets tacked together so we can insure a perfect fit.  It's just so much easier to handle it this was rather than re-cutting a new piece from the pattern which is surely off from the rest of the pieces at this stage of this Angel's life.


And Jeanne's Tiger Window is really taking shape now that she's begun grinding her pieces.  You can easily see that the right hand side of this window is fitting together perfectly.  Jeanne's speed has really picked up now that she's confident in working with glass and I have no doubt that this will look wonderful.


Linda L has begun working on this single image of two pumpkins which I believe will turn into a single Lawn Ornament when it's complete.  There's not much left to go on this pair, just some stems and possibly some leaves.  Expect to see Linda make a few more of these as the weeks go by.


Ann's made impressive strides with her latest Fleur De Lis.  With her background cut, ground, and tacked into place she's ready to begin the most complex part of her window-- the triple, interlocking border.  I've inked in the tricky corner sections on her pattern because unlike most borders these get confusing as you try to figure out what pieces span two sections and which two sections should they span.  I have no doubt that Ann will be very far along on them when she returns.


We have a lot of beveled window this week and Brenda's window, although clear and beveled, doesn't get lost in the mix at all.  This is a very stylish design that I initially drew incorrectly, so when you enlarge this picture and see that the bevels aren't in the right place rest assured that they are NOW residing in the correct place for this particular design.  We roll with the changed here in our classes!


Sue began working on this small version of the LSU/Tiger Claw LSU Window.  She's shrunk down the pattern so these claws aren't going to be near as easy as you might think they'd be.  She has half of those claws cut out and then there will just be background and borders left to go on this.


Look out because Terry's Tiger is nothing short of ferocious.  But then, if you look really closely you'll see the cross that he's sporting in the design!  I'm looking forward to seeing what this one looks like in the light so we can get the full effect of the subtle cross.  As I tiger alone I think Terry completely nailed this one!


Vickie's Fruit Bowl Window is all tacked together and her grapes are ground and wrapped.  This isn't going to be a nice window, it's going to be a STUNNING window--  In fact, it already is.  And next week she'll get her background all cut and hopefully ground.  I love showing someone how to cut from the actual glass pieces rather than the paper pattern.  There's always a little confusion and then a lot of awe when they see how quickly things go.


With just the top fish left to re-cut, Shelly has made this intense window look down right easy!  Interestingly enough, that top fish was the first one she cut out before I mentioned that her fish should best be cut from vibrant colors so they wouldn't just disappear in the strikingly bright blue water.  Now that it's all ground and fitting together Shelley plans to re-cut this fish when she comes back in.


Cindy began working on 3 Cross Suncatchers and she's learned the hard way that straight lines really require a strip cutter to make things go easily.  She has a third one all cut out and that one WAS done on the strip cutter so that should go far more easily for her.


Myrt got the rest of her background pieces cut out and has begun grinding them.  There are a few pieces left to go but since these were cut from the actual glass butterflies and flowers things already fit very well with just a minimum amount of grinding required.  Once this is tacked together Myrt can get her border cut and she'll be ready for solder.


Triple borders are becoming quite the thing here!  Betty is doing an interesting variation of an interlocking triple border that really showcases the interlocking part of the border by combining sections of the border.  It may not make sense right now but it will next week when you see how it all fits together.


And Mary Grace is obviously on a pumpkin kick as she has begun cutting out her own version of a Double Pumpkin Lawn Ornament.  She was paying attention when I told her that anything could be a lawn ornament because she walked in with this pattern and asked, "I want to do this but only the two pumpkins and the leaves.  Can we do it?"  And the answer is......................................(insert drum roll here)....................YES!


Whew!  It's been a hectic week and this post is a day late but it's finished now so I get to concentrate on the new set of classes that have already begun.  We also have a fusing workshop this weekend featuring Martha and Becky S.  It will be a busy first day but it should be fun as well.

Paul
Bayou Salé GlassWorks

Tuesday, August 11, 2015

I'm Bleeding Again, Pass Me The ShamWow

As I mentioned last week, 'wrapping' or 'foiling' is one of the most important parts of making a stained glass window.  If the foil on your pieces is damaged, not straight, kinked, folded over, or uneven your solder will reflect this.  Solder doesn't cover foiling mistakes.  But you already read about that if you were here last week.  I've wrapped a clear piece of textured glass with some black back foil in the picture below and made as many mistakes as I could think of while I did it.   Any black that you see is the underside of the foil (Which shouldn't be seen on a well wrapped piece).  So then, let's take an in depth look at what you should avoid when foiling


A) This is call 'stair-stepping' and it occurs when you don't overlap the end of your foil perfectly to the start of your foil.  Sometimes it's impossible to get the two ends to align because the foil tends to warp a bit when you tear it from the roll.  No matter the case you should always use a razor knife or exacto knife (just make sure it's not dull) and cut from the widest point on backward to the smaller point.  If you apply just a little pressure on the blade you will feel it travel along the foil under the overhang resulting in a perfect line up.

B) Torn edges usually occur when you are pressing down your foil with something that isn't smooth (standard yellow painted pencils are notorious for causing this problem).  Be careful as you are pressing down your foil because in most cases this problem can only be fixed by re-wrapping that section of the piece.  This can also be a sign of reversed foil edges which are almost always the result of careless handling of your pieces before you've pressed the foil to the top and bottom side of the glass.  These sections have the sticky side of the foil facing upward after you've pressed it down.  Sometimes you can fix this by picking at the foil with your fingernail and bending it back into  place.

C) Uneven foiling comes from not centering your glass on the foil as you are wrapping.  Remember to always have the sticky side of the foil facing you and to pull the foil taut before pressing it against the glass.  If you see the foil isn't overhanging evenly on both the top and bottom of the piece just pull the foil back and reposition it.  You can easily remove and reposition the foil several times without causing the foil to lose its stickiness.  Uneven sides can also be so extreme that there will be no foil on one side of the glass at all which is completely unacceptable.


D)  Splitting is a common problem when it comes to foiling.  This only happens on tight inside curves and sometimes can't be avoided.  When you become proficient at soldering you can hide these small splits with solder but it takes a lot of time and skill to do so.  The best thing to do when bending your foil over the top and bottom edges of an inside curve is to slowly apply pressure to the edge of the glass with a wooden dowel (or plastic pen) while SLOWLY angling the dowel (or pen) a little more with each full pass over the curve.  Do this to both sides and I can guarantee that your split foil will be reduced to next to nothing. 


E) Reverse folded corners happen when you don't take the time to make sure your corners fold over as you would a Christmas present.  Be sure that the foil on one edge of your piece is compositely flattened before moving to the second side.  I rarely short fingernails and can easily do this in less than a half second.  Practice makes perfect! This can also be fixed bu simply flipping the foil back to its proper direction before pressing it down

These are the most common foiling problems that I can think of right off the bat.  Remember that your soldering job will only ever look as good as your foiling job.  they go hand in hand with making a beautiful window.  If you have any questions about anything here (most specifically the part about preventing your foil from splitting) be sure to ask me in class.

So that was pretty long winded.  I didn't think it would take near that long to cover all of that!  But now that it's over with let's take a look at what our students have accomplished this past week.  And we'll do that by starting with Paula whose Bayou Mirror has been a long time coming, but whose time is now officially here.  I think it turned out beautiful and I believe that in the end Paula is very satisfied with the results.  There are a lot of memories in the making of this mirror but it started on a high note and it has ended on one as well and isn't that what really matters?  It's beautiful but I defy you to show me something that Paula's made that hasn't been beautiful.


Linda L's first transom window insert is officially completed and it's a spectacular window.  Clear glass and bevels are a timeless, classic design and within a week or two Linda's home is going to have three of these timeless, classic windows in it! 


Carol completed her latest LSU Window and thanks to this project I think I've discovered the secret of getting glass texture to show in my photographs.  But the drawback is that it also highlights any problems in the window but as you can see here there isn't a problem to be found even if you went over this with a magnifying glass. Carol even tinned the brass channel on this beautifully.


Sue completed scarecrow and likes it so much that she'll be making another.  The suspender look on this scarecrow is a very good one and in the end Sue decided to make this to hang in a window rather than from a stake in the yard.  The beauty of lawn ornaments is that you can always  just add a hook or two and turn them into a suncatcher.  I went ahead and added pupils (which I forgot to do before Sue took this home) but if she brings it back in we can easily fix that oversight. 


Cindy never slows down at all because this week she knocked out three more Fleur De Lis suncatchers and,well, what else can I say about these?  Cindy's on a roll.


Bonnie came in and immediately got to work at a grinder to finish fitting together her second Iris.  Once it was ground she set her sights on getting the leaves for both windows cut out.  And she did!  Next week she'll be at the grinder once again and then she'll be wrapping these two windows and preparing to cut background glass.


Terry is holding off on her Cross De Lis and has begun work on this Tiger De Lis that she redesigned.  And saying that she's BEGUN working on it is very misleading because, as you can see from the picture, she's very closed to having this all cut out and ground already.


Charlie got his four bevels cut and wrapped (which wasn't hard to do at all) and then re-cut the one piece of background glass that had met with a slight accident the week before.  Once everything fit  together he tacked it all into place and then began working on the final border.   That border is now cut and ready to be skimmed on the grinder and then wrapped when Charlie returns.


Vickie's first project looks astounding!  She picked some incredible looking glass globs to use for grapes and then began grinding her glass.  Before class was over with she had everything ground and everything but the grapes wrapped.  I think it's safe to say that the hard part is behind Vickie now.


Jeanne's had all of the purple glass cut out for her Tiger window last week and this week she got her gold glass cut out,  We laid everything out on the pattern and she's going to begin  grinding her pieces when she comes back in.  The mouth was going to be especially challenging so I helped her out by hitting it with the glass saw.  We'll do the same with the piece of background glass that fits inside the mouth because it would be impossible otherwise.


Ann started wrapping her Fleur De Lis that she ground last week and within a half an hour she was ready to start tacking it together.  Once that was done we discussed size and borders.  Ann is going to go with three borders and make this into a perfect square.  We have the details all hammered out on paper in pencil and Ann is ready to begin cutting her background.


Carol is making a crab that is so beautiful it brought tears to her eyes before she even finished it.  Sadly, the main body of the crab has a few cracks in it due to an accident, but even though Carol thought it was pointless to continue I've convinced her to keep forging ahead.  Once all the glass is tacked together and the window is a little more sturdy we'll knock that bad piece out and restore this window to the glory that it once promised to bring to Carol!  That's a promise.


Becky resumed work on the initial side of her Bird Of Paradise / Initial Window.  With the oval completed and fully soldered Becky will begin adding background pieces to her Bird Of Paradise side when she comes back in.  Once both sides are complete she'll join everything together with  connecting pieces of background glass.  Building it this way makes things much more manageable and is the best way to handle larger windows.  


Brenda has her two bevels wrapped and the fill in pieces all tacked into place.  We drew up a quick pattern but it's off due to the fact that I was under the impression that Brenda's original window had a double border.  No matter, we've got a final size and know exactly what to do to easily put things right.  Next week it will be background for this project.


Gale completed the soldering on her Humming Bird Window and Wow! what a job she did.  She came in with only the the back side left to solder and I demonstrated to her what the problem was that she experienced on the first side; too much speed.   When it comes to soldering, slow and steady always win the race.   At the end of the class Gale had everything but one flower soldered.  I looked it over and have to say that Gale is now officially one of our best solderers at this point in time.  If I told you that her soldering was perfect I'd be making it sound bad-- it's that good!  When she comes back in all she'll need to do is wash and color it.  I can't wait to see some light behind this.


After completing her mirror Paula began working on a small 3D Rose Lawn Ornament which kept her pretty busy for the night.  Everything is cut and 95% of it is ground, so if she manages to come in with these pieces wrapped she'll certainly get this completed next week.  In fact, even if she DOESN'T have everything wrapped I'm sure  this will still be completed because putting these together is a quick and easy process-- once you know the trick.


Linda L has 2 more transom inserts to go and all of the glass has been cut and attached.  She's taken this pair home with her where she hopes to get a little extra soldering done.  Both of these windows front sides are nearly completed so I'm sure we'll see at least one of these finished (possibly both) when Linda returns.


Shelley is grinding full speed ahead on her Aquatic Scene Window.  She's beyond the halfway point (starting from the bottom moving upward) but is having second thoughts about the color of the top most fish.  I say change it out now because once you put solder on it you're pretty much committed to the color choice.  You don't want to look at this when it's finished and wonder why you didn't fix it when you had the chance.


Only three Fleur De Lis' for Cindy this week you might have asked yourself?  Heck NO!  Cindy also cut out, ground, wrapped and tacked together this cross suncatcher as well.  Now that she's made one with a pattern I'll ask her of she wants to see how much easier it is to make without using a pattern.  I think it will really impress her.


Myrt  finished cutting and grinding the last of her butterflies and has officially begun wrapping her pieces.  The flower and leaves are completed so there's only the butterflies to go.  Once everything is wrapped she'll tack it together and be ready to trace this on top pf her background glass.  Myrt is making short work of this window!


Natalie resumed work on soldering the second side of her  crab window.  By the end of the night she had it completed save for some touch ups and hooks.  Next week she'll give it a bath, color it and  be ready to start a new project.  Look to see this project showcased as a completed window in our next post.


And lastly we take a look at Jeanette's Kevin The Minion Window.  This is the back side which means that she has the front side soldered already.   Jeannette would most certainly have this completed next week but she's going to be out of state next week so we won't get to see Kevin completed until the following week.  There's still a little wire work left to do on his hands but that won't take long at all.


And that pretty much brings us back up up to date.  We have a fusing class occurring in two weeks so that will certainly be fun, especially since I know everyone who is signed up for the class.   Be sure to look for another update next week!

Paul
Bayou Salé GlassWorks