
Okay, it's time to get to our students work this week! We're going to start off with Bonnie's Round Magnolia Window which is nothing short of stunning. It's been a design that's created a lot of talk throughout the classes and Martha has already decided that she wants to make one. The black patina against the white petals works perfectly as does the third shade of green for the border, And I haven't even mentioned the fact that the window is round rather than square which also sets it apart from other windows. Bonnie's soldering is top notch and her work has inspired others to make this design which I know we'll be seeing more of in the future.

Wow, didn't Linda F's Birdhouse window turn out great? I will admit that I wasn't initially thrilled with the border color when she picked it but it turns out that I was 100% wrong because it fits this window like a glove. I love when a students color choice opens my eyes! I remember when something of this complexity would have taken Linda two or more months to complete and now she's able to finish it in less than half that time. From her cutting to her soldering she's been turning out amazing work.


Jane completed her second Cylindrical Lampshade and here we get to see both of them side by side. The one on the left is the new one and if you look closely you can see that the solder hasn't been colored yet-- that's something that she plans to do when she gets it home. Now that she has these out of the way Jane plans on making 2 windows featuring two different logos (which we'll see when she returns).

And then we have Ann's latest Fleur De Lis Initial Window. This one is brought to you by the letter B. Her border glass has darker pieces on the top and bottom while lighter sections flank the sides. The (large) piece of glass she selected for the border had a very irregular color pattern to it so she carefully pieced together the effect that you see below rather than haphazardly letting the differences in shading randomly destroy the flow of the border. Careful planning always pays off, and Ann proves it in this window.

Remember what I said about the use of pins in the beginning of this update? Well, Myrt's Sunflower Window is a perfect example of how you should use pins to secure your pieces. Nothing is going to shift out of place on this window! Myrt is wrapping all of her pieces now and when she returns she'll easily get her eight pieces of border attached. Once that's done she'll be soldering. This is what I call perfect workmanship.

And Mary Grace has her Bird Of Paradise just about ready for solder. She has the center section all wrapped and tacked together and has the first thin amber border cut and ground. That means there's just one border left to go and then she can begin the final soldering process.


Carol cut out three variations of our standard Fleur De Lis suncatcher and decided to make them into one window. She cut a length of clear glue chip glass to the size she wants the window to be (sans border) and then traced her FDL's onto the glass. After making three vertical cuts through the centers where the FDL's will be added into the glass Carol was able to cut the glue chip into 12 pieces that all fit together perfectly. And she also got a quick lesson in making symmetrical designs as well! Next up for Carol, border(s).

Brenda's CC Window is all ready for its back side to be done. When I left she only had 4 lines left to solder on the front of this window. That means that this will certainly be a completed project when Brenda comes back in.

And Shelley's Mermaid Window really only needs a few pieces of glass ground and then some bubbles added before she starts wrapping it. She's decided to go with the glass that I liked best for her bubbles-- a nice iridescent waterglass. It shouldn't take long to get them completed so she may be wrapping this when she comes back in.

Meanwhile, Linda L made some great progress on her two Ribbon Boxes. Once the the lids were completed she cut the glass for the box sides and once they were tacked together she cut out the mirrored bottoms. With just the smallest amount of soldering left to go on these we'll surely see these completed when she returns. Then she'll be moving onto mirrored hearts.

Terry's latest window is a decidedly Art Deco 'D' design. She came in with it all cut out and once she completed grinding it she began wrapping her pieces. Then she tacked it together and got her border added. Now that's what you call a productive night.

Cindy's Panel Lamp is all cut out and I'm wondering of she may want to add a small crown to it. Whether she does or not I know that the lamp will be beautiful. But a crown will only add eight more pieces to the total and help hide the spider that secures the shade to the base. I think I'll cut some out of cardboard and attach them to the test lamp that we made to see what she thinks. At any rate, Cindy has her 'jig' all set up and has begun grinding her first panel. What a difference this shade is going to make once it's on her base.

Just look at all of those colorful pieces of glass. What do they form? Well, it's hard to see right now but in a very short time you'll see that this is an elephant. Paula has about a third of this ground but she bumped the board causing the pieces to shift just as I was about to take the picture. Trust me when I say that this will be one of the most colorful elephants that I've ever seen (not that I've personally seen that many!)

And Janet's Window, which she now refers to as the Tree Of Life, is coming along wonderfully. She has her outer border tacked together and firmly anchored onto her board so that the window will be perfectly square when it is completed. When I say square I mean that the window will have four corners with perfect 90 degree (right) angles. When she returns we'll cut the strips for the thin inner border and work from there.

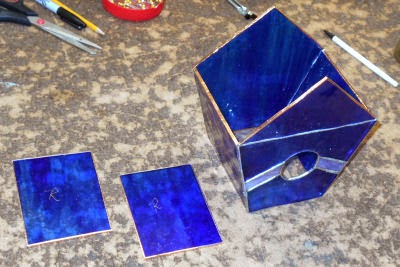
Jane not only finished her Cylindrical Lampshade but she also began putting this Birdhouse together as well. She has two different birdhouse designs cut out but accidentally brought the wrong roof sections for this particular pattern so the two pieces you see to the left of the birdhouse don't quite fit! If they had she would have easily gotten this project together before she packed up and headed for home.


And wrapping things up this week we'll take a look at the Boat Window that Jeannette began working on. Most of the details of the boat will be comprised of lead lines. cutting into the glass that she'll use for the sky which means that the sky may be a bit tricky to cut. We want the grain (or flow) of the sky to be unbroken so the lead lines will appear to be ropes in front of the sky. It won't be hard to do but Jeannette will need to take her time and work one small section at a time.

So to reiterate, let's never forget to use many, many, many pins to steady our projects while we are grinding them. That is one of the best tips I can give which will make your pieces fit back together perfectly after they've been ground and wrapped.
Paul
Bayou Salé GlassWorks
No comments:
Post a Comment