We have another quick tip this week that most people don't think about so I'm putting it front and center here. Almost all the glass that you use has numbers on it to identify the type of glass, the price per pound, and the price of the sheet of glass. These numbers are usually written with a marker or paint pen which will wash off easily enough when the project is completed. The thing is, you should always remove these numbers from the glass BEFORE you wrap your pieces with foil. If you cut through the numbers (or lettering) as shown in the piece below and your glass is transparent you can easily have problems later on down the line.

If you foil your pieces while there is still writing on the glass you can't remove all of the marker later because foil will be covering some of it. But who cares about what's under the foil, right? Well, if the glass is transparent these marks will be visible when you turn the glass around as the picture below reveals. Be sure to remove all the writing on your pieces BEFORE foiling your glass. Markings caught under the foil are a sure sign of a beginner stained glass crafter.

I'm very excited to announce that Janet has completed her first lamp and that even she was amazed at how easy it actually was to make. Of course Janet has considerable stained glass skills so there's that to take into consideration. This type of lamp is called a Panel Lamp which means that it was made out of a series of identically sized flat panels. It's a great first lamp to make and Janet's is certainly a showstopper this week.

Cindy came in with a bit of a dilemma this week. She has business cards all over her place of business with no way to keep them organized. She brought in four colors of scrap glass that she had lying around and within 15 minutes I showed her how easily a business card holder could be assembled. By the end of the class she had three more completed and I'll bet that she could easily make 10 more if she wanted to next week. These are wonderfully functional and even fun to make (as Cindy said herself).

Rowena made this Peacock Suncatcher that's really gaining in popularity. And without a doubt, Rowena's version of it may sway even more students towards making it. I've always found this to be a fun project to make and I've always found them to be a good seller.

Sue's finished her Winter Window which was made in colors that perfectly capture the season. The center text portion of this window is barely 12 inches wide so when you look at all the pieces in this window be sure to realize just how small they are, especially the letters. Sue's precision cutting paid off in spades with this window and she even figured out how to use a strip cutter all on her own for the borders!

Linda L put the finishing touched on her Wiener Dog Lawn Ornament and then turned her attention to completing her Boy and Girl Baby Suncatchers. All three are wonderful but those babies are adorable! They're only eight pieces of glass so they can be done quickly and easily and Linda certainly proved.

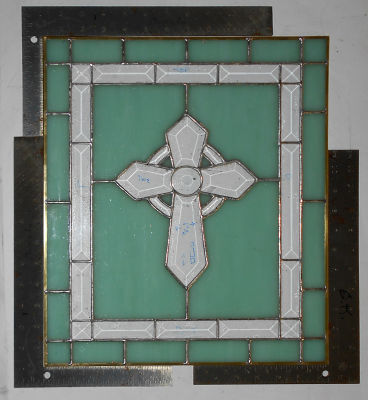
Carol finished her version of the Cross De Lis and I just can't find any fault in it. I never even have to touch anything up on her work any more and as you can see from the picture this is flawless. Great work!

And speaking of Fleur De Lis', take a look at Shelley's. She did a wonderful job on this from start to finish. It's perfectly symmetrical, perfectly cut, and perfectly soldered. The FDL itself is bold in its color with the double border not drawing any attention away from the subject itself. This is perfection all the way around.

Ann has the inner section of her Transom Window all cut out and basically ground at this point in time. She has some tiny pieces in that cross and she handled it almost effortlessly so I'm thinking that the out border section of this window with its flowing ribbons won't be any problem at all for her. Ann has certainly come a long way in her stained glass career.

Bonnie has all of her Study In Straight Cuts wrapped and ready to be tacked together. When she comes back in I'm sure she'll begin soldering this. Since this window has no curves in it at all I suspect the soldering will go VERY quickly. Bonnie will just need to remember to ease up on her solder flow before reaching every joint (and there are a lot of them) to prevent solder build up in the corners.

Brenda's Beveled Cross Window is all tacked together and she even got the front side soldered. She needed this window done quickly and she's done it. Look to see this among our completed pieces when we return with our next post.
Becky S has almost all of her Spiral Window ground and has begun wrapping it. I didn't get a finished picture of how far along she is on the wrapping but it's mostly completed. If she's going to use lead covered glass for the background sections then she'll cut out her four curved borders before she does her fill ins-- and we'll explain why in our next post.


Linda F's Beveled Cross Window was completed just before class ended so she didn't get it washed or colored before taking it home. But she's promised to bring it back next week so we can give it a proper send off with a beautiful picture.

Barbara took classes with us a long, long time ago and has decided that she just couldn't live without us. :-) The first thing we did was to go over the basics of cutting again and when I suggested that we continue with a butterfly she asked if she could do one of the larger 3D Butterflies which I had no objection to. The cutting went so well that by the end of the class she had everything cut out and more than half of it ground. She's taken it home to continue grinding so this may very well be another project that we see completed next week.

Terry's Spiraling Flower Scene is fitting together wonderfully now that she's grinding and she says that when she leaves class next week she plans on taking it home with her so she can begin wrapping it. There are still borders to add but the bottom half of this two panel project is nearing completion now. Other students have certainly been noticing it sitting there on its shelf and are even considering making it.

Sheri, our newest student, completed her butterfly last week and decided to make a Stylized Fleur De Lis Window as her first official window with us. As you can tell from the picture below, things went wonderfully. She picked a very difficult to cut, heavily textured glass for the darkest blue sections but she still managed to get all of the FDL cut out. She'll be working on the grinder when she returns to class and then you'll really see this fitting together.

Martha may have completed her two Duck Windows but she still has two irons in the fire. She resumed working on her Seafood Window by finishing up her Oysters leaving her with just four Crawfish left to go on it. But while she's doing that she's also started the Fleur De Lis Window you see on the right. The glass that she picked for the FDL was only big enough to finish the job IF she didn't break anything, but as bad luck would have it one piece broke leaving her with a bit of a problem: She could wait for new glass to arrive (which may not even match what she already had cut out) or she could alter the pattern. So altering the pattern is what she did. You can see where the arms don't go as high as the pattern originally called for but in the end that won't make a difference at all. And handling it this way ensures that the glass matches through and through.

In order to move along to her Transom Window design Rowena was forced to change the bevel cluster that she wanted to use. She was able to turn up a replacement cluster that is VERY similar to her original pick and is only just one inch shy in its width. In the picture below you can see that she has the pieces all wrapped and ready to be tacked together. You can also see the original bevel pattern traced out in marker under the new bevels pieces. All in all, not that much of a difference at all.
NEWSFLASH: Rowena's original choice for the bevel arrived at our door this weekend so it will be interesting to see which one she decides to go with when she returns to class.

Betty is working on her larger version of Linda F's Easter Rabbit as well as another Jester Suncatcher. Her version of the Rabbit is large enough that she was able to actually cut glass pieces for the eyes rather than having to paint them on. (We have no choice but to paint a mouth on though.) Two at a time is how Betty normally works and as you can see these two projects are very close to being completed.

Linda L added a background to her Air Force Window this week and has the red border pieces cut out as well. Her straight lines are truly straight and everything is nice and symmetrical. And that's the way (uh huh, uh huh) we like it (uh huh, uh huh)! Chalk this up as another finished window to look for when we return next week.

And this is Myrt's Cross De Lis Window that she's literally flying through. She's wrapping her pieces already so that means this will get it's background cut out when she returns. And if things go REALLY well we'll have a border cut out for this as well.

Carol started this Bee Lawn Ornament while she was in class and as you can see there are only three pieces left for her to cut out and grind before she can tack this together and then solder it. These always look great especially when you see them in person since there's nothing flat about them. Yep, this Bee will be 3D!

Then there's Susan who's putting all of her eggs in one basket, And all of them means eight of them. Or was it seven of them? No, I distinctly remember that I could have seven chips so that must be why the number seven is stuck in my head. Regardless (or irregardless), I now realize that these two eggs remind me of Carol's Bee from up above. Just change the white to black and add some wings, right? Eggs-- go figure. I think I'll eat a bag of chips now.

I guess it's time to wrap this up and get ready for our next batch of classes. As you well know by now there's always something happening here so come back again next week to read all about it.
Paul
No comments:
Post a Comment