Annette's Transom Window was completed this week and although it took some time to make, the end result proves that the time was WELL spent. Interestingly enough when I drew up the pattern it only had two borders on it. Annette loved the three tiered beveled border that I surrounded my Parrot Window with and she wanted to know if she could do the same on her window. Changing it would add less than 3/4 of an inch to the overall size and there was more than enough room in the opening that this will reside in to accommodate that added size. Note Annette's use of white iridized glass behind the black central M. The black is an absence of color while the subtle shifting colors of the iridized background help to offset the negative space. Pure excellence all around!

Last week I shared the story about Judy's unfortunate incident with her Plate/Teapot Window. The reason I pointed it out was so that I could highlight that even when things are at their 'worst', we can work around those problems and end up with a finished project that shows no scars. This week Judy's plate window is finished and it's perfect. We simply knocked out the broken plate and soldered a new one into its place. Gorgeous!
Let finished her Margaretta quickly indeed. She began it just last week and here we are looking at the completed window with light behind it already. She's also taken more glass home with her so she can work on another window before she comes back into class. I guess you can say that Let has got stained glass fever!
Robert came in with the center glass and all of the border bevels foiled for four windows! By the time class ended he had all four windows completely soldered. Since we won't be having any classes next week Robert will use the free time to work on the doors that these will reside in. Time should waste for no one! Although I only have two windows pictured Robert as made two of each of these sizes. That's what you call a production!
Susan R's Rosebud Flowerpot Ornament is actually going to be used as a decorative memorial piece at a grave. It will be out of reach of the general public so she's hoping it will be safe. From what she tells us you'd need a ladder to reach it so this Rosebud should last for quite some time... The bud itself is downright stunning largely because of the red water glass that she used to make it.
Shelley's Circular Mermaid has been completed and I really like the way she used the background glass for the border as well. The mermaid herself flows almost completely around the window thus acting as a border of sorts. Finishing it off with the same blue that was used for the water opens up the design of the window rather than confining it inside a new color choice.
Lisa completed four Initial Panels while she was in class and they all came out perfectly. You might think that there's not much to making letters but you'd be wrong. It's all too easy to have bad penmanship due to poor cutting and/or grinding but Lisa gets top marks for each of her four panels!
Susan D was busy using her Kiln during the week and managed to make a picture frame (on the left) as well as a light switch face plate (on the right). I love them both and am always thrilled to see her using her kiln.
Here's Linda L's second Beach scene all ready for display. The blue water and the white sand highlight the tropical feeling that the palm trees bring to the finished product. But it's that cute little crab with the big wide eyes that really grabs your attention, doesn't it?
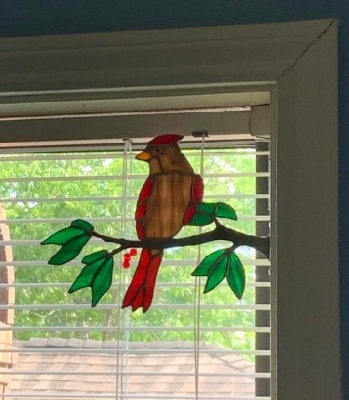
Here's a look at the latest Bird on a Branch that Susan D made. It's always nice to get a picture of a project that has been installed so we can get the full effect. Keep your eyes peeled and keep on scrolling because there's more to come.
MiMi's number 13 window lived up to its name in full because in the end she had to rout out the opening in the door that this was going in to make it fit. Much like Judy's Plate/Teapot Window, MiMi persevered and everything is fine now. But the most exciting thing about this window being completed is the fact that MiMi is about to start on her last window in the HUGE set of 14 windows!
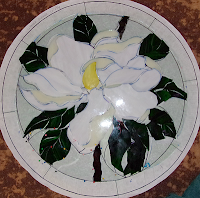
Kerry has got all of the glass cut out for his Circular Magnolia Window and is ready to begin grinding. The big question on circular windows is: Where do I begin grinding since there are no corners to place a square against? The answer is simple: Anywhere you want. You can start from the center or you can start from any outside piece. It really doesn't matter-- the only thing that matters is that you follow the outside circular curve perfectly.
Lara has begun her Peony Window and has used a mix of light pinks and iridized whites for the top flower. She's still undecided on what will happen for the bottom flower but I know that whatever she chooses will be perfection. She's only one week into the creation of this window and she's already made a ton of progress. She's also talking about using Fractures and Streamer for at least some of the background. Look out because I think that this is going to be stunning!
Somehow Steve managed to turn up enough pieces to make a second Sunflower Suncatcher. The first one is essentially completed needing only one more piece of wire to be attached before he can wash and hang it. The curves he's achieved on his wire work are mighty impressive especially when you take into consideration the fact that this is actually his first Wire Rodeo. He's even added lead accent ends to the wire which provides even more character to his sunflowers!!
Linda F started her Birds On A Wire Window and boy is she flying through this. All of her birds have been cut out and her color balance is perfect. On a window like this it's possible to have too many 'heavy' or dark colors on one side which can throw the piece off balance. Not so here because Linda's birds look very proportional and level to me.
Betty is working on what I call the 'pendant' Fleur De Lis pattern. It's really got a distinctive look about it that was actually inspired by a piece of jewelry that I saw on the internet one day. I added some inside cuts for some character but what really catches everyone's eye is the angled crossbar near the center which holds the three pieces together. It adds a definite flair of elegance to the design.
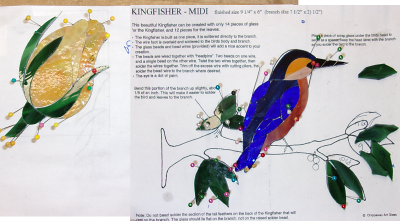
Stained glass feathers are an excellent way to use up scrap glass while making something both colorful and attractive. The real beauty of feathers is that you really don't need to follow the pattern 100% since it doesn't matter of they're 'off' a bit from one another. That said, Lisa's pair of feathers are indeed perfect mirror images of each other because she's following the pattern ever so precisely.

Mary has her Cardinal and Sunflowers Window well under way with the Cardinal all cut and ground. She'll be working on one of the flowers next and is using a technique I swear by to make this window. Instead of cutting out all of her paper pattern pieces she's only cutting them out one section at a time. In other words, so far only the paper pattern pieces for the cardinal have been separated. Now that the cardinal has been cut Mary will cut out the pattern pieces for one of the flowers and then trace them onto her glass. This is the best way to maintain organization and be able to move efficiently. Look closely to the right and you can see the uncut pattern pieces for the flower that will reside to the left of the cardinal still completely attached together.
Susan D has two more small projects almost wrapped up. This week she's cut and ground both a miniature Rosebud and another Bird on a lead branch for the her window. Apparently 'never slow down' is Susan's motto.
And look at what I just received in my text messages! Susan has completed the bird that she ground while in class and already has it hanging in the same window that her two other birds reside in. Stunning!
June has only a piece of two left to grind and then she'll be able to cut the final ECG lines into her Nursing Window. I have no doubt that June will be wrapping this when se returns because the final cuts are all straight lines that won't require any real grinding, just skimming, to get them to fit. That's the beauty of working this way.
Now here's something that you don't see every day-- it's the third and final Beach Scene with the crab tacked together but resting (floating?) on top of the water. You can see the opening in the sand below it where it will eventually reside. It already fits into place which means that the only thing that Linda has left to do for this is to wrap a few more palm fronds, tack this together, and then cut out her sky.
And again, the proof is in the pudding (so they say). Mary Grace's second Peacock window is moving along at breakneck speed since she got it almost completely ground in just one class. The second time always makes things go together easier! This speed is also a testament to how important it is to take your time when cutting your glass. Mary Grace will be wrapping and tacking this bird before you know it.
So then, we're going to be doing things a little different from here on out. A lot of times we start our posts with a stained glass tip but I've decided to share them as separate blog posts so that they can be searchable within the blog. It will also allows us to have a featured window on Facebook each week so expect a stained glass tip notification in your email inbox soon!
Paul
Bayou Salé GlassWorks


No comments:
Post a Comment