I promised you last week that your razor knife had one more secret that I'd share with you and here it is. Hold the back end of your cutter (the blue arrow is pointing exactly where you should hold on) and carefully pull the back end of the cutter off in the direction of the green arrow. (Make sure your blade is retracted so you don't accidentally get cut on the exposed blade.)
Depending on the razor knife you'll see a tab tucked away under the cover you just pulled off (or maybe you won't-- it all depends on the brand of knife you have). Gently pull that in the same direction that you pulled the back end off and you'll find extra blades! Yep, tucked away inside your cutter are replacement blades. If you don't see a tab just tip the razor knife backwards and the hidden blades will slide out.
To
replace the blade just pull the thumb slider all the way out of the
back end, remove the blade from it, and replace it with a new one.
Reverse the process that you used to disassemble your razor knife and
you have what is essentially a brand new knife!
So then, Kerry finished up the work on his Mardi Gras Fleur De Lis and ended his night with a completed window alas, with a break in it. :-( There's nothing worse than getting ready to wash your window and discovered a crack. Luckily even though it was a large piece (the top part of the FDL) it was a simple fix. In the end no one will ever suspect that there was a problem because it was repaired seamlessly.
Let's Santa Face Window came together wonderfully and even though this is her first real project with us (after the butterfly suncatcher) she already has a firm grasp of the skills and techniques needed to make stained glass. She's about to being cutting glass for a Dragon Fly Window next week and to be honest I don't think it can turn out any better than her Santa Claus did!
Linda F's colorful Fish window will get inserted into a metal frame and then be displayed proudly. This started out as a suncatcher and then Linda Added some background glass to it and determined where to add lead lines to make the glass possible to cut.You've got to love her colorful creations which always manage to turn heads!
Cindy turned up in class with a large, completed Peacock Suncatcher that she worked on during the week while at home. One of my favorite patterns, I've found that these sell almost as fast as you can make them and I know that this isn't Cindy's first Peacock so she surely knows that already.
One down and two to go. Cheryl's Wedding invitation has been 'boxized' and is now ready to be gifted as the best possible kind of keepsake-- a practical one! This not only preserves the invitation but also provides storage for just about anything. In other words, it's the perfect gift for a perfect couple.
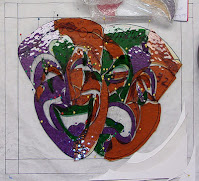
Susan R completed her first Mardi Gras Mask which she'll decorate further with green, gold and purple ribbons hanging from hooks that have been mounted in the corner edges of the mask. She's finished this in plenty of time for the holiday and will have a second one completed when she comes back in next week.
Betty finishes off the last of our completed projects this week and her circular Fleur De Lis is stunning. Everything lines up just right in this and next week we'll provide you with a tip so that any FDL's that you make can easily look as good as Betty's is.

Annette has begun work on a new project and it's a big one. This Monogrammed Transom Insert features six roses, two buds and is brought to you by the letter 'M'. So many of our students have noticed the pattern while in class this week and now that there's some glass cut and placed into position those students will now get even a better feel for just how exquisite this window will look when Annette finishes it.
Next we have another pattern that has been gathering a lot of attention. Ann's Lady Of Guadalupe incorporated some pieces that none of us were sure of. The pattern came from a pattern book and since I had a few questions about the image I did a little research and may now want to touch up a few details on the bottom. I'll know for sure once I see the full sized pattern again and then I'll discus it with Ann.
As promised, here's a look at all of the glass that makes up Mary's Butterfly and Morning Glory Window. It's a sweeping, graceful design that Mary has complimented by using Baroque glass, which is a swirling, textured semi transparent glass) for the background. She got it all ground this week and she's already begun wrapping her pieces in foil. Perhaps she'll get a border put on this when she returns (if she wants one).
Shelley's decided to put together another Mermaid Window and although the uncolored pattern was hard to see now that there are colors involved it all makes perfect sense. I will say this though: That mottled blue glass is a nightmare to cut when you're dealing with thin pieces involving deep inner curves. We had to haul out the glass saw so we wouldn't waste any more of this expensive but beautiful glass.
Now this is going to be as cute as a button. Betty's three birds already look fantastic just sitting here on their wire but wait until you see the twist that will occur when these are soldered into position. Be sure to come back in 2 weeks (Betty won't be here next week) to see just what that twist is!
There's a holiday on the horizon and Linda L has had to stop working on her three Beach Scene Windows so that she could get this Bunny with Eggs out the door in time for Easter. She got it all cut out and ground in just one class with plenty of time to spare so I have no doubt that this will be finished on time.
Linda F's Stained Glass Cross Heart was also completely ground by the end of the class day and now she's going to wrap and tack this together before cutting the trim. This will make the grinding and fitting of the trim go far easier since she'll only be dealing with one large piece rather than a lot of small pieces that can easily shift all over the place.
With everything ground save for the propeller assembly on her Plane Window, June has made incredible progress. She's a natural at grinding who quickly understood the importance of tracing one piece of glass atop another to achieve a perfect fit. When June comes back in we'll make a few more cuts to form the struts of the plane and then she'll begin wrapping her pieces in copper foil.
Meanwhile on the table next to June, Cindy was working on this amazing looking Nautical Themed Tray. There's really only the beveled edge left to attach to this and then Cindy will be able to wash and finish it all off. Outstanding! Now mind you, this platter is decorative, not functional. As our students know, we never hold a window like a platter because the weight of the glass alone can be enough to cause the glass to bow and then break. Putting any weight on top of this and carrying it horizontally would be disastrous.
Barbara really did a top notch job cutting out her Abstract Art piece. In fact, she did such a good job following the lines with her cutter than this was entirely ground in well under an hour. This is proof that you can actually save time by taking more time when cutting. Barbara has taken this home to wrap so it may very well be finished when we see it again.
After getting the yellow, green and brown cut out for the actual flower portion of her Sunflower Window, Judy then swung on over to the grinder where she began fitting everything together. It already looks like a sunflower which means that her cutting is very good. It won't be long before Judy starts wrapping each of these pieces in copper foil.
After completing her Wedding Box Cheryl began working on the borders that surround two Mr. Bingle cards which will be the tops of two more boxes. These are two different sizes so she can't just cut two of everything to fit. Still, these should go together fairly quickly. Perhaps we'll see one go out the door next week.
Sheri's Mardi Gras Masks aren't the kind to just cover the eyes--they're complete faces and she's forging along absolutely wonderfully with these. It's hard to believe that these aren't ground yet because everything already fits together so nicely. Once again this is further proof that if you take your time you save time. This is going to be a wonderful window. Of that I'm completely sure.
Linda L got as far as she could with her Easter Bunny (she forgot to bring her foil along with her) so she witched projects and resumed working on her Beach Scene Windows by grinding away that the pieces that she'd already cut. Next up for this project she'll begin cutting out the three different greens that will make up the fronds of the palm tree. Mixed but similar colors work so well together in trees and flowers (and skies, and water, and ground, etc. etc.)
With the background cut and ground for her Peacock Window, Mary Grace has a huge decision to make involving the curved top of her window. We'll go more into detail about that next week when we see just what she decides to do.
Even while experiencing numbness in her arm and hands, Melissa managed to get this decorative Fleur De Lis suncatcher cut out and ground. Once this is tacked together she'll set it into a circular piece of glass to make it absolutely rock solid which is something that this Fleur De Lis would NOT be if she were to leave it like this without any background glass.
I jumped the gun last week when I told you that Mimi was finished grinding her latest Hexalong Window. She was close but it wasn't entirely ground yet. This week I can safely say that it IS completely ground and that she has also started wrapping her pieces. She plans on having all of it wrapped when she comes back in and if so that means we'll most likely see this get some channel attached.
Here we look at the six Flower Angels that Susan D is working on. Three of them are now completely ground leaving only three left to go before Susan begins foiling and then soldering them all together. Actually, now that I think about it Susan said that these would be hang the other direction so they would be more flower than Angel. I do believe that I've posted the picture upside down!!
Lastly we have the second of the pair of Mardi Gras Masks that Susan R is working on. It's all cut, ground, and wrapped in copper foil which means that this will surely be completed shortly after Susan returns to class.
Things are
picking up again as more and more people return. We're
expecting to see Martha and Jan back in action next week so the shop will REALLY
be full!
Paul
Bayou Salé GlassWorks