It's come to my attention that a lot of our students don't realize that you can 'sharpen' your standard razor knife (or box cutter). For trimming foil I've found that a cheap dollar store variety of razor knives works just fine. The one thing you need to realize is that the blade MUST be extremely sharp or it will tear your foil rather than cutting it. I change my blade just about each day that I use it. Sounds expensive right? Nope, not at all. If your blade is extendable (as 99.99% of dollar store razor knives are) then you have multiple tips on each blade. In the picture below I've extended the blade revealing diagonal lines that allow you to break off a section leaving you with a new (and sharp) tip. Before I go further along I need to say that the first rule of these simple instructions is:
1) NEVER snap your blade without wearing safety glasses.
2) To break off the bad point simply extend the blade so that the first line is past the edge of the blade guard. The picture below shows exactly where that first line should be. That 'line' is actually a perforation of sorts.
3) Take a pair of pliers and line them up so that the edge of the pliers don't cross the line on the blade.
4) You should be holding the razor knife in one hand and the pliers in your other hand. Making sure that you are wearing eye protection hold the knife firmly while applying controlled pressure in a downward twist with the pliers. Do not make sudden snapping moves, just exert continuing pressure until the blade breaks off cleanly. If by chance it won't break try bending it back and forth (up and down) until it snaps off.
And that's all there is to it. Once you've done this a few times you'll find that you don't need a pair of pliers because most razor knives come with a built in tool for the job. We'll cover that and one other razor knife tip in our next post. If you thought this was amazing, wait until you see what we show you what secrets your razor knife hold when we return next week.
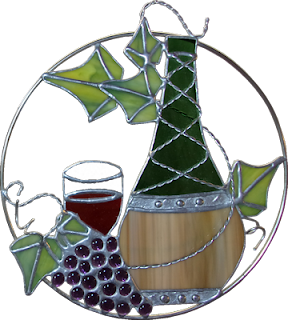
Okay then, it's time to address the fact that Susan R's Wine Hoop puts everyone who looks at it on Cloud Wine. I knew it was going to look great but all of that twisted wire work really put this over the top. This is what a Hoop Project is all about-- large wide open areas that would have to be cut into smaller sections with lead lines running all throughout if you were to fill the background with glass. Now that all of her work on this has been completed perhaps Susan will stop and smell the rosé!
Next we have Susan D's Cardinal Branch Decoration which is another stunning piece of art. Susan went for broke on this and had her bird and leaves attached to the branch before I even knew she was ready for that final step. And it was only when I went to take the picture when I saw that she even added little glass berries to the branch as well. Well, butter my butt and call me a biscuit because this turned out perfectly!!

Betty was as busy as can be and came in with four large Suncatchers ready to be soldered. She's made one of the Mardi Gras Masks that I haven't seen made for a least 5 or 6 years now. That said, later on in this post you'll see someone else working on Mardi Gras masks. Before we get to that I really want to point out how perfectly Betty's Knot Cross came out. Everything lines up so perfectly and the curves are all very fluid and graceful.
Now Cindy had this Pelican Suncatcher completed along with all of the other suncatchers she had finished last week but while we were getting it ready for a hook we discovered a break in the neck. So she took it home and back came in this week with it repaired and looking fine. We added a hook and Cindy has taken this bird to market!
Cindy also worked on her Nautical Themed Tray by getting the background cut and ground on the left side of the piece. By the time she left the Seahorse and the Life Preserver/Anchor were all tacked together. That leaves just the background of the dolphin on the and then a beveled border that frames it all. I have to say that the colors she's chosen are perfect all around!
June finished cutting all of the glass for her Plane Window save for the sun itself but that should take less than one minute to cut. She's got her water all ground and fitting together nicely and is working her way up from the bottom. Even though it isn't ground yet you can clearly see what the plane looks like. In other words, this is looking good!
Linda F began this beautiful multicolored Stained Glass Cross and I have a feeling that it's going to be very popular. Not only is it gorgeous- it's also a GREAT way to use up some of that scrap glass that piles up in everyone's workshop!
Steve is working on a Cheshire Cat that doesn't have a face so much as big expressive features. Yep, what you see is what you get. It's a great design and the gold tooth that he's added gives this grinning cat even MORE character (if that's possible).
Judy appears to be working from the outside inward on her Sunflower Window. She cut out both her blue sky and her Root Beer Brown border this week which means that the blank flower sections will be filled in with green and yellow when she comes back into class.
Susan R not only completed the wire work on her Wine Hoop but she also managed to get two Mardi Gras Masks cut out as well. She's already grinding the first one to get a perfect fit and I doubt these will take her long at all.
Barbara's got a nice little abstract Panel going on which is a stained glass rendition of a drawing that her brother's grand daughter came up with. When this is finished I'll give you a side by side comparison of the window and the drawing.
Once Susan D finished her Cardinal on a Branch she set herself to work on this pair of Flower Angels. I know she has two of them cut out but I also see two more heads in the picture which suggests to me that she may be making at least one other pair of these.
Lara had her Beach Sunset Window all ground and wrapped in foil when she walked in the door. She didn't have any borders cut yet but that was done during class as you can see in the picture below. Her colors are perfection and this window is now ready to be soldered. Pass me a Tequila Sunrise, please!
Meanwhile, Lisa's orange sky and red sun reminds me of Lara's window up above! The trees that are featured in this pair of windows are completely different and although they are both very calming, they achieve their effect in different ways. Instead of an alcoholic beverage, Lisa's circular Matsu Tree scene makes me think of meditation, Tai chi, and massages complete with aromatherapy. Alas, Lisa was possibly feeling a little stressed when dealing with all of those tiny pieces because what you really can't see is the fact that this tranquil scene is only 12 inches in diameter.
Let came in and got her borders cut and ground and then even managed to tack everything together. She's already begun soldering and really only has only the back of this left to go before she can take it home. She already has her next pattern in mind and that's a good thing because she'll be starting it next week after she finishes her Santa.
Is MiMi on a roll or what? Her newest Hexa-long Window Insert is all ground and ready to be foiled. That entertainment room is coming together quickly now!
Linda F also worked on her Fish Panel of which the front side is completely soldered already. I have no doubt that the back of this will be completed when Linda comes back in and that we'll be looking at this with some back lighting behind it when you see it in our next post.
Mary Grace's Peacock Window is well underway now that everything has been tacked together. She's traced out the pattern pieces for her background glass and I'm pretty sure that will all get cut out upon her return because there really isn't all that much background glass to cut.
Cheryl is well under way with her first of three Boxes. The larger Wedding Invitation top has been completed leaving only five pieces of glass left to cut for that one. Cheryl has decided (wisely) to go with single borders for the two smaller Mr. Bingle boxes and those will be under construction before you know it.
Mary's Morning Glory and Butterfly window is all cut out but she had packed it away before I could get a picture. Well, here's a look at six of the pieces anyway! Next week she'll be grinding so she won't be able to disassemble the entire project which means that you'll get a much better look at what she's making when we return with our next post.
And there you have it!
Paul


No comments:
Post a Comment