Monday, March 14, 2016

The Rabbit Died


Let's start things off this week with some basic cutting rules.  Curves are the worst part of stained glass.  People rarely break glass when they're making a straight cut-- it's always a curve that causes all the trouble.  There are numerous curve tips I can pass along but the most basic one is what I see people ignoring most.  In the diagram below you can see a series of green lines and red lines.  The green lines represent curves that are cut-able in one shot.  The red lines are curves that should never be taken in one cut.  The difference between the red and the green curves is easy to spot once you notice (or have me point out) that the red curves all double back on each other.  In other words, the ends of the curves have your cutter coming back at you rather than away from you.  Now I'm not saying that the red curves are impossible to cut in one shot, but I am saying that they are far harder to successfully cut unless you are very comfortable with you glass cutting abilities and you can precisely set your running pliers set screw.   Above all remember that we are dealing with glass and that a gentle touch is required at all times.

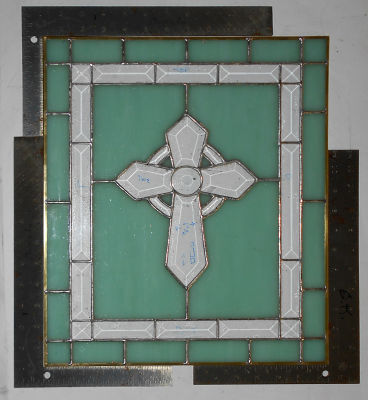
Ok, now that we know what you should and shouldn't attempt while cutting glass let's look at our first completed window of the week which was made by Brenda.  Her latest Beveled Cross Window is nothing short of stunning.  Nice, perfect straight lines are what make this window look so great. Windows like this are all about precision because if your lines are off then the window will be cock-eyed.  As you can see, there's none of that here.


Sue came in with the notion of getting two Shamrock Hat Lawn Ornaments completed and by the time she left she accomplished her goal.  True, she had some of this cut out before she came into class but the amount of work she achieved while in class was VERY impressive.  Two completed projects in one class is always an astounding feat no matter how much of a 'head start' you have.


This week we introduce our newest student Jan whose butterfly is her first project with us.   Things went really well with Jan and her butterfly is nice and symmetrical.  She plans on making a Geometric Window with bevels and straight cuts when she returns and we'll see her progress on that in our next post.


We have another Beveled Cross Window to look at this week and this one was made by Linda F.  She used all clear textured glass for this design starting with bevels for the cross, glue chip for the background glass and ending with hammered glass for the border.  It's a stunning window made by a student who really knows her way around a piece of glass.


This is Mary Grace's latest American Flag Lawn Ornament which is easily her best one yet.  With her working in her new work shop at home she's forcing herself to push beyond her comfort limits.  This is paying off in spades for Mary Grace as you can see in the picture below.


Our last completed project this week is Betty's version of the Easter Bunny that Linda F finished two weeks ago.  While Linda's was made as a window, Betty's is a stand alone bunny that will either hang in a window or rest in an easel on a table. The pattern was found on the internet and when Betty made hers we had an incident where the hat fell of of the Rabbit.  This will happen whenever you have a straight line in stained glass and normally I catch these design errors but this is one that got past me.  We fixed it by adding some wires on the back side of the hat and now this bunny should be nice and  secure.


Becky S now has all of her Spiral Window cut out, ground and wrapped!  It looks beautiful already and the missing pieces that you see are going to actually be filled with lead.  It's a nice technique that's really going to make this window stand out. 


Ann has the center portion of her Cross Transom Window all ground and ready to be tacked together.  Once that's done she'll move along to the border which is honestly another four stained glass windows in themselves.  It already looks wonderful but it's going to be another one of Ann's standout windows when it's completed. 


Brenda's Justice of the Peace Window got its background glass cut out this week and there's only one more piece left to grind before she wraps it, tacks it, and then adds a border to this piece.  Brenda cut her background out of one solid piece of glass so that the grain flows perfectly across the window.  It's a nice touch that should be used whenever possible.


Gale has come back to class and she's not wasting any time at all.  She's started this Magnolia Window that Becky S designed for her and is moving right along on it.  All the white is cut out and she's got her green leaves traced out already so this is almost together already.


After more than a year of being on our list, Judy showed up for her first official weekly stained glass class.  She's taken numerous Weekend Workshops with us so she already has a good grasp on how to make stained glass.  Because of that we skipped the beginner butterfly and Judy started working on this 3D Butterfly Lawn Ornament instead.  It was a good call because she got this all cut out, ground, and even wrapped before she left!  All of that work in one class is pretty amazing.  This is another project that will be completed next week.


Linda F's Eagle and Flag Window is another in a long line of projects that saw a lot accomplished this week.  With all of her glass now cut and ground she only needs to finish wrapping these pieces and then this will be ready for solder. Linda has certainly come a long way!


Carol's bevels have arrived!  She's got two of these now and she already has one all cut out and tacked into place.  That means that she only has one left to go on this project.  She's going to add three more borders to the other Beveled Fleur De Lis Window that she made a few weeks back so she can use it as a stand alone window.  I'm sure we'll being seeing that before you know it.


Bonnie's Easter Bunny is being made with a little knowledge that comes from Betty completing hers first.  We now know where there is some structural instability in this design so we'll take measures to prevent this rabbit from losing it's ears.


The Swirling Flower Window that Terry is working on is almost ready for solder.  It's a large window and since Terry hasn't been able to easily transport it she's been leaving it in the shop  between classes.  Now that it's all cut out she's decided to brave taking it home so she can hopefully get some of it wrapped and then tacked together.


Vickie got the rest of her background pieces cut out for her Geometric Window and has even put a huge dent in grinding it.  As you can see the bottom half fits together beautifully.  It looks like she just needs to get the upper left corner and a few pieces in the immediate center fitted and then she'll be wrapping this.


Myrt's Cross De Lis Window is all cut out now.  She tacked the FDL, cut her background, ground it and then got the background wrapped as well.  She picked out glass for her border and we cut the strips into the correct lengths.  She only needs to cut down the her border strips into four pieces each and then she'll be ready to wrap and solder this together.


Sheri's made excellent progress on her Stylized Fleur De Lis Window and it's all ground now.  It's hard to tell now while it's resting on the table but there are actually three different shades of blue glass used in this design.  Once it's hanging the shading in this window will be easier to see.


Speaking of Fleur De Lis', Cindy's LSU De Lis is almost completely cut out now.  She's been working on grinding it and she's really made a lot of progress.  It looks to me like we'll see this window being wrapped when she comes back in.


Betty's got a second Jester in the works and it's ready to get it's face cut out of glass.  She's toying with the idea of giving this version black eyes (as you can see in the picture).  Once the face is cut out  Betty will have a better feel for how the eyes look and we'll see how that all works out when we come back in our next post.  


Jeanne came in and resumed work on her pair of Beveled Crosses.  By the time class was over she had both of these wrapped and tacked together.  It looks to me as though she'll easily complete them when she returns to class next week.  She's used rough rolled glass for these which will sparkle nicely when they're held up in the light.


We had a lot of heavy rain warnings and more than a few students were wary about making the trip to Bayou Salé.  However, even though we were a few students short this week we certainly had more than enough projects on the work tables to keep us busy. Next week should be clear and sunny so expect to see even more windows when we return.

Paul


Sunday, March 6, 2016

Only 7 Chips?


We have another quick tip this week that most people don't think about so I'm putting it front and center here.  Almost all the glass that you use has numbers on it to identify the type of glass, the price per pound, and the price of the sheet of glass.  These numbers are usually written with a marker or paint pen which will wash off easily enough when the project is completed.  The thing is, you should always remove these numbers from the glass BEFORE you wrap your pieces with foil.  If you cut through the numbers (or lettering) as shown in the piece below and your glass is transparent you can easily have problems later on down the line.


If you foil your pieces while there is still writing on the glass you can't remove all of the marker later because foil will be covering some of it.  But who cares about what's under the foil, right?  Well, if the glass is transparent these marks will be visible when you turn the glass around as the picture below reveals. Be sure to remove all the writing on your pieces BEFORE foiling your glass.  Markings caught under the foil are a sure sign of a beginner stained glass crafter.


I'm very excited to announce that Janet has completed her first lamp and that even she was amazed at how easy it actually was to make.  Of course Janet has considerable stained glass skills so there's that to take into consideration.  This type of lamp is called a Panel Lamp which means that it was made out of a series of identically sized flat panels.  It's a great first lamp to make and Janet's is certainly a showstopper this week.


Cindy came in with a bit of a dilemma this week.  She has business cards all over her place of business with no way to keep them organized.  She brought in four colors of scrap glass that she had lying around and within 15 minutes I showed her how easily a business card holder could be assembled.  By the end of the class she had three more completed and I'll bet that she could easily make 10 more if she wanted to next week.  These are wonderfully functional and even fun to make (as Cindy said herself).


Rowena made this Peacock Suncatcher that's really gaining in popularity.  And without a doubt, Rowena's version of it may sway even more students towards making it.  I've always found this to be a fun project to make and I've always found them to be a good seller.


Sue's finished her Winter Window which was made in colors that perfectly capture the season.  The center text portion of this window is barely 12 inches wide so when you look at all the pieces in this window be sure to realize just how small they are, especially the letters.  Sue's precision cutting paid off in spades with this window and she even figured out how to use a strip cutter all on her own for the borders!


Linda L put the finishing touched on her Wiener Dog Lawn Ornament and then turned her attention to completing her Boy and Girl Baby Suncatchers.  All three are wonderful but those babies are adorable!  They're only eight pieces of glass so they can be done quickly and easily and Linda certainly proved.


Carol finished her version of the Cross De Lis and I just can't find any fault in it.  I never even have to touch anything up on her work any more and as you can see from the picture this is flawless.  Great work!


And speaking of Fleur De Lis', take a look at Shelley's.  She did a wonderful job on this from start to finish.  It's perfectly symmetrical, perfectly cut, and perfectly soldered.  The FDL itself is bold in its color with the double border not drawing any attention away from the subject itself.  This is perfection all the way around.


Ann has the inner section of her Transom Window all cut out and basically ground at this point in time.  She has some tiny pieces in that cross and she handled it almost effortlessly so I'm thinking that the out border section of this window with its flowing ribbons won't be any problem at all for her.  Ann has certainly come a long way in her stained glass career.


Bonnie has all of her Study In Straight Cuts wrapped and ready to be tacked together.  When she comes back in I'm sure she'll begin soldering this.  Since this window has no curves in it at all I suspect the soldering will go VERY quickly.  Bonnie will just need to remember to ease up on her solder flow before reaching every joint (and there are a lot of them) to prevent solder build up in the corners.


Brenda's Beveled Cross Window is all tacked together and she even got the front side soldered.  She needed this window done quickly and she's done it.  Look to see this among our completed pieces when we return with our next post.


Becky S has almost all of her Spiral Window ground and has begun wrapping it.  I didn't get a finished picture of how far along she is on the wrapping but it's mostly completed.  If she's going to use lead covered glass for the background sections then she'll cut out her four curved borders before she does her fill ins-- and we'll explain why in our next post.


Charlie has the first side of his Bird of Paradise Window soldered and what a great job he did on it.  Charlie's one of our newer students but his work on this project shows that he certainly knows what he's doing.  This is a huge window and this side alone took almost two rolls of solder to complete.  That means that this window will have close to four pounds of solder holding it together! 


Linda F's Beveled Cross Window was completed just before class ended so she didn't get it washed or colored before taking it home.  But she's promised to bring it back next week so we can give it a proper send off with a beautiful picture.


Barbara took classes with us a long, long time ago and has decided that she just couldn't live without us. :-)  The first thing we did was to go over the basics of cutting again and when I suggested that we continue with a butterfly she asked if she could do one of the larger 3D Butterflies which I had no objection to.  The cutting went so well that by the end of the class she had everything cut out and more than half of it ground.  She's taken it home to continue grinding so this may very well be another project that we see completed next week.


Terry's Spiraling Flower Scene is fitting together wonderfully now that she's grinding and she says that when she leaves class next week she plans on taking it home with her so she can begin wrapping it.  There are still borders to add but the bottom half of this two panel project is nearing completion now.  Other students have certainly been noticing it sitting there on its shelf and are even considering making it.


Sheri, our newest student, completed her butterfly last week and decided to make a Stylized Fleur De Lis Window as her first official window with us.  As you can tell from the picture below, things went wonderfully.  She picked a very difficult to cut, heavily textured glass for the darkest blue sections but she still managed to get all of the FDL cut out.  She'll be working on the grinder when she returns to class and then you'll really see this fitting together.


Martha may have completed her two Duck Windows but she still has two irons in the fire.  She resumed working on her Seafood Window by finishing up her Oysters leaving her with just four Crawfish left to go on it.  But while she's doing that she's also started the Fleur De Lis Window you see on the right.  The glass that she picked for the FDL was only big enough to finish the job IF she didn't break anything, but as bad luck would have it one piece broke leaving her with a bit of a problem:  She could wait for new glass to arrive (which may not even match what she already had cut out) or she could alter the pattern.  So altering the pattern is what she did.  You can see where the arms don't go as high as the pattern originally called for but in the end that won't make a difference at all.  And handling it this way ensures that the glass matches through and through.


In order to move along to her Transom Window design Rowena was forced to change the bevel cluster that she wanted to use.  She was able to turn up a replacement cluster that is VERY similar to her original pick and is only just one inch shy in its width.  In the picture below you can see that she has the pieces all wrapped and ready to be tacked together.  You can also see the original bevel pattern traced out in marker under the new bevels pieces.  All in all, not that much of a difference at all.  

NEWSFLASH:  Rowena's original choice for the bevel arrived at our door this weekend so it will be interesting to see which one she decides to go with when she returns to class.


Betty is working on her larger version of Linda F's Easter Rabbit as well as another Jester Suncatcher.  Her version of the Rabbit is large enough that she was able to actually cut glass pieces for the eyes rather than having to paint them on.   (We have no choice but to paint a mouth on though.) Two at a time is how Betty normally works and as you can see these two projects are very close to being completed.


Linda L added a background to her Air Force Window this week and has the red border pieces cut out as well.  Her straight lines are truly straight and everything is nice and symmetrical. And that's the way (uh huh, uh huh) we like it (uh huh, uh huh)!   Chalk this up as another finished window to look for when we return next week.


And this is Myrt's Cross De Lis Window that she's literally flying through.   She's wrapping her pieces already so that means this will get it's background cut out when she returns.  And if things go REALLY well we'll have a border cut out for this as well.


Carol started this Bee Lawn Ornament while she was in class and as you can see there are only three pieces left for her to cut out and grind before she can tack this together and then solder it.  These always look great especially when you see them in person since there's nothing flat about them.  Yep, this Bee will be 3D!


Then there's Susan who's putting all of her eggs in one basket, And all of them means eight of them.  Or was it seven of them?  No, I distinctly remember that I could have seven chips so that must be why the number seven is stuck in my head.  Regardless (or irregardless), I now realize that these two eggs remind me of Carol's Bee from up above.  Just change the white to black and add some wings, right?   Eggs-- go figure. I think I'll eat a bag of chips now.


I guess it's time to wrap this up and get ready for our next batch of classes.  As you well know by now there's always something happening here so come back again next week to read all about it.

Paul


Tuesday, March 1, 2016

My Little Tool

We have a very important, yet quick and easy tip for everyone out there this week and it doesn't even need a picture to help illustrate it.  Before tracing around your paper pattern pieces onto a sheet of glass make sure to wipe the glass off with a *slightly* damp paper towel and then give it 30 seconds or so to dry.  You'll find that the marker lines won't wipe off nearly as easily with your fingers while you're cutting and that your marks will last longer while you're grinding as well.

Now I really love our first finished piece-- Natalie's Pelican Window was inspired by a painting that she saw and her choice of blue/green background glass really makes this stained glass window resemble a painting.  The double border certainly doesn't hurt either since it doesn't take the viewers eye away from the Pelican itself.  Natalie did a great job on this all around.


Becky B's Horseshoe Cross was also finished this week and I'm happy to tell you that her taking the time to slide the square bevel to the true center was the right thing to do.  I never really took a picture of it when it wasn't positioned correctly but trust me when I tell you that it was distracting.  Since I was the person who misplaced it you now know with out a shadow of a doubt that we all make mistakes.  Becky's soldering on this really impressed me because when you get right down to it Becky hasn't had much soldering experience with us yet.  What a wonderful project this turned out to be.


Carol only has one more of these Beveled Fleur De Lis sections to go now but when you see that one completed it will have the border on the left side of the window.   Carol's still not sure if she likes this FDL only because it's smaller than one she originally wanted to use.  Framing it with a textured glass brought it up to the correct size but it isn't nearly as wide as her original pick.  Those FDL's are still on back order so time will tell us what Carol decides to do here.  Myself, I think this looks fantastic.


Cindy finished her pair of 3D Butterfly Ornaments and like everything that Cindy touches, they turned out beautiful.  This is a nice variation on the standard Butterfly Suncatcher which looks great spinning away in a window.


Speaking of Butterflies let's look at the Butterfly Suncatcher that our newest student, Sheri, made this week.  Sheri had never cut glass before but caught on very quickly.  She also followed the pattern lines perfectly which reduced her need to spend a lot of time at the grinder.  At the end of the day she walked out the door with this beautiful pink Butterfly.  I know we're going to see great things from Sheri and can't wait to see what they will be.


Mary Grace's second Easter Bunny Lawn Ornament shows us that she's truly perfecting her stained glass technique.  This one is much smoother and the eggs are more consistent.  She says she has one more of these to go and then she'll be done with Rabbits (until next year?)


Rowena's latest Butterfly Lawn Ornament proves that she's got the construction of these down to a science now.  She always makes perfect butterflies with minimal effort.


This is Betty's third clear textured Fleur De Lis Window and for some reason that I can't figure out the textures have photographed beautifully here. She's been using different texture schemes with each of these window so although they all look similar they are anything but identical.


Becky S's Spiraling Geometric Window is REALLY coming together now as she has a good 75% of it ground and fitting together.  She's decided to change up the center section of this by using some glass globs but the really fun part will be when she adds the leaded sections of glass.  And it looks like we'll be seeing that real soon now.


Carol also worked on this Cross De Lis Window which only needs some solder on it's back side now.  Her attention to detail is top notch and this window certainly proves that.   Hopefully we'll get to see this lit up when she comes back in next week.


Now that Cindy finished her pair of 3D Butterflies she's resumed work on her LSU Tiger Fleur De Lis Window.  She got quite a bit completed during class this week and is moving at a nice quick pace.  She'll be wrapping this before you know it.


Janet's Lamp was all ground and wrapped so before she called it a night she soldered the front sides of all six of her panels.  She's taken them home to flat solder the back sides so we can tack these together and finish it when she comes back in.  This lamp is practically complete at this point in time because there are technically only six lines left to solder!


Jeannette's Peacock Window is being made in two sections that will soon be joined together because she's managed to pretty much complete the top sectioned this week.  That means that she'll most likely be cutting background when she returns.  This is really coming together now and she's quickly approaching the home stretch.


Ann is making excellent progress on her Cross Transom Window.  With the center section completely cut out she has begun grinding the innermost cross section. Before she cuts anything else Ann will wrap and tack this together to maintain a perfectly rectangular window.


Mary Grace also has two of the four sides of her Candle Holder ground, wrapped and tacked together.  She's halfway to the point where she'll join these together and once they're joined this will essentially be complete.


Brenda stopped working on her JP window so she could get this Cross Window under way.  With all the glass cut she only needs to grind this before she can begin wrapping and soldering.  This will be finished before you know it.


Linda L came in with her Dachshund Lawn Ornament all cut out and put together save for the front leg.  She wasn't sure if she should tack the leg on top of the body or if she should go the distance and grind out an opening for it.  In the end it was a no-brainer:  She ground out a section of the body and then soldered the leg into place as she would any other piece of glass.  The reason she handled it this way was was due to stability.  The leg would never have been firmly attached by simply tacking it on to an outside lead line and would have likely pulled loose while being exposed to the weather.

Linda also cut out and ground these two cute Baby Suncatchers as well, which she's taken home to wrap so she can have them completed when she returns.  


Vickie is working on a Geometric Window and it's really coming together nicely.  She has just three more pieces of red glass to cut and then she'll be moving on to her background glass.  That background glass will be what she works on when she returns to class in two weeks.


Martha's been busy picking out colors and working on her Oysters this week.  She has a few iridised pieces cut out in a very tasteful way.  This is looking great already which proves that Martha can easily hold her own when it comes to making stained glass.


Myrt's got her own version of a Cross De Lis under way and it's taking shape in an astoundingly speedy mannor!  We saw her cut and grind the cross portion of this window last week and this week she's managed to almost complete the Fleur De Lis portion of it as well as having it ground.  I'm fairly sure she'll get this wrapped when she returns.


The bottom panel of Terry's Spiraling Flower Scene is pretty much cut out and she's decided to take a break from cutting and move onto grinding for a while.  It's really coming together now and it won't be long before Terry starts wrapping and tacking.


Sue's Winter Window is all ground and fitted together.  She even has the center portion of it tacked so she is ready to add the two borders on the top and bottom of this panel.  These will surely be attached next week and maybe even soldered.


Bonnie's Study of Straight Cuts is almost completely ground at this point in time and she has a great deal of it wrapped as well.  I suspect that it will only be one more week before Bonnie starts tacking all of this together.  Wrapping as you go on something like this helps prevent things from growing and changing the proportions of the window as the foil makes things expand.  It's without a doubt the way I would handle this.


Susan's Easter Eggs are moving right along and she's even cut out a few more of them including a second variation of the hardest one with the 'teeth'.  I'm pretty sure all but one of these are ground so Susan may be assembling these upon her return.


Paula is about to begin working on our famous New Orleans Scene Window that she's making some modifications to.  She has most of it mapped out and has her pattern traced out as well so be prepared to watch this scene come to life in a somewhat new way over the next few weeks.


Due to the storm that occurred on Tuesday our students were flying out the door to their cars and I managed to miss getting a picture of Linda F's Cross window.  Below is a quick sketch of what her window looks like at this point in time. 


I'm sure we'll see an actual picture of Linda's completed Cross Window when we return next week so be sure to come back to check it out.

Paul
Bayou Salé GlassWorks