Monday, November 6, 2017

The Colorful World Of Black And White

Your windows will only ever look as good as your pattern.   Sure, you can make minor changes 'on the fly' but there's only so much you can compensate for.   When tracing out your pattern onto poster board it's so very important to take your time and to follow the lines on the original pattern as closely as possible.  Rushing through this important step will almost always cause your window to suffer.  In the picture below you can easily see how the hand traced copy (on the right on the florescent yellow/green paper) follows every nuance of the original pattern.   It your pattern pieces start off badly, your window will surely finish that way as well.   And pay attention to how you cut up your paper pattern with scissors as well.  Your window will only ever look as good as your individual pattern pieces look.


Well now, Jeannette completed her Donald Duck Window and as I always say, you just can't lose with a comic character window.  They make perfect stained glass subjects due to the fact that they use a limited color pallet.  Jeannette did most of the work on this while at home bringing it in only to solder.  The end result is truly brilliant, wouldn't you say?


Terry's Poinsettia Wind was completed this week and what a burst of color it is!   Her use of glasses with varying degrees of transparency really makes this window sparkle when it has some light behind it.   The pieces are plenty but the troubles were few for Terry as she completed this in record time.


Betty finished her Geometric Window this week and the blue and clear textured glasses that she used combine to make a very striking window indeed.  All is symmetrical in her work making this a great example to show how precision work pays off.


Tasha finished her smiling Teeth Window and although it's an odd subject matter it's a wonderful window when it's completed.   This is going to be a gift for a friend who's a Dentist so in the end it's the perfect window for that application.


Linda L made these two Cardinal Suncatchers quickly and efficiently.  Everything from the cutting to the soldering flows together masterfully, and that's a fact!


Sheri completed her second Crawfish Panel and did something slightly different with this one.   As you may recall she used a painting as the inspiration for this design but after the first one was completed it was pointed out to her that the legs of the crawfish were actually coming out of the wrong place.   She's re-positioned the legs on this second window and all is right with this beautiful Crawfish.


Melissa completed her first Cross Suncatcher while she was at home and brought it in for some VERY minor touch-ups and a hook.  The end result is a beautiful cross that Melissa already has more of in the works (as you will see later on down in this post).


Tracey completed her first Butterfly Lawn Ornament this week and it turned out beautifully.   The wings perfectly aligned down the center perfectly and her soldering was out standing.  Next up for Tracey is a 3D Bumble Bee!


This is Lara's interpretation of Van Gogh's Starry Starry Night Painting.  It was a little overwhelming starting it but by just working on one color at a time you can see that Lara has made wonderful progress on this in a short amount of time.  In case you aren't familiar with the original I'll post a side by side when this is completed.  It's already looking fantastic.


Roxane pretty much worked on her own this week and when I checked things out near the end of class I was amazed at how much of the grinding she had completed on her Compass Rose Window.   Roxane fully understands the importance of grinding within the lines as this window plainly shows you.   This will be a delight to see completed and I don't think that will be too long from now.


Terry has also been hard at work on her latest Caduceus Window.   Yet another hand drawn design, Terry has a full command of all the required skills needed to make stained glass.


Linda L is making great strides on her Mickey Mouse Easter Window  with just one day of work on it.  She's picked out some wonderful colors for this and you can already see how it will all come together.


Jan's making a beautiful Mother Mary Panel and she has it all cut out, ground and ready to be wrapped.  I love the look of this and may end up making one myself.  Once this is tacked together Jan will add a background glass and a border to 'square' it off.


Linda F now has all of the glass cut for her Nouveau Tulip Window and she's already midway into the grinding process.   I'm thrilled at how Linda knows that when something doesn't follow the pattern on one side it has to not follow the pattern on the second side as well.  It's only a mistake if both sides don't match!


Next up we look at Susan R's Fall Harvest Pumpkin Window.   It's all been tacked together and she's currently working on her multi-colored corn kernels.   These really look great and the best thing is that she didn't have to cut them individually because she found a container of glass beads at a local hobby store.   She still had to wrap them and she needs to cut a few of them in half to fit perfectly but that's easy compared to the work that she would have had to do if she hadn't found the beads.


With her grinding coming along every bit as great as her cutting, Mary Grace's Tree of Life Window is certainly well on its way to becoming her defining piece.  I can't begin to tell you how impressed I am with her progress on this.


Fran was back in this week and quickly resumed work on her Fish Window.   Now she has the water cut out and although you cant see it while it is lying down on the table, the density of the glass varies in accordance to the depth of the water.  It's little details like this one that helps draw a viewer to study a window more carefully.   Little things mean a lot.


Bonnie has a number of irons in the fire but this week she spent time making these three Suncatcher Tree Ornaments that incorporate bevels and two pieces of glass.  We'll surely see what these look like completed when Bonnie comes back in.


Betty also resumed work on her Rose Window and she's up to the point of cutting out her background.  With her borders tacked together she will be able to start grinding this when her last background piece has been cut.


Tasha not only finished soldering her Smiling Teeth Window but she started on these two Beer Glass Suncatchers as well.   These are being done as mirror images and the pair will be gifted to someone who will surely appreciate this wonderful design.   I like how the suncatcher hangs at an angle but the beer itself stays level.   I believe that is what makes these two Beer Glasses look so realistic.


Cindy's Mermaid Panel is ready for solder and that means that it will be completed upon her return.  You can't see them now but there are tiny little letters fired into the sailors cap that she's wearing.  We'll show them to you in a close up when you see this in its finished state next week.


Susan D has moved on to a new project this week which is a large Santa Suncatcher.  She's started this by working on Santa's face because it's the hardest part of this design.  Everything from the neck down should be a piece of cake for Susan.


As I said earlier, that Cross that Melissa made at the top of this post was just the tip of the iceberg.   Here you can see that she has three more already cut out and ground.   And there are even more just cut out waiting to be ground.  Melissa is becoming a Cross Making Machine!


Myrt got all of the glass pieces in her Ribbon Bordered Fleur De Lis Window wrapped and tacked together.   After that she then picked a color for her final border and got that cut into its individual pieces.  Next she'll skim these and wrap them, allowing her to begin the soldering process for this window.


Martha has the glass for her two Cross Windows all cut and ground so she's taken these home to possibly start soldering them during the week.   These need to be done by the end of her next class and I have no doubt that she'll be making that dead line.


Rowena's 'C' window was completed by the time class was over with but there wasn't any time to wash and color it so that's what's on the agenda for Rowena when she comes back into class next week.   This window is a done deal so expect to see it hanging when you see it again.


There's only the soldering left to go on Brenda's beautiful pair of Transom Windows.   Hopefully the next two weeks will be nice, easy, and relaxing for her as she does another one of her wonderful soldering jobs.


Shelley is making her own Tree Of Life Window and this week she got started by tracing out her pattern and then distributing all of the leaf pieces into 7 different piles.   Each pile will be a different color and how it turns out is how it turns out.  You can't lose with this pattern and spending too much time deciding what color goes where is only an exercise in futility.


Next up we have the Bee that Tracey cut out and ground in just one class.   Don't forget that she also soldered her Butterfly as well making this past Wednesday one VERY productive night.  She's doing wonderful work on this and it may very well be completed when we return next week.


Becky had an idea that she wanted to use baroque glass for the border on her Geometric Window but the color she was originally thinking about didn't really work with the window when we put the glass next to it.  in the end this was the hands down winner.   We may even get to see this cut for it when Becky returns.


And there you have it.  This time change is really messing with my head so if you find too many typo's in this you know what the problem with me is!

Paul
Bayou Salé GlassWorks

Monday, October 30, 2017

The Queen Of Color


First up in this post we have Shelley's newest Kokopelli Window that was completed this week.   For the record I think it's a very stunning window indeed.  I really love her glass choices and how each of the three glasses that she's used tie into each other.  This is truly a window that flows.


Now you may have noticed that we're changing things up by posting our tip AFTER a featured Window of the week.  So then, you may be asking,  why have we alteration our old look for this new format?  Well, due to a change on Facebook the first image in our post becomes the featured picture for the link.  This has made our Facebook posts less than stunning lately (since they haven't shown our student's work) and hopefully this will fix the problem.   

So then, this week's tip is about curves.  When working with stained glass curves tend to get lost in the lead.  Whenever I work on windows I exaggerate my curves.  Most times I do this by giving an extra push while at the grinder to the center of my inside curves.   When I'm actually drawing out a pattern I always exaggerate my curves.   Look at the drawing on the left which I found on the internet.   It's certainly a flower but it just doesn't flow.   The image on the right was adjusted by tracing over the pattern and adding curves to each line.   I'll admit that I'm not thrilled with the end result and would like to take another shot at it but I did this at 10:30 pm trying to get a tip ready for this post.   Still, I have to admit that it does look better than the original design.   So flesh out those curves by leaning into them while you're at the grinder-- your windows will thank you!


Next among our completed projects is Bonnie's Thanksgiving Turkey Suncatcher which she finished well ahead of Thanksgiving. Her colors are flawless, the pattern is flawless and her work is meticulous.   Should she decide to do the detailed Last Supper Window that  she is thinking about making, well, I know all will be fine.


Sheri made this wonderful Crawfish Window based on a whimsical painting that she brought in.  If you ask me, it's  the wire work that really sets it off.   She's got another almost completed and we'll see that later on down in this post.


Cindy completed these two Beveled Heart Suncatcher pieces and the beauty that you see in them comes from their simplicity.   How can you not love these?   As you may or may not be able to see, she's colored one of them in copper (on the right) and left the second one in silver (on the left).


Linda F completed her Noel Window and what can I say other than , "It's perfect."  She's done a top notch job with this and her cutting skills are formidable to say the least.  


Linda L completed her second LOVE Window and like the first one, it's a winner.   She's also started work on a new Mickey Mouse Window which we'll look at next week.  I will reveal this much-- it's Easter themed.


Lara is working on a Starry Night Window which might seem a little intimidating but she's already got a lot of it cut out.   Shades of blue will be predominant in this window and I know that Lara will be quite pleased with it when she's got this under her belt.


Beth has decided that the multi-piece Tree that she traced out last  week might do better after she gets a little more familiar with the Stained Glass Making process.   So the Tree pattern that you saw last week is now something for the future.  In it's place she will be doing a wonderful Dragonfly Window which will show her how to assemble two separate sections of a window and then combine them into one.  This is her background (which she cut out wonderfully but which doesn't 'pop').   Next week she'll cut out her Dragonfly and begin grinding.


Betty has started this beautiful Rose Window and since she's using a beveled outer border we have assembled the double border first.  She still needs to grind, wrap, and tack the inner border but when that's completed she will have the opening ready for the center Rose portion of her window.  Doing it this way ensures a perfect fit.


Angie's Calla Lily Window got its double border attached as well as some brass channel to surround the window.   The only thing left to do is the soldering which shouldn't take Angie long at all.  Slow and steady wins the race and when it comes to soldering you just have to realize that if it doesn't look good while you are doing it, you're probably moving too fast. 


Terry began this Poinsettia Window while she was at home during the week and I must say that she got a whole heck of a lot of work done on it!   All the pieces that you see have already been cut and ground so Terry was able to spend a relaxing class just sitting down and foiling her pieces. There's going to be a bow in it's upper right but Terry doesn't like what she drew up will be changing it after this tacked together.


Roxane's Nautical Compass Rose Window is already all cut out.  She won't finish cutting the final border pieces until the rest of this is ground so we can make sure that it's a perfect circle when it's completed.   Any adjustments that need to be made will happen on the final border.


And speaking of nautical items, we next look at Cindy's Mermaid Window which will surely be completed when she returns.  It's already wrapped save for the final border  which we'll attach as soon as Cindy walks in the door next week.


Tasha's Smiling Mouth Window got ground while she was in class and the valuable lesson that Tasha learned was to not mix up your teeth when you move them around to grind your lower lip!   All worked out fine though and Tasha's window already makes me want to smile.


Becky S has been busy grinding away at her Geometric Window and by the end of class she had it all ready for foil.   This is another window that will incorporate solid lead pieces so some of the glass that you see below will be completely wrapped in foil.  You'll see how that works out very shortly.


Barbara is also doing very well at the grinder.   With her Tulip Window  almost half way ground but she's wondering what happened to a number of pieces that are mysteriously missing.  All I can say is that this is a common problem when dealing with so many tiny pieces.   Sometimes things get tossed into the trash unknowingly.   The best course of action when his happens is to simply continue grinding what you have and then the missing pieces can be filled in later (usually after the window has been tacked together). 


Linda F has started working on this very modern Tulip window that is actually a flower window and a geometric window all in one.  It's very modern and because the border is irregular she's had to cut that by hand rather than with a strip cutter.  There's an air of Art Nouveaux in this window and I like it.


Susan R's newest Pumpkin Window (or Fall Harvest as the pattern calls it) is all ready for foil.  Just look at that multi colored corn-- It's awesome! After this is tacked together we'll cut the background and then slap a border on it. 


Brenda now has all of the glass cut for her second Transom Widow and only needs to wrap the outer border before she can start soldering it.  That means she's just about finished with this beautiful pair of windows.


Mary is grinding away on her Iris Window and look how far she's come along in just one class!  She's doing a spectacular job on this and moving at an incredible rate of speed as well.   I think it's safe to say tat Mary has the art of grinding down to a science.


Mary Grace is another student who has made spectacular progress on her project in a short time.   Her Tree of Life Window is all cut out now which means that she'll be grinding on this when she comes back.  That  shouldn't take long because her cutting has been amazing on this and it looks so great that Shelley is thinking of making one herself.


Rowena's latest Initial Window is a big one and it's just about ready to be soldered.  With only the final border left to wrap and tack, this window is just about completed.  I will say that the beveled C in the center will become much more obvious once this is off the table and back lit.  That will allow all of the different textures of the glasses that Rowena's used to become apparent.


As promised, here's a look at the second Crawfish Window that Sheri is working on.  The one under construction is on the far left while the painting that she based it on is on the far right.  The one in the center is the completed Crawfish that you saw at the beginning of this post.


Martha has stopped working on her Day Lily so she can knock out two quick Beveled Cross Windows.  She has her pair of crosses cut out and ground so each window just needs four pieces of glass and then some border pieces.


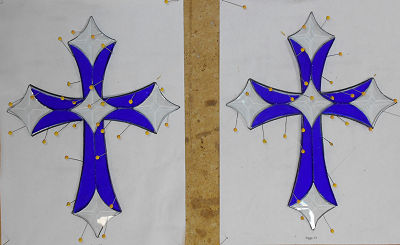
Melissa has three crosses very similar to Martha's all cut and ready to be ground.  This is the first one and I must say that I think it went much easier than the one she made last week now that we've changed the pattern for something more symmetrical.


Tracey finished grinding her 3D Butterfly Lawn Ornament and then wrapped and tacked each wing together.  Although it looks like this is one piece the wings have NOT been joined down the center.  Once they have both been soldered separately they will join at an angle to form a realistic butterfly which will surely be done next week.


Lastly, Susan D is busy leading her leaves and I have no picture of them  they pretty much look the same but the pile is much smaller now!  Perhaps she'll have the 100+ of these completed when she returns.

That's it for this week.  See you again soon!

Paul