Monday, October 7, 2019

Strung Out On Spiders

Precision is a major component towards giving your finished windows a professional look.  It starts from the moment you trace out your pattern all the way until you lay down your soldering iron.   One trap that many people fall into is badly cut pattern pieces.   If you want your pieces to fit your pattern then your pattern pieces need to match the pattern perfectly.   Taking your time while cutting out your paper pattern pieces will help greatly to make your cutting and grinding go that much easier.

Below you can see two paper pattern pieces.  The one on the left was cut without care while the one on the right follows the original pattern perfectly.  Curves should be smooth and fluid-- they shouldn't have points or resemble a stop sign.  If you want your finished window to look good then you need to make sure that the pattern pieces you are tracing onto your glass truly resembles the pattern and not just resemble them somewhat.  Take your time and your work will look MUCH better.  Trust me.


So here's my problem.  We have two windows this week that just go above and beyond what we normally see.  The order in which they are presented here was picked by a toss of a coin because I I just couldn't decide which one deserved pole position.

The coin was flipped and now I present to you Lara's Peacock Window which was completed this week.  Just the size of it alone makes this one impressive window indeed.  Her craftsmanship and her colors are perfection and this window will be a feather in Lara's stained glass cap for a very long time.  I've always loved making these and I know for a fact that Lara did as well.


Next we have MiMi's Seafood Window which proved that MiMi is capable of dealing with the tiniest of pieces with the utmost precision.  If she hadn't stayed within her lines this window would easily have twisted all out of shape but it is absolutely perfect.   The newsprint background and the fact that a lot of the pattern matches perfectly across pieces helps give it an even more realistic look.  Top that all off with a wood grain border that even resembles a table and you have one magnificent window.


In a slightly smaller scale we have Belinda's Wine Cats Window.  Everything lined up wonderfully and Belinda is learning more and more each week that she's with us.   At the rate she's going she'll be teaching classes soon!


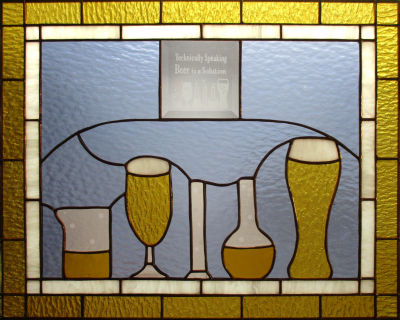
Carol never fails to impress and her 'Beer Is A Solution' Window makes a fun statement indeed.  This project started out with a 3x3 bevel that had the phrase, 'Technically speaking, Beer is a solution' etched into it along with a small scene showing two drinks and assorted scientific type containers.   We drew out the scene, added a place for the bevel and then Carol went the distance and even etched small bubble into the glass.  A solution indeed!


Jeanne M cut out her Halloween Bat Suncatcher when she was last in and this week she ground, wrapped, and soldered it.   The original design didn't have the moon behind it but by adding it we've made sure that this suncatcher will NOT fall apart.  Boo!


Susan D finished another corner Spider Web and would have finished the last (4th) one as well but she really wanted to assemble the Spider that hooks onto it.  Here's what it looks like when it was completed with the spider attached.


And here's a close-up of the spider itself.  It's put together with five pieces of thin copper wire, a Teardrop Crystal from a lamp, and two packs of glass beads both large and small.  In the sunlight this lights up like it's on fire!


Next Susan R put the finishing touches on her 3D standing Bird.  These are cute, but like Jeanne's bat we've made adjustments to the pattern to make it unlikely to fall apart.  Remember that just because you see something made on the internet it doesn't mean that it's been well designed.   Part of stained glass is learning about 'hinge sections' in glass and how to avoid/fix them.  Susan's Bird is as solid as can be due to the fact that we added two more lead lines to the leaf/base.


In the last of our completed projects this week we have one of Angie's two Macaw Flower Pot Decorations.  She decided to go with something small this week so she can ease into her next window which will be a biggie!


Belinda began this Sunset (Sunrise?) Window while at home during the week and it looks like she has yet another winner on her hands. She's already grinding this so who knows what it will look like when she comes back in.  The woman, like her sun,  is on fire!


Barbara got her Fleur De Lis tacked together and then wrapped the beveled border that surrounds it.  Once that was done she cut a piece of background glass to fit the rectangle and then traced the FDL and 2 accent bevels onto it.  After cutting up the rectangle into 9 separate pieces Barbara had an almost perfect fit before she began to grind.


Melissa has begun work on this half circle Peacock Tail Window which I think is going to be stunning indeed.  I love her colors and as you can see she's making excellent headway into this project just one class in on it.


It's hard to see what's going on here but this is one half of a VERY large circular Transom Window that Jeannette has begun working on.  The pieces are so large that we can't fit the end pieces onto a standard sheet of glass so we have managed to come up with a work around for the problem which we'll reveal next week when we implement it.  Because this is so large Jeannette will be working on this in two sections.   This week she worked on the first (left) side section.


Lara's begun work on a pair of Scissors Suncatcher and she's using the shading of the glass to work for her.   We normally do the blades in grey glass but Lara was able to cut them from the same piece of glass that she used for the handles, jut out of a much lighter section of the glass. 


Becky S now has all of the glass cut for her Egret Window and only has a few more pieces to grind before she begins foiling and then then assembling this large window.  The end is getting near as you can surely see from the picture below.


With all of her glass ground, Shawn is working on foiling her pieces after which this window will be soldered.   There won't be a border on this which won't be a problem because there are many lines leading out to the edge of the piece which means that the channel will be secured just as firmly as if it were attached to a border.  I've complimented Shawn's grinding on this project and now I have to say that her wrapping has also hit a new high.


Carol started this LSU Window after finishing the work on her Beer Is A Solution Window.  In less than three hours she got all of the bottom panel cut out (including the background).  She also has some of it ground already as well!


With her border now firmly tacked into place and her front side soldered, Patrice is just about ready to finish her Umbrella Lady Window.  I have no doubt that this woman will be completed upon Patrice's return because her soldering skills have really taken off on this!


Mary has begun the grinding process on her Heron Window and with just about half of it ground she really hopes that the rest of it will be all fitted into place before she walks out the door next week.  Me, I think she'll surely do it and then move on to wrapping.


The top of Cindy's Skylar Box only needs its border to be foiled and then she'll be able to add a hinge across the top and then finish soldering it.   Once that's done she'll make the box bottom and this will be completed.


Mary Grace only needs to cut out the Blue ribbon and white number and then she'll hit the grinder with all of the pieces that she's worked so hard to cut out.  Her window is already taking shape but we still need to add the year to the design and you won't believe how that's going to fit in!


Kerry made short work in the wrapping of his Tractor Window this week.  It looks like he'll tack this together when he returns and then he'll be able to fill in the tedious small pieces that may be somewhat problematic.  Since the rest of the tractor will be tacked together he won't have to deal with pieces shifting all over the place while he's working with all of those tiny pieces.


Just in case you weren't sure, Martha indeed does have two projects in the works that she's been jumping between.   Here they are together.  On the left we look at her Wedding Invitation Box, and on the right we have her Rose Window.


With her two borders firmly attached Annette is now ready to rest a bit by beginning to solder her Psychedelic Poodle Window.   She picked a heavily textured glass for the outer border and although it's harder to wrap it wasn't that much more time consuming.   Besides, the look of it is incredible (especially when it has light behind it) so all of her efforts will prove to be well, well worth the time.


Finally we have Tracey's latest Butterfly Lawn Ornament.  I may be wrong but I think she got this all cut, ground, wrapped, and tacked in one night.  She's got these flying right of the door!
 

And there you have it- another weeks worth of work in one easy to digest Blog post.

Paul


Monday, September 30, 2019

Tid Bits and Other Things

Our tip this week deals with grinding.   For some reason people like to grind their background pieces and then fit the subject matter into the openings left behind but this is always wrong.   You should always grind the background glass to fit the subject.   This prevents things from twisting out of shape.  Keep this in mind and your windows will look better than ever.

Last week when we looked at Jeannette's Humming Birds and Flowers Window all you could see were black pieces of glass.  Now that she's finished it and we have it hanging with a little light behind it you can fully see all of the beautiful glass that she chose to use.   Blue and green always look great together and Jeannette proved it with this window.


All I can say about Tracey's Grinch Window is that I almost can't handle a window with this much character!  She's captured his likeness PERFECTLY and her work on it is magnificent.  She should really be proud of this!


Angie's Beveled Bee and Flower Window is both vibrant and charming at the same time.   As bright as the border and the flower are, they steal no focus away from the Bee at all!  That beveled bee is so cute that I think he'll make a wonderful suncatcher all on his own.


Barbara H's Wisteria Window is gorgeous.  I had no doubt that it would be but the border glass that she picked out made it even better than I expected.  It was absolutely perfect for this because it adds a little bit more purple without overloading it as a solid purple border would.  Brilliant!


Melissa completed her version of the Birds on a Wire and made it look easy.  Just look how straight that branch is that they are sitting on.   I think she enjoyed making this because it was far simpler than anything else she's done in a very long time.  Wait until you see her next window though-- she sure likes those repeating patterns of tiny, tiny pieces!


Halloween is in the air so I made this delicate Bat Suncatcher to see just how sturdy it would be.   And the answer is, well, not very.   I really liked the look of the wings on this but next time the bat will get a moon behind him to keep things nice and solid.


Mickey Mouse hasn't been made in a while so when Jeanne L saw the pattern hanging on the wall she knew she had to make one.  Besides, she already has a Minnie and you really do need a Mickey if you only have Minnie Mouse.  Jeanne made this quickly and efficiently in just one class.  Not bad!


Here are two Dragonflies that Jeannette also completed this week along with a Personalized Dove Suncatcher as well.   She purchased a pack of metal letter beads, strung them out into the name 'Lillian' and then tacked the beads under the wing.  She's got about 5 move of these to make and she may need another pack of letters to finish them!


Here's a look at just one of six Dragonfly Flower Pot Ornaments that Angie completed this week.   Start to finish, she did it all on her own which even includes the stakes.   

Now here's the thing-- Rowena also made Dragonflies and as we saw above, so did Jeannette.   I don't believe I got pictures of Rowena's but her story is the same as Angie and Jeannette's story-- from start to finish she did them all on her own.  I just don't know whose belong to whom.


Next we have Jan's Dragonfly Panel which has now been completely ground save for three pieces that she lost due to unfortunate circumstances that you can ponder about!   Rather than re-cutting new pieces she's going to wrap and tack this first and then use the empty areas as a pattern to get an absolutely perfect fit.


Susan R found another 3D Bird ornament online and printed it out to use as a pattern to make her own.   The bird is all cut, ground and wrapped so she'll be starting something new next week after  she completes this.


Angie also got two pumpkin Suncatchers started after she completed each of her Dragonfly Flower Pot Ornaments.   I will be very surprised if these aren't done in time for our next post.


Jeanne M said that she wanted to work on a Bat Suncatcher and that's exactly what she did.   She's got her bat and moon all cut out (this Bat will be far sturdier than mine because of the moon) and she'll begin grinding this when she comes back in.


Barbara H began working on a Fleur De Lis Window and she has the clear FDL all cut and ground already.  Since it's been cut from clear glass you really can't see anything but the grain lines on each of the pieces (done in blue) but this will really stand out when it's off the work table and lit up from behind.


Becky B's Springfield Fish has all three(!) of its eyes tacked into place which means that this window is ready for its background glass.   That should be cut out upon Becky's return and then she'll decide what to do about borders for this project.


Cindy has the top lid to her Baby Box just about completed.  There's only the background glass behind Skylar's name to go and then a quick border.   Once the lid is made the rest should go very quickly because the box bottom itself is very easy to assemble.


Belinda is close to winding things up on her Wine Cats Window now that she's filled in her missing pieces.  That went quickly because when you cut from openings in your project rather than  pattern pieces, you tend to get a perfect fit the first time with minimal grinding required.  Belinda hopes to get some soldering done on this while she's at home so there's a good chance that we'll see this finished next week.


Carol's Beer Is A Solution Window made incredible progress  during class as she got the center tacked together and then got two borders and some channel attached as well.   That's as productive as you can get in the span of 3 hours!  This ought to be completed soon and then maybe we'll drink to it!


With the back side of her Peacock Window all soldered Lara only needs to check the front side for any run-through's and then she'll be able to wash and color this spectacular Window.   We almost got a look at it completed this week but we had so many finished projects that I wanted to make sure this got a place in the spotlight it deserves.  This will certainly lead off out next Blog update.


And Fido the Psychedelic Poodle is nearing completion as Annette managed to get her background glass ground, wrapped and tacked.   She's picked out a beautiful border for this and we'll surely see that get attached upon her return.   Nice doggie!


MiMi's Seafood window is ready to walk out the door for the last time as it now has its border pieces attached as well as the channel.  She's been soldering the front side which is very nearly completed and that only leaves the back side to go before she gets to wash this, color it and then take it home for good.


With all of her background glass cut out Mary is all set to begin grinding her Heron Window.  She's picked a clear background that you really can't see while it's on the work table, but that's going to make the subject matter stand out beautifully once this is hanging in a window. 


Next we look at Becky S's Egret Window.  Now that all of those feathers have been wrapped you can really see all of the detailed feathers in the bird.   Becky also got the beak, the legs and the tops of her Cat Tails cut and ground as well which proves that she was keeping busy.


Yeah, they're hard to see while on paper but Susan D has two more Webs all fitted together.   Spiders are on her horizon if I can just remember how to make them!


With each piece he grinds into place, Kerry's Tractor gains more and more definition.  The steering wheel and the seat have yet to be cut and before we have him do that we're going to tack together all of the pieces that he has ground.  That will allow us to move things around easily without all of the glass scattering out of place.   It's been a lot of work but Kerry's up to the task and the good news is that the end is near.


Shawn is fast approaching the end of her grinding which means that wrapping will be consuming her time very shortly now.   I think she's going to be so very proud of this window when she sees it completed because it's coming together beautifully!


In the end, with her final border cut and ready to be ground, Martha's Rose Window proves without a doubt that simplicity can be stylish all by itself.   And to think that it isn't even completed yet!


So there you have it.   Classes start again tomorrow which means that it won't be long before we're back with yet another update!
 
Paul