Monday, December 6, 2021

You've Got Blood On Your Face (Big Disgrace)

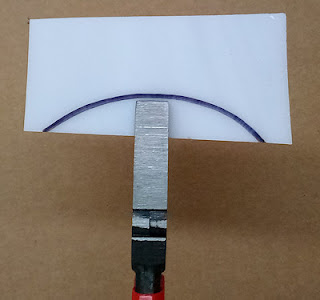
I see so many people using their Breaker/Grozier Pliers incorrectly.  This leads to their break not following the score line.  In the picture below the score of the cutter runs along the curved black line.  This should be easy to separate  because it follows the 3 to 1 curve rule, however the pliers are incorrectly placed which will most likely cause the score to fail.   Never place your pliers in the center of a curve.  Unless, of course,  the curve is only as wide as the pliers (and even then I tend to hang the pliers off of the glass a bit.)


Always position your pliers at either end of the score line that you made as shown below. 

When you start from the center the glass has to break in two directions at once.  On a straight cut you could succeed with that method but on a curve you'll probably lose one or both the the points at the ends of the score line.  Even with a straight line it's most desirable to start at the edge of the glass.   Always start at the beginning of your cut.  If it doesn't separate then try from the other end.  If it still won't break it's  most certainly a bad cut that needs to be redone.

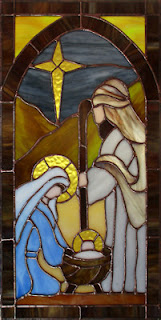
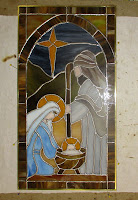
Well, there aren't any bad cuts in Betty's Nativity Scene Window which is now finished and up for sale.  I like how she picked colors that represent the scene for what it is rather than the image that people have in their head-- the night sky and dark, softly blurred mountains create a still and peaceful setting for a glorious event.


Lisa made a Clown Fish (Nemo?) Nightlight as well as a Teddy Bear sleeping on the moon that I just can't get enough of.  Embellished with tinned wire Curly Q's (yes, that's their technical name) Lisa also took the time to drill a hole into a yellow star and hang it above her serene, sleeping bear. 


Annette got her Angel with a broken wing that she made last week  repaired and then set her sights on a green Joy Suncatcher and a Mary, Joseph and Baby Jesus Suncatcher as well.  Someone is really becoming well prepared for Christmas!


Speaking of Green, Shawn made this Grinch Hand with an Ornament  in just one night and still had plenty of time to work on her other Ornaments as well.  We've enlarged this pattern ever so slightly and that makes the curves  easier to cut as well as better fitting the hand for a standard sized ornament.  (But then again, only the Whos  know how big the Grinch's hands actually are.)


Up next we have a Butterfly Suncatcher that Steve made this week.   He's used all clear textures and a black patina on his lead for some great contrast.  Steve sort of knows what he's doing because his wife is Lisa (who made the Bear on the Moon up above) and he's been watching and getting his hands into it a bit while she's been working on glass at home.  Steve decided to come in for a while and make a few items and judging from his work on this I'd say we can expect big things from him!


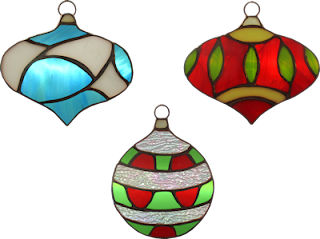
Ann's latest batch of Christmas Ornaments are finished and I have to say that their pictures came out so much better than what showed on the camera viewfinder while I was taking them.  She's used the same color scheme on all of the ornaments she's made and that means that every single one of them mix and match nicely with each other.


Susan R started work on two more Angled Flower Yard ornaments.  She's altered this one to be a Poinsettia and she already has all the cutting finished for this pair.  She may have just begun this project but already the end is near.


Sheri has decided that Grinch Hands are where it's at so she's begun cutting out six of them.  Her cutting is very much  spot on because you can easily see that they already fit together nicely even though they haven't been ground.   The only thing left to cut to finish these are the red sleeves and the two white pieces that form the cuff.


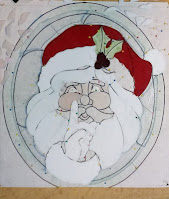
Kerry's Santa Face has come together in a spectacular fashion this week.  His eyes haven't been fitted into place yet but I always like to have the face tacked together.   Having the pieces around the eyes tacked together prevents them from shifting out of position.  We wouldn't want a cross eyed Santa now, would we?


Well now, this is very hard to see due to the use of white glass on top of a white pattern.  What you are looking at is the state of Georgia cut out of red glass and set within white glass which will then be bordered by black glass and some bevels.  Everything has been cut and ground so this is ready for Lisa to begin wrapping in foil.


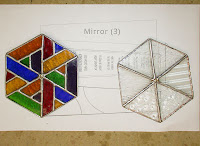
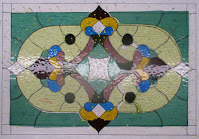
Melissa said that I couldn't share a picture of the sides of her Kaleidoscope because she doesn't like the way it looks right now.  Luckily, her pair of  image wheels that will make the reflections in the mirrors of her Kaleidoscope were completed so I'm showing you a picture of them instead.  Below you can see how the Textured clear glass helps distort and refract the colors to create incredible images.


Betty also had time to work on this commissioned piece based on the letter 'N'.  It's all tacked together and it only needs to be soldered at this point.  The 'problem' to this piece was that the customer wanted to avoid color in the finished piece.  We'll take a look at just how Betty made this window stand out once we see it completed and hanging up in two weeks (alas, she won't be able to make it into class next week).


Linda L came in with a picture of a stained glass Succulent(?) that was displayed in an actual flowerpot.  "Could we make a pattern like that," she asked?   Of course we can, but we're also going to make it the way I always like to draw up patterns-- better than the original!  This single Succulent will be made up of three overlapping layers to give it much more depth than the original could ever have.  Here's the start of it and very soon you'll see just how it all comes together.


This is another window that's hard to see right now but once you know that it's an Old World Santa Claus you can see it pretty darned well.    The tree, at this point, is still completely missing but that will be rectified as soon as Jan finishes Grinding each of these pieces.   There's a name for this style of art but for the life of me I can't come up with it right now (no matter how much Googling I do.)


With her Fleur De Lis all cut and ground Cindy is ready to start foiling her pieces.  A penny for your thoughts?  How about a quarter for scale instead.  Yes, that's a quarter along the bottom of this window to give you an idea of the size (or more so the lack of size) of Cindy's latest project.


With her borders all attached and only some soldering to go I'd say that Martha is quickly running towards the finish line on her Build Your Life Window.   After agonizing what colors to use for her double borders the best choice was to use a heavily textured clear glass for the inner border and a solid green for the outer border.  And, as you can already see, it all comes together wonderfully.


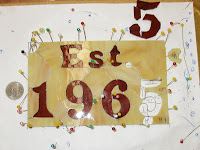
Susan D now has all of her Date Plaque Panel ground.  She's begun foiling the minuscule pieces that form the  background and the letters 'Est'.  She's concerned that it isn't as straight as she'd like it to be but we aren't going to do anything about that until the bottom section is wrapped and tacked.  Once that's done we can get down to the nitty gritty and make sure that everything is perfectly aligned along the top row. (Sort of like with Kerry's Santa's eyes.)


With all of the large feathers in the train of Mary Grace's Peacock being ground she is now ready to focus on the smaller, inner 'eye' sections.   The trick here is to keep everything flowing gracefully so Mary Grace is taking her time to make sure this looks perfect.

 
With everything ground and fitting together perfectly Linda F has started foiling the pieces of her Victorian Window.  You can see she's started in the lower left corner and is working her way upward and outward from there.  Is this the correct way to do it?  People always ask me where they should start but there is no right or wrong-- it ALL has to be done and the order in which the pieces are foiled matters not.


I'm so used to seeing this pattern made as a suncatcher that can fit on a single piece of paper.  Shelley's altered that though and it causes me pause when I see just how much larger Shelley has made this rendition of the mermaid.  And that's not the only thing that is larger (wink, wink!)  This is one voluptuous looking Mermaid!


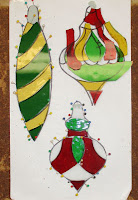
These are the three Christmas Ornaments that Shawn resumed work on after completing her Grinch Hand.  There are only a few pieces left to grind so she'll surely be foiling these when she comes back in.


MiMi has a name for her new Octagon window (just like she did for her last one) but it's not Nueve as you might expect (since her last window was known as Ocho).  This one apparently has German heritage.  Neun!    When I took German in high school Frau Robinson always told me that there shouldn't be an exclamation point at the end of everything that I spoke in German, but I couldn't seem to break that habit.  In this case both MiMi and myself agree that Neun should be spoken with as much force as one can muster.
NEUN!


And there ya go!  Christmas isn't just around the corner-- it's only a few days away at this point.   We have a lot of Christmas projects under way and we'll see the ones that need to be completed by the 25th finished, and others will carry over to the New Year a bit to remind us that it will be coming around again in a very short year from now.
 

Paul 

Bayou Salé GlassWorks


Monday, November 29, 2021

It's a Doozy!

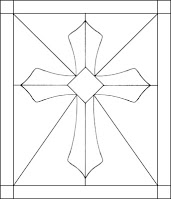
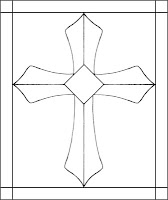
One of the hardest things in designing a pattern is to determine why and where to place the lead lines that will make your window possible to cut.   In all actually, there is no right or wrong.  It's all about aesthetics. That said, in most cases the trick is to minimize lead lines so your windows look less busy.   Extra lead lines can be distracting.   Below is a standard Cross Pattern that actually contains extra lines that are actually unnecessary.  Those are lines which can easily be removed. The four lines radiating outward from the center of the cross to each corner of the window are inessential because the corner pieces can easily be cut without them.   To me they only distract the eye and remove focus from the cross itself.

 
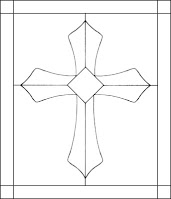
Below we've removed those unnecessary lines and now the cross stands out much better.   If you want your subject matter to be the absolute focus of the window, extraneous lead lines need to go.  

 
We can take the above example a little bit further though.  The small lines that radiate from the four points of the cross can be removed if we make the cross touch the border of the window as you see below.  To me, this is much cleaner and the cross is clearly seen as compared to the first pattern design.


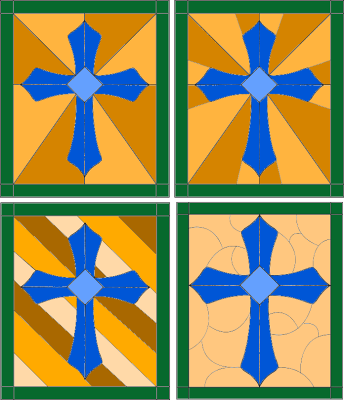
Lastly, I need to say extra lead lines may be added to make a statement or for stylized effect.  In this case I believe that the first pattern we showed would be fine if you were using two alternating background colors.  Believe it or not, I'd actually add more lines to achieve that effect so that the colors form a radiant pattern.  Here are a few examples that help prove that there really is no right or wrong when it comes to lead lines.  Sometimes you just want to be fancy (as in the bottom right).  It's all a matter of preference.


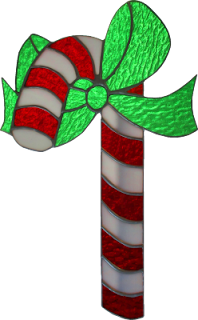
Susan R is saying Merry Christmas in a big way with her oversized Candy Cane Lawn Ornament.  She's maintained her curves and her straight lines on this and the soldering on her edge work was top notch!  This will surely decorate her yard for years to come.


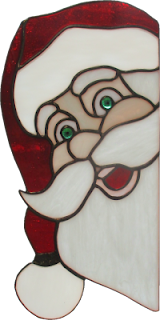
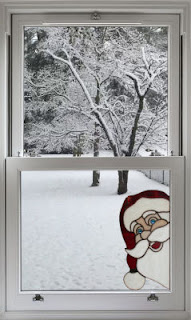
Linda L is taking a different approach to decorating her house for the Holidays with her Santa Head which appears to be looking into your house when mounted along the side of a window.  She's made three of these and is only keeping one of them for herself so two people are going to be very happy when they receive their Santa Faces.


And here's what Santa looks like when he's 'installed'!


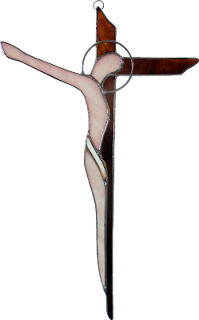
Next up is a very modern take on a Crucifix that I made in the spur of the moment.   I really do like the look of it so I thought I'd post it here for inspiration.  Also, you wouldn't believe how light weaight this is, or how delicate!


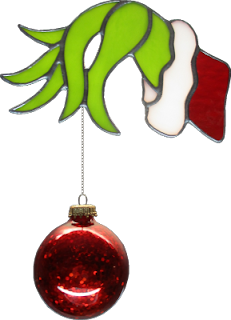
My Grinch Who Stole Christmas Suncatcher is another 'I have about two free hours, lets make this' kind of project. That green hand with pointed fingers is instantly recognizable and the neat thing is that there's a real Christmas Ornament at the end of that chain.  My only complaint is that it's just a wee bit to small so I've fixed that and any others you see made here will be scaled to size correctly .


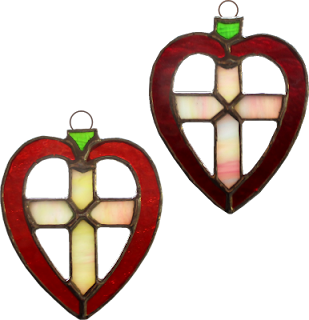
Cindy made several (six or seven) of these Apple/Cross/Hearts as gifts for teachers this year.  It's a great idea and the best part about them is that she made them all out of scrap glass that was piling up on her work table which means that no two are alike, and she has a cleaner working space!
 
 
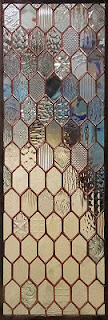
MiMi got her eighth (ocho) insert completed before she left class and  we got a nice picture of how the textures of the clear glasses she used distorts EVERYTHING behind it.  You wouldn't believe the mess that this door is concealing when we took its picture there in the shop.  Luckily it went home in a nice new shiny red car that MiMi has named Salsa.  And now you know the rest of the story.
 
 
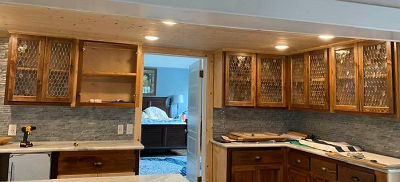
And here's Ocho  installed in MiMi's house.  I believe it might be the one on the far left.  


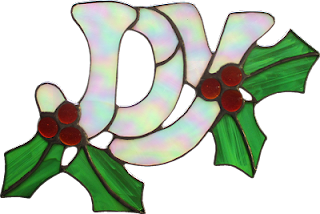
Annette made another JOY Suncatcher with Holly Leaves and Berries.  She's used an iridised White glass for the letters and I think that this is possibly the best color scheme I've seen this done in yet.  I think she said that she had another one under construction so I'll be looking forward to seeing what color Joy will be when we see it next.


Linda F got all of the glass cut for her Traditional Victorian Stained Glass Window and is now working on the grinding phase of its creation.   The colors look great and her use of cathedral glass throughout give the window a very authentic antique feel. 


Melissa has begun assembling her Kaleidoscope and the two image wheels are already  soldered and ready to be mounted as soon as the body is completed.  Why is one clear?  That's the texture wheel which is mounted between the color wheel and the mirrors.  Rotating that wheel gives each view six different textures to chose from.


Cindy also worked on her mini Fleur De Lis Panel.  It's taking shape now as she begins cutting out the actual Fleur De Lis itself.


Kerry is very far along on his Santa Claus Window.   Santa is completely cut and Kerry has already got a good portion of him ground already.  Will it be done in time for Christmas?   I have no doubt about that!


Susan D has only five more pieces left to grind and then she'll be ready to foil the pieces that make up her Nameplate Panel.   Interestingly enough, I just noticed that she has 5 pieces left to go and they are all pieces that make up the number 5.   The conspiracy theory portion of my mind wonders if that means anything...


Get your Christmas Ornaments here!  Shawn has another three cut out and one of them is completely ground already.  She wastes no time while working on these, that's for sure.


Betty's Nativity Scene Window is all assembles and is just awaiting solder now.  In fact, I won't be surprised if this gets completed when she comes back in.  I think the colors on this are perfect as it IS supposed to be a night scene.  I shake my head every time I see nativity windows with a star surrounded by beautiful pale blue skies with well lit hills before them.  It's just wrong.


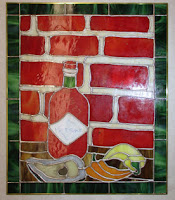
And lastly we have Judy's Louisiana Hot Sauce Window which is now completely soldered on the front with just the back side to go.    There's only a little touch-up work to go on this and I'm fairly certain that we'll see this completed when we see it again one week from now.   I can't wait!


And there you have it.   It was a odd week in the shop with classes being transferred here and there all throughout the week.   Thanksgiving always throws us for a loop since we have classes on Thursday.  Still, we managed and our students turned out some spectacular work.

Paul


Monday, November 22, 2021

When I Think About You I Cut Myself

With Thanksgiving occurring this week and our shuffling classes around I've just realized that I  have to get this post out ASAP because we have class this evening.  Therefore we're just jumping right on in starting with Linda F's Beach Scene Panel.   It's her very own original design and she's done wonders with it as you can clearly see for yourself.  We all start somewhere and I can guarantee you that my first original pattern wasn't as complex as this one is!
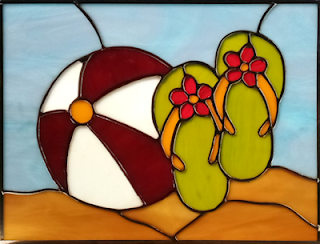


Next we look at Annette's Joy Suncatcher complete with Holly Berries.  The 'problem' with this was deciding what color to make the letters out of.  Red or green are the 'obvious' first choices until you realize that the red berries would get lost in red glass and that the green leaves would disappear if the letters were green.  Amber was the choice Annette went with but the fluorescent lighting I used for the picture makes it look more yellow than it actually is.    In the end, Annette made quick work of this project and has taken home a new Christmas pattern that we'll reveal to you with when she returns a week from now.


Lisa made a Cardinal and a Flower suncatcher that she wanted to mount into a hoop to make one single suncatcher.  Even though they are two separate entities you'd swear that these were designed to compliment each other in a single scene right from the very start.  But that's not all that Lisa finished this week...


Lisa also completed seven nightlights!  Three Deer Heads, two Soccer Balls and a pair of softballs.  She plans on doing a little painting on some of these to add some extra detail but she's doing that at home so what you see below are the nightlights as they appeared as they left our shop.


 Sheri's becoming a pro when it comes to making Hummingbird Suncatchers.   These were an order that she cut out, ground, and tacked together while at home.   She soldered them while she was in class and by now they're most likely residing with their owner!


Shawn added solder to her latest trio of Christmas Ornaments which finished them up and allowed us to share their final picture with you.  Next up for Shawn are (imagine a drum roll playing here)... more ornaments!


I could be wrong but I believe that Betty has completed her final three cutlery Dragonflies. Here's a look at one of them that flew out of the door with her.


I had an order for two Beveled Crosses so I'm picturing them here to use as inspiration amongst our students.  These have yet to be made in some of our classes and when it comes down to quick yet beautiful gifts well, these certainly fit the bill.


That Cross order also included two large Butterfly Lawn Ornaments and when our Wednesday morning class saw these on the table I ended up passing out three patterns for them.  Everyone falls in love with these once they see them in person.


Linda F actually started cutting the glass for this window when she walked into class and by the time the left she had all but 10 pieces cut out and ready to be ground.  She's flying through this project and I know that it won't take her long to get it ground as well.  I think this would have been completely cut out had she not been stumped on what color to use for her final accent pieces.


This mouth watering Christmas Candy Cane is being made by Susan R who also managed to get her all of her glass  cut out and most of it ground.  At the rate of speed she's traveling on this it won't be all that long before we get to see this hanging up with some light behind it.


Kerry began working on a Santa Face Window that's driving everyone crazy in all of the classes.   If I hear "Ohhhh, I want to make that" one more time....  LOL!  Color-wise this is very simple to do since it's only made up  of red, white, green and flesh.  Faces can be tricky though and it takes both time a patience to make sure that you don't over grind anything.   That said, Kerry already has this looking like a Santa Claus before the grinding has even touched a piece of glass..


Next up we have Shelley who has begun working on her favorite subject again-- a Mermaid!   She's modified the pattern slightly but there's no mistaking  this gorgeous creature for a sea dragon, that's for sure.


The pictures that you look at here in our posts  can be very deceiving when it comes to size.  Yes, this may look like a full sized window but Cindy's latest Fleur De Lis is actually a very detailed panel which is only  ten  inches wide by ten inches tall  and that includes the double borders!  Cindy revels in small panels with intricate pieces.


Jan's Old Fashioned Santa Claus is starting to coming together now.   What you don't see (yet) are the green leaves that will make up the Christmas Tree that Santa is carrying because those won't be cut into place until Jan grinds this window and has everything fitting together just right.  Making it in this manor (as we discussed in last week's tip) is the easiest way to get a perfect fit with minimal grinding required. And once all of those green pieces are  added you'll easily see the Christmas tree under Santa's arm.


Melissa is working on a Kaleidoscope with a twist-- it's going to feature song lyrics along the under side of the scope.  You won't see them when you look through the mirrors but you'll be able to read them when you lift the Kaleidoscope up to look through it.


Betty is all cut and ground and just waiting to get her Nativity Scene wrapped and tacked so she can add the borders all around this window.  She'll be using a dark brown wood color for the border pieces and then a green/brown mix for the left and right upper corner sections. 


Judy officially has all of the grinding finished on her Louisiana Hot Sauce Window and is now set to begin wrapping all of those pieces.  I know she doesn't enjoy foiling very much but I honestly feel as though the majority of the work is behind me when I get to this stage of a windows creation.  You can even see exactly what the finished window will look like at this stage of the game.


He may not have any pupils in the whites of his eyes (yet) but you can't miss the fact that this is Dr. Seuss' Christmas Grinch.  Cheryl has really caught on to the grinding process and you can certainly see that in the picture below.


I didn't get a picture of Bee's current project but this is the logo that we drew the pattern from.  She already has the wolves heads cut out as well as some of the green leaves which means that Bee is adding some much needed color throughout her interpretation of this design.


With just a small S left to go in the letters that form the abbreviation for the word ' Established', Susan D appears to be making excellent headway.  The numbers are going to be a piece of cake to grind because they are practically huge when compared to the letters in this window.


Ho Ho Ho.   That's one 'Ho' for each of Linda L's Santa faces.   She's currently grinding glass globs into position for his eyes and the Santa on the bottom left is ready for solder.  Those blue ares are certainly striking but wait until you see them after they have their black pupils painted on the.  It really makes a HUGE difference!


With her second Sugar Skull eye coming together I reminded Sheri that she really ought to wrap and tack that first eye before something happens to it and the pieces get scattered.  She said that she would have wrapped them but that she didn't have the correct size foil.   I had previously mentioned that she'll need to use 5/32 foil on some of this but Sheri thought that I said on all of it.  Now that she realizes that the smaller foil is only for the white glass she can get some of these small pieces locked into place.


Mary Grace had a slight issue with one of the long pieces of glass for her Peacock window when it snapped in half .  The problem was that she no longer had  a piece of glass big enough to re-cut on.  Here's the easy fix to that problem: just grind the straight break line into a curve and then re-cut the other half of the piece (which is now much smaller than the original piece was).   This technique makes it appear as though the newly created lead line was always a part of the pattern.  And that is why Mary Grace has a hole in the middle of her peacock right now.   We'll fill that in next week and no one will ever know the difference.
 
 
Ann's got her next batch of Christmas Ornaments all ground and she even has a few of them wrapped already as well.   I suspect that she'll have at least a few of these completed when she comes back in giving her time to make even more of these for the holidays (if she chooses to).


Here's a close up of side two of MiMi's latest Hexa-long window.   I have to say that these are a blast to solder on.  It's no wonder MiMi is managing to still have fun while making these!


With three completed Ornaments under her belt this week Shawn has begun cutting out two new ornaments with a new color scheme.   These ornaments are so easy to fill in with colors because just about every color out there works in these patterns.


With everything all ground and fitting together perfectly, Martha was able to begin foiling the pieces in her Build Your Life Window.  My hat goes off to her because I know she did NOT want to grind all of those letters (they did give her a tough time) but she did them and they look wonderful.  Also, I have no doubt that this window will be finished in time for Christmas.


And in the end, with all of the broken glass knocked out and then replaced in her huge Beveled window, Barbara is now ready to solder this, wash it, and take it home again.


I would have two more pictures to show you but Mary and Tracey managed to run out the door before I got a chance to snap pictures of their projects.  Mary was working on grinding two Christmas Ornament Suncatchers while Tracey actually completed either two or three of her own ornaments.  Either they have to give me a warning that they are leaving or I  have to pay more attention.  (Mostly it's the later.)
 
As I said at the beginning of this post I was a little short on time in putting this together but everything should return back to normal next week.  I even promise to have another tip of the week so be sure to come on back next Monday. 

Paul