Ok then! Linda L has completed her Poodle Window and everyone loves it. I even heard it described as 'Precious beyond words' in one class. Linda had always planned on using black for the outer border and when the time came to cut the glass we discovered a beautiful black and white baroque glass that worked so much better than the wispy black she had originally considered. Sometimes a last minute change can be a window's best friend.

Mary Grace has completed her Large Iridized Fleur De Lis Window. I was a little concerned that the Fleur De Lis might get lost in all the clear glass but as you can see that isn't a problem at all. With a nice mix of bevels, clear, and iridized glass, this window looks great!

Becky S completed her Multi-Colored Cross and very successfully managed to go over the edges with just the right amount of solder. Too little solder makes the edges of the foil easy to tear, but too much solder makes the edge irregular an very unattractive. In this case Becky got it just right.

Then we have Myrt who put the finishing touches on her own Beveled Cross Window and ended up with this beautiful color combination. Her work is excellent-- all her lines are all straight, her curves flow smoothly, and her soldering deserves a special call out on its own. She's got another Cross variation in the works for her next project that we'll see next week.

I C double! Yep, Brenda has officially completed her CC Window which some of you may know stands for Central Catholic. Or is it Carbon Copy? Anyway, the logo was altered slightly so it could be done in glass and the end result is perfection. Two thumbs way up for Brenda's double C's. (Now get your mind out of the gutter!)

Carol finished cutting out all of the glass for her Wood Duck save for the sky which we're leaving until the very end. Cutting it after everything is fitted together will allow the pattern of the glass to remain intact and give a more realistic look to the sky. Carol has begun to grind her duck and has about 75 percent of it fitting together already. Once it's all tacked together she'll simply slide a piece of blue glass behind her window, trace around the leaves and then have a perfect sky.


And this is Jeanne's latest Beveled Fleur De Lis window. She could stop right here and begin soldering it but she plans on adding one more border to this. She'll be using the same glass that she used for the background so it will all tie in beautifully.

Next we take a look at Betty's newest window which is an Iris and Water Lily design. She's a little worried about all the stems and leaves in the center of the pattern but I know she has what it takes to handle it. Besides, it's not nearly as difficult to do as she thinks it is. But we're going to make things easier for her by doing the window in three sections: the upper Iris, the lower Water section, and the center stems and leaves. She'll do the top and bottom sections first and even go so far as to tack them together before she begins the center. This will stop any shifting from occurring and make the stems and leaves easier to deal with.

Well, it looks like I was wrong yet again! Ann isn't putting a Fleur De Lis in the center of this window, she's making another 'L'. Her next version will forgo the letter and replace it with a larger circled Fleur De Lis. This week she cut out the circular L section, ground it and then wrapped and tacked it all together. There's only 12 pieces of glass to go and then this will be another completed window under Ann's belt.

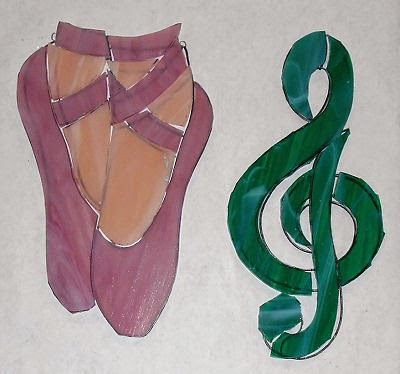
Lynn's Ballerina is all cut out save for the final border. I think we discussed going with two borders, a thin, inner border followed by a final thicker one. All in all, she could just put a channel on what you see here because the 'stones' act as a border themselves but I have to admit that I'm partial to double borders and this window would really look great with a thin inner border done in an accent color.

Rowena's Humming Bird Window is 100 percent officially all cut and ground. She took her border pieces home with her so she could wrap them throughout the week and then come in with them all ready to be tacked into place. Once that's done she'll begin soldering. And since there's not a lot of soldering in this window I suspect that it will go quickly for her.

Abita just needs its top section cut and ground and then Susan will have this completely under control. The thing is, I suspect that she's added more pieces to the top section rather than subtracting pieces. Nonetheless, she has the pattern pieces all traced out onto her red glass and will start cutting when she comes back in.

Shelley started a 3D LSU window this week and she's really blowing me with how much she's accomplished. There are only seven background pieces left to cut and then she can start grinding this. I remember when this would have easily taken her three or four classes to cut this much glass. Now that's what you call improvement.

Martha's LSU Badge Window is just about ready for borders and lettering. Martha took the Stained Glass Paint Pen home with her to apply the letters and she's texted me a few times asking for advice. She sent me a picture and I think that it looked just fine but I don't think she's happy with it. needless to say, I can't wait to see what she comes in the door with. And remember-- we are always our own worst critic!

Cindy was supposed to be taking her time on her Texas A&M Window but apparently she only works at one speed--fast! With just the Blue Bonnet pieces left to cut out, Cindy has told me that she plans on having this ready for channel and hooks when she comes back in. And I believe that will be the case. The amazing thing (to me) is that she was able to also knock out this Four Feathers window as well! That one just needs solder and she assures me it will also be completed next week as well.

Lastly we take a look at the pattern that Becky S is going to start working on. It's a variation of an old favorite interlocking border design that I've used on various occasions that always turns out great. And as you can see, the letter 'C' is certainly popular this week since it appears 3 times inside of 2 windows in this update. Look to see some cutting getting underway when Becky returns.

And that about does it for this update. Come back again next week when we'll have a smaller update due to several missed classes. I'll fill you in on all the details then.
Paul
Bayou Salé GlassWorks
No comments:
Post a Comment