Last week I showed you this picture and asked if you could figure out how to make this pattern using even less pattern pieces. As it is now, you can cut 4 of each piece that is outlined in red to make this entire window.


Now let's move on to something far more pleasant--Betty's Acadiana Flag Window variation. I have to say that this turned out beautifully. What makes this work though is Betty's attention to detail in assuring that each three Fleur De Lis is identical to one another. If they were off at all this wouldn't look nearly as great as it does!

Jeannette's Christmas JOY Window is now officially completed and will be ready to hang in the Christmas yet to come in just 11 months! That's right, we're already 1/12th of the way there. Jeannette has experienced a personal tragedy and though it will be hard to overcome we want her to know that we miss seeing her and that we're surely there beside her.

Rowena's Sunflower Window reminds me of how much I love this design. It's the overlapping yellows that make this stand out to me and Rowena did excellent work on this. Yep there's definitely one of these in my future.

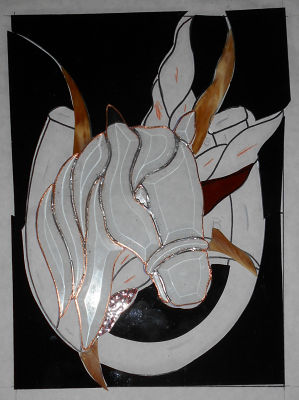
Angie is now working on a Horse Head Window and she decided to add a horse shoe and some oats to give it some pizzazz. With her black background glass all cut out there are only a few pieces left to go before she can start grinding this.
Lara's Indian Headdress now looks like a colorful piece of art instead of a hard to see line drawing on a piece of white paper. This pattern is coming more and more alive with each cut piece of glass that she places on it. I have a really good feeling about this!


Linda L has decided that she wanted to make a colorful Owl Suncatcher that was last made in September of 2015 (according to the pattern). Linda is going with a systematic approach to her colors and is trying not to get any of the same pieces to touch. It looks like she'll do just fine and I very much like that she kept the eyes uniformly colored.

MiMi's Bull in an O Flag Window is all cut out save for the squiggly piece of glass that makes up the Bull's tail. This is a tough window to grind so to make things easier we are going to ignore the bull in the center until the rest of this is ground and fitted together. We'll show you just how that works out for Mimi as the weeks progress.

Terry's Geometric Window is about halfway ground and as you can see, Terry's secret to quick and efficient grinding is to use a lot of pins as she moves along. Making sure that the pieces you've ground don't move is the key to a window that fits together perfectly.

Beth missed a class last week and was able to make it up in our first class of the new week. By the time she left she had most of her glass cut for the tree section of the her Address Window. When she came back in on her regular night she was able to get the tree and background completely ground and even managed to start wrapping it. That's what I call great progress.

Barbara H now has all of her Tulip Window ground and is working on wrapping all of those pieces. This is a beautiful window already and I'm going to push her to do a double border on it. This window practically demand it!

Jan is back and she finished grinding the circles and ellipses that surround the plate that is the centerpiece of this very different window. Now that each piece is wrapped she'll be able to tack this together and then resume working on it in a surprising way when she comes back in next week.

With her inner amber accent pieces all cut and ground into place, Melissa set upon tacking the circular section of her large Geometric Window together. Once that was done she cut and ground the first of three borders. We held this up to get a little light behind it and to get a feel for the window and all I can say is, WOW!

Carol's bathroom and bedroom have been remodeled and now she's working on Rabbits. They look precious enough but when your Bunny starts laying hard boiled eggs, well, you know that can't be any good-- especially if they're solid.

Myrt decided to wrap and tack the pieces that she had ground and then cut her background glass by laying it under what she tacked together and then tracing around it. She's got the bottom two pieces ready to be foiled and the rest will happen when she comes back in.

Brenda tacked her beveled border together and then, like Myrt, got two of her background pieces cut, ground and even wrapped. It's really coming together now but they'll be a second one following this very shortly.

Becky S's Peacock Window only needs to get its final border attached and then she'll be ready to solder. I've posted two pictures of this because the one on the left doesn't have the reflection of the light on it so it appears less colorful than it really is. The one on the right has some light bouncing off of it and you can see how much color all of that iridised glass adds to the overall effect of the window.

Mary Grace's 'B' Window is all tacked together and it even has its channel attached. This should be completed when she comes back in because there really isn't much to solder on this window. I have to say that I love the design of this.

Susan R's Mardi Gras Mask Panel is all tacked together and ready to be soldered. By cutting the edge background pieces from the actual glass mask rather than pattern pieces, Susan was able to get perfectly even lines around all four sides of this panel where the border connects. Those four edges are, in my opinion, the most important part of a stained glass window.

Linda F has completed her Christmas Lights Window and only needs to wash and color it before we can get a finished photograph of it. She also managed to get her Quilt Square Window tacked together but one of the pieces was cut a little short so she's left it out and will re-cut it it before she solders this. If you look hard enough you can see the piece on the bottom of the quilt square.

And in the end we have Shelley's Tree Of Life Window which is so very near completion. She's got her multi colored border attached as well as the channel in place which means that all this needs is a good soldering job and then it will be ready to hang. Will we see it completed next week? There's only one way to find out for sure and that's to visit us again for our next update.

Hope to see you again in seven days!
Paul
Bayou Salé GlassWorks
No comments:
Post a Comment