As promised last week, here's a big secret about making Fleur De Lis' that a lot of people don't realize. Most people assume that a classic Fleur De Lis consists of 7 pieces, but it's actually only 4. The band that travels horizontally across the lower center is actually covering 3 long pieces. Below we see the FDL both with (on the left) and without (on the right) the the band.
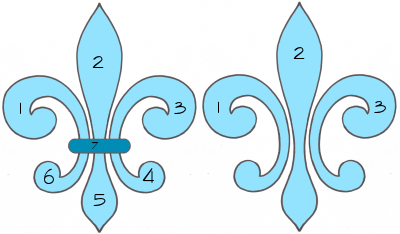
To make an FDLin glass we HAVE to cut 7 pieces because the two arms and the center piece are literally bisected by the band. If you want your FDL to look good you have to ensure that the pieces above the band align perfectly with the pieces below it or you lose the effect and the Fleur De Lis just looks bad. Paying attention to details like this will always make your stained glass look more professional and less like a beginners work. Check out the Fleur De Lis below which doesn't align properly. As George Takei would say, "Oh my!"

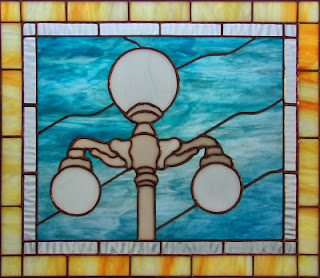
Martha's completed her latest Franklin Street Lamp Window which was designed around the rule of thirds. Offsetting the light slightly to the left gives it a much more appealing look rather than simply centering it (as any photographer will tell you). Have you noticed how Martha's sky maintains the flow of the glass throughout the entire background? That's one of the benefits of tracing the light on top of a piece of glass the same size as the background-- you can create a sky that flows naturally and more contiguously rather than cutting out individual pieces randomly placed onto glass creating a 'broken' effect.
Linda F's Antique Cross is nothing short of stunning. Made from scrap glass, this pattern was drawn irregularly and unsymmetrical to accent the fact that it's supposed to look old, worn and distressed. Now you might think that this would be a great beginner pattern since you don't have to worry too much about straight lines but you'd be wrong. There's big difference between distressed and poor workmanship. Linda displays that difference perfectly here with her wonderfully constructed Cross.
Then there's Cindy who made a gorgeously detailed Butterfly using all iridized glass. It's very hard to capture the effect within a photo but by bouncing the flash off the center of the butterfly you can see some of the color changes that occur within each single piece of glass. The other thing that Cindy did was to change the body from a long straight piece to several circles which prevent the butterfly from folding along the body. Hinging is a big problem in stained glass and Cindy recognized and avoided it masterfully.
Susan D has two of her six Tulip Flowerpot Ornaments completed. It's amazing how differently these look simply by turning them upside down. Students have asked why I call these Flower Angels when they hang the other direction and this clearly demonstrates why. Because they're literally Flowers when you turn them around (or in this case Angels!)
Melissa's Fleur De Lis got wrapped, tacked, soldered, patina'ed, and hung this week! But that happened AFTER she cut out the eight pieces of Fractures and Streamers background glass that prevented this design from having a hinge problem of it's own along the top of the 'band' across the center of the FDL.
As promised here's a look at the second Mardi Gras Mask that Susan R made. As I said last week, Susan will decorate these further with some purple, green and gold streamers attached to the corners. I found these streamers as a picture online and simply photo-shopped them into place to give you an idea of what the finished mask will ultimately look like.

Jan is working on a plate window but I didn't get a picture of the finished pattern, just the plate itself. Sooooo, I recreated the pattern on the computer and overlaidit on top of the table so you can get a feel for what this will look like once she completes it. Since she has two plates I'm thinking that there will be two of these...
Susan R finished her Mardi Gras Mask and also worked on a 'spiral' of chocolate hearts. Each heart has a red band which decorates this cute revolving heart pattern. She got it all cut out this week and will begin grinding when she comes back in next week.
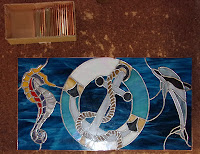
Shelly's Circular Mermaid is really taking shape now that the mermaid herself has all been cut out. I have to say that I love her idea of making the border out of the same glass that she'll use for the background because it will make the mermaid look more like she's surrounded by water rather than being in a frame. We'll see just what color the water will be when Shelley returns.
Let is moving along on her second window and just two weeks in she's already got this Dragonfly cut out and completely ground! She's taken the piece along home with her so she can have them all foiled when she come back in which means that she'll easily have a double border on this when we see it again.
Sheri is working at breakneck speed one not one but two windows at the same time. Her we see her Sugar Skull which has almost all of its complex pieces cut out now. Sure there are a few more to go but I really believe that she has the hardest sections of this under her belt now.
Sheri's second window involves two more 'faces' with these being Mardi Gras Masks. This window is almost completely cut out so she's been grinding away at it making it fit together perfectly.
Linda F has to make four of these HLB windows for her daughter who teaches at HLB. These are being made in the school colors and since she's making four of them we'll be seeing what appears to be the same panel for the next few weeks-- but they won't be the same panel.
With her flowers all cut out Annette will next move along over to cutting out the green stems and leaves. Once those are cut she's going to grind this and tack it all together before she cuts out the background. This will help prevent all of the pieces in the flowers from shifting out of position as the grinds the background thus making life much easier for her.
Ann's Lady Of Guadalupe is taking form now that almost all of the glass has been cut. She's already begun grinding this (on just her second week into this large project) so expect to see a clearer and clearer picture of this each week from here on out.
Speaking of clearer pictures, June's Airplane Window is unmistakably evident now that she's finished grinding everything. She's also begun wrapping her pieces and will soon be able to split some of the pieces in half to make the extra details of the struts that cut across the sky and wings of the plane.
With the front side of her newest Hexalong (or Hexagon) Window soldered, Mimi will be starting a new window that begins her series of shorter versions of this design. The end is near!
Here are three more of the tulips Flower Pot Ornaments that Susan D is making. Last week I pictured them upside down unintentionally but this week I've pictured these upside down so you can see how different they look from the two properly orientated flowers at the beginning of this post.
With her background cut and her border ready to be attached, Linda L is just about set to wrap up all of the remaining work on this Easter Window. That remaining work involves a little solder, a few whiskers, and a painted eye so it won't be long before she completes this.
Barbara's Painting As A Stained Glass Window is ready for solder and a channel. In fact, Barbara has already texted me a picture of this window completely soldered so this will be among our completed projects when she comes back into class.
Cindy's got all of her bevels wrapped (they're in the box in the upper left of the picture) and the front and back of her Nautical Tray soldered. When she comes back she'll align the bevels to each side forming a lip which will turn this flat window into a very stylish 3D tray that's sure to turn heads!
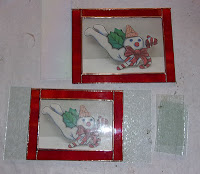
Here we look at the two Mr Bingle box tops that Cheryl finished working on. She'll work on her box sides and bottoms when she comes back in which means that these may very well be completed upon her return. She's got the glass all picked out so I'm counting on these being finished next week.
And lastly we have the pattern that Kerry has begun creating. It's an Ames Window which is actually a pretty cool optical illusion. Click the link here to see what this will look like while it's spinning in circles.
And there you have it! All the news that's fit to read!
Paul
Bayou Salé GlassWorks


No comments:
Post a Comment