All of our students know that even if you have a spongeless grinder I recommend using a sponge with it anyway. One thing that people don't realize is that when you add water to the grinder you should also add some to the top of the sponge while filling the tray. The bottom of the sponge will always clog with ground glass particles making it hard and unpermeable. Pouring water over it from the top helps flush the sponge a bit and allows more water to come up and onto the grinding head. That said, you should still remove the sponge once a week and squeeze it out in water over and over until you can tell that there's no more glass trapped inside of it. This quick and simple task will keep your grinder head sharp much longer and also enable you to grind faster.
So, first up this week we look at Mary Grace's large Peacock Window. These long windows are always difficult to photograph and even though the bottom of it is somewhat blown out (overexposed) you can clearly see how spectacular the finished result is. This is actually the first of two windows that she's making in this particular design. The second version will be a mirror image if this one with the colors possibly varying between them, but they will undoubtedly be a matched pair.
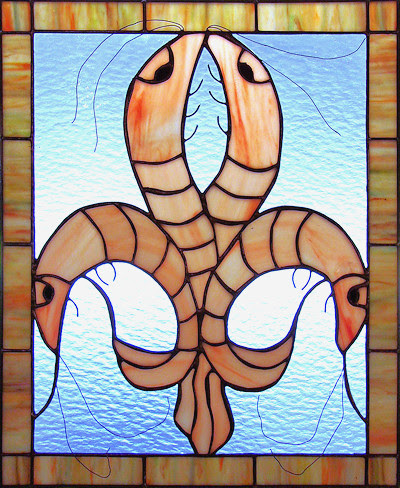
Next we look at Kerry's Shrimp De Lis Window complete with extensive wire work to form the
maxillipeds and the antennae. (Who says you can't learn anything reading our Blog?) Kerry got this done in record time and his cutting and grinding keep getting better and better.
This Rooster has been made a few times in the past but the legs have always been a problem area. By placing a piece of clear glass between the legs you can make them much more sturdy than if you were to just leave them hollow, but they still need to handled with care. When June began making this I re-examined the problem area and with a simple 2 piece addition of green glass (along with the clear glass between the legs) we've managed to make this Rooster rock solid! My hat goes off to June who did a wonderful job cutting and grinding this complex piece. I can't wait to see what she begins next.
Up next are the first of three Beach Scenes that Linda L is putting together. Look at that water! It's no wonder the glass she used is called 'waterglass'. But in all honesty it's the addition of the little baby crab looking up at us from a sand dune which makes this window so cute. And lastly, check out the cutting and grinding that was done on the piece of glass that surrounds the crab-- That's some quality work right there.
Betty completed her three Rosebud Panels this week and as you can see they were made in three different colors. When you are making windows to hopefully sell it's best to provide options which Betty has certainly done here. The pattern that she used was actually cut down in size by about 50 percent and I honestly feel that these Rose Buds are much better suited to this size. Every pattern has a 'optimum size' and this one has found a perfect fit here in a window that measures roughly 12 inches tall.
Let has created another Sunflower Heart and her work just keeps getting better and better. Again I need to draw your attention to how perfectly the outside edge of this heart aligns to each previous piece. There are no stair steps here and that, along with her color choices, makes this the perfect suncatcher.
And finally, here's a different view of MiMi's latest (twelfth) completed Octagon Window Insert. If you look closely at the bottom left you can see a clip that holds the window into place in its wooden frame which means that this window has already been installed!
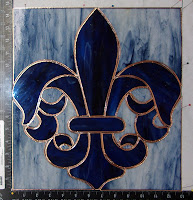
Lara's been moving through projects at break neck speeds and this Fancy Fleur De Lis proves it. She got it all cut out while at home and she managed to grind and then wrap all of the pieces while in class. She hopes to have this completed upon her return and I have no doubt that it will be since there's only a border and some solder left to apply to this stunning window.
Judy is making a pair of Sandals and managed to get everything cut and ground in just one class. She also has 90% of this foiled so the end is very near on this cute project.

Susan R began working on a large 3D Potted Cactus which she's making in three separate sections. Each section will be completed as a finished piece and then joined together to provide more depth than you'd get if it were assembled as one large piece. There are pro's and con's to this method, the pro being that the Cactus will have depth but the con being that the finished piece is less sturdy than if it had been soldered as one piece. Since this will be 'mounted' into a flower pot it won't be handled very often so the trade off seems fair.
Cheryl spent her night soldering the four panels of her Birdhouse and then adding a bead to the six roof sections which she foiled in scalloped foil. This foil makes a fancy beaded edge along the front of the glass which give the piece a fancy decorative look without having to deal with iron temperatures and different lead mixtures. This will surely be together and completed when you next see it.
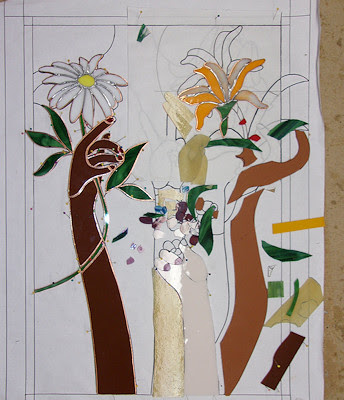
With her left hand all cut, ground, and wrapped Shawn is ready to begin grinding the next arm in the line up. Once each of the arms and flowers have been ground Shawn will tack them together and then work on fitting the background pieces into place.
Ann's Multicolored Sphere is actually the background of a multi-part window. It's really taken shape now that she has even more colors cut and placed into position. True, she still has more than a few pieces left to cut but she's well beyond the halfway point here. Once this has been soldered together Ann will tack a stained glass cross on top of this to give the window a nice 3D effect.
Robert's third window has all been cut and ground which means that once he wraps his last eight pieces he'll begin soldering this. He was able to solder his other two windows in just one night and since this is about a third of the size of his previous windows I'd say that it's safe to assume that this will be completed upon his return.
Martha has certainly been very busy working on her Butterfly. She's even ground some glass globs into the outer perimeter of the wings which make it look even better than it did before. At first this was going to be a large suncatcher but Martha has decided to turn it into a window by adding nine pieces of baroque glass to square the butterfly off. She only has the top piece to go and then she'll put a border on this and begin soldering. All of that will easily happen when she next comes in.
Linda F's redesigned the ever popular Heart Cross by removing the heart and replacing it with a bevel. This was done to 'butch it up' a bit so to speak. Either with a heart or a square bevel in the center, this is one large suncatcher that demands attention and Linda's work on it is nothing short of amazing.
With just one piece of border glass left to grind on her Mermaid Window, Shelly is about to wrap her final pieces and then begin soldering. This will surely be finished before you know it. Round windows can be tricky but Shelley has ground this wonderfully.
With almost all of the background pieces cut out Susan D is just about ready to begin soldering this little beast of a window and finish it off. Why is it a beast? Well, it's only about 12 inches wide which means that all of the pieces in this window can accurately be described as super, super tiny.
Cindy got an LSU Plaque all cut out and ground this week and now she's already wrapping it in foil. I think that it's safe to say that this will be completed when we next see it again.
With all of her background glass cut and tacked into place Annette has begun working on the final two borders for her Initial Transom Window. The first border is just about completed which leaves her with just one more border to go. She wanted to use bevels for the final border but we're going to have to plan out something a little tricky to get that work out. We'll see what road that takes us down when we return a week from now.
And to wrap this all up we look at the next two Beach scenes that Linda L is working on. The crabs still need to be cut into place but now that she's completed one of these the other two should move along quicker. It's all about becoming comfortable with each process and now that she's done each process it's just a case of repeating the steps a second and third time.
And there you have it. Classes are filling up again and these posts are taking longer and longer to create but this one is actually getting out the door pretty early!
Paul


No comments:
Post a Comment