Sunday, March 12, 2023
Grinding The Line
Sunday, February 5, 2023
Fitting In
Sunday, January 29, 2023
Perfect Corners and Alignment
Here is the same border with perfect alignment. Note how the lead lines connect perfectly as they cross paths (highlighted in red).
Paul
Sunday, January 1, 2023
Either End
Each week I see too many people using their Breaker/Grozier Pliers incorrectly which leads to their break not following the score line. In the picture below the score of the cutter runs along the curved black line. This should be easy to separate because it follows the 3 to 1 curve rule, however the pliers are incorrectly placed which will greatly increase the likelihood of the piece breaking. Never position your pliers in the center of a curve!
Always position your pliers at either end of the score that you made with your cutter as shown below.
When you position your pliers in the center of the curve the glass has to break in two directions
at once. On a straight cut you could succeed with that method but on a
curve you'll probably lose one or both the the points at the ends of the
score line. Even with a straight line it's most desirable to start at
the edge of the glass. Always position your pliers where you started your score line. If
it doesn't separate then try from the other end. If it still won't
break it's most certainly a bad cut that needs to be redone.
The moral of this Hints and Tips post is simple: Never position your pliers in the center of a curve!
Paul
Wednesday, October 19, 2022
Clean Your Glass!
So take the 30 seconds or so to clean your glass with a lightly dampened paper towel to save yourself time and headaches further on down the road. There's nothing worse than having your lines wipe away before you are finished cutting it.
Paul
Sunday, October 2, 2022
Tracing Patterns
Monday, September 12, 2022
Hinge Points
A Hinge Point exists when you have a straight line running through your entire stained glass piece Without anything cutting across it. These lines will easily fold as if they were a hinge (hence the name) and make your piece weak. Below is a pattern that has multiple hinge points which our student Susan wanted to make.
If we don't fill the center with glass you can see where a straight line forms (as shown along the dotted red line).
Worse yet, this pattern is FILLED with straight lines! Any of these or multiple instances of these lines WILL hinge in on themselves destroying your hard work.
Here's an example of what is certainly going to happen if we make the suncatcher without taking precautions to prevent the hinging from happening.
The easiest way to alleviate the problem is to fill the center with a solid piece of glass. It can be a tricky cut but it would easily prevent the piece from hinging along any of the axis. If you don't like the idea of the design being changed by filling in the center then use a piece of plain window glass and the look is maintained.
Alas, Susan wanted to hang a crystal in the opened center of her suncatcher so we had no choice but to reinforce it internally by placing small pieces of re-strip in between the blue and the yellow pieces of glass (as indicated below by red marks). Re-strip resembles copper foil and can easily be cut to size and hidden between pieces of glass before they are soldered together. When re-strip was applied to this suncatcher the finished result was as study as if we had filled the center with a piece of glass since it prevents the line from folding.
We're going to look deeper into hinge points and how to avoid them in our next Hints and Tips.
Paul
Friday, September 2, 2022
Following the Flow
Tracing your pattern accurately is a very important step in the stained glass making process. I often watch people rush through the tracing of their patterns and end up with clunky representations of what they are trying to make.
The first important rule of tracing is that straight lines NEED to be made by using a straight edge. I care don't how good you may be, your interpretation of a straight line will never be as accurate as a line made with a straight edge-- and trying to grind crooked line straight is one the the toughest things to do.
The second important rule is to place your hand inside of any curve you are tracing rather than outside the curve. In the diagram below the hand rests incorrectly, outside of the curve making it necessary for the entire hand and arm to move the complete length of the curve being traced. There's an easier way.
By flipping the pattern upside down we can now place our hand inside the curve and even rest our wrist on the table. Now when you trace the curve your hand and wrist acts as a compass and creates a smooth flowing curve. You won't be able to get the entire curve in one pass-- for that you'll need to reposition the pattern to line up with the curve that your hand makes, but this is far easier than shifting your entire arm and body to follow the curve as shown above.
Simple tricks like this can make your patterns much more accurate and lead to far less time consuming grinding at the grinder.
Paul
Sunday, August 28, 2022
Support You Windows (Part 2)
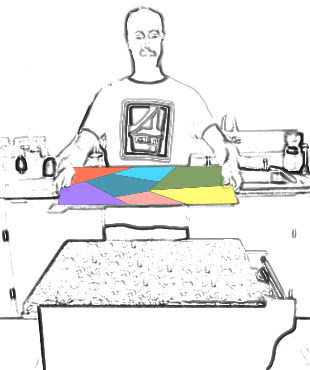
There are right and wrong ways to move your windows and for some reason people ALWAYS want to transport them incorrectly. The most important thing to understand about windows is that glass doesn't bend-- It breaks. With that in mind, first and foremost: NEVER CARRY YOUR WINDOW LIKE A PLATTER!
Never place your hands on opposite sides of the window! This inevitably leads to carrying the window like a platter.
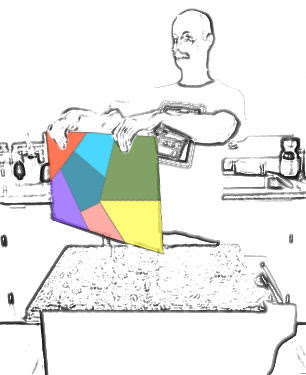
Your hands should always be on top of the window.
Again, and most importantly: Never hold your window as if it were a platter (horizontally). Carrying it as a platter provides no support to the center and allows the window to flex which causes glass to break.
And that's all there is to it.
Paul
Saturday, August 20, 2022
Support Your Windows
Friday, August 12, 2022
Numbering Patterns
1) Your pattern that you are building on, the pattern that you have cut out, and especially the glass you have traced the pattern onto must ALL be numbered or the numbers are pointless.
2) If you are using tracing paper to make your copy onto poster board, number the pattern while the tracing paper is is still in place this way you only have to number things once. This also helps prevent numbering errors and saves a GREAT deal of time.
3) It's easy to miss a piece. Don't worry. If that happens look number it the same as a piece next to it and add the letter B to it. 38B for example.
4) DON'T FORGET TO NUMBER THE GLASS YOU HAVE TRACED YOUR PATTERN PIECE ONTO! I see this happen all the time where the pattern and the poster board pattern have numbers but not the glass itself. The purpose of the numbers is to help you place your glass on the pattern. If you haven't numbered the glass after you traced around the poster board pattern onto it you've numbered your pattern for nothing.
And that's it. Happy numbering!
Saturday, August 6, 2022
Grinding Stock Bevels
Saturday, July 16, 2022
Properly Using A Sponge
We use sponges often when making windows but I've seen a problem developing that I'm going to call out. These Scotch Brite sponges (and their knock offs) seem to be everywhere now and for good reason-- that scrubby green or blue side is very handy when washing things The problem is that the green or blue side is a piece of soft but scrubby plastic fibers that cover the sponge and allows very little water to pass.
So, when putting a piece of sponge in your Soldering Iron Holder make sure that the scrubby side of the sponge is down and that the sponge itself faces upwards (as seen below). The same holds true when cutting a new piece of sponge for your grinder. The sponge itself should be against the grinding wheel, not the green or blue scrubby side. If the scrubby side is against the grinding wheel it is actually preventing water from getting to the wheel.
Saturday, July 9, 2022
Wash That Glass!
Saturday, July 2, 2022
Cutter Maintenance
Cleaning is very simple and takes less than 5 seconds. Simply take a straight pin
and gently push it into the slot above the wheel to force out any grime and grit that
has accumulated there. It may take a few pokes to clean it out but when
you've made a few passes with the pin you will hopefully be able to see
through the slot. If
your cutter has a long oil wick you may not be able to see through the entirety of slot but you will see a lot of dirt and debris come out. You'll know you are finished when the pin travels through the slot with very little effort.
Always keep your cutter's wheel in a SMALL amount of oil when not in use. An old coffee mug with a circular piece of sponge lightly soaked in oil is the best place to store your cutter when it is not in use. Just take a sponge and cut it into a circle that fits snuggly in the bottom of the mug. Again, make sure the entire bottom of the mug is covered or your cutting wheel will slip off the sponge and onto the bottom of the mug thus defeating the purpose.
Paul