So let's look at what our students have made this week starting with Brenda whose Magnolia Window is officially finished. When she came in I handed her a piece of glass that she had left behind last week and she said she had cut out another one while she was at home. She then opened a cardboard sleeve and pulled out the completed window that you see below. WOW! I knew I was going to like this. Brenda has really fallen in love with double borders and as you can see she knows how to make them work!

This is Linda L's latest project. She found the wrought iron frame in a Delphi catalog and fell in love with it. We simply measured the inside opening subtracted a little more than an inch from the top and side measurements and then stretched out the 'L' design that Ann was using so it would fit into a rectangular window rather than a square one. We added four accent pieces and a green color scheme and this is what Linda took home this week. Not bad at all, don't you agree? And VERY classy!

Lynn's second Panel Lamp is officially complete. Well, that may be a tad bit of a stretch because she still needs to color the lead on it, but that shouldn't take more than 20 minutes. It turned out every bit as nice as her first one did and her soldering on 3D projects has grown immensely. I could see a big difference between the lead lines on this lamp and the lines she did on her first lamp. But don't worry, I touched up the first one before it left the shop so both lamps match in that respect. This is yet another job well done by Lynn.

Betty completed the first of her two Stylized Fleur De Lis patterns and I have a funny feeling we'll be seeing another one of these next week because we all know that Betty likes to work in pairs. But she only has one Cowboy's Star window cut out-- go figure...

This is the L window that started it all--sort of. Ann came in with a basic design that had four upright Fleur De Lis' in the corners and an 'L' in the center. She asked if I could fine tune the pattern and that was it for that particular week. The following week before Ann came back in and before I had even really looked at her pattern Linda L came in asking if I could come up with an 'L' design to fit inside of the wrought iron frame she had purchased. When Linda left I all I did to fine tune Ann's original pattern was angle the four Fleur De Lis' in each corner and set the 'L' inside of a circle in the center of the window. These two moves eliminated a TON of lead lines that distracted from the design. Ann did all the work and her window is gorgeous. And she's about to make another letter window after this one. (And when Terry saw the L patterns she decided to make one as well! The 'L' went viral in class!)

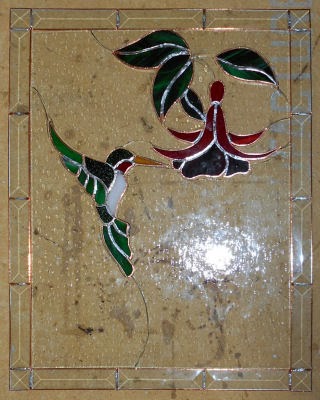
Becky's Rose Bud is really stunning. The choice of glass is perfect and the fact that she was NOT afraid to use the yellow/orange streak that was in the large piece of red she was using for the flower makes it look so much better. It would look great in pure red also but the added color really makes it stand out and look even more realistic.

Brenda didn't have a window to work on this week so she decided to make something quick and easy. Myrt suggested making a Beveled Fleur De Lis Window and Brenda said that she had the perfect place for it so that settled that. And here's the Beveled section of her window all wrapped and ready to be cut into its background when she returns next week.

And Carol came back into class, immediately started grinding her window and ended up taking it home with her to possibly wrap in copper foil during the week. That means that she managed to get all of this window ground in one class. She's moving along quickly with her first project and I think we can expect big things from her as the weeks go by.


We know that Janet is working on three transom windows and this week we see that she has her first FDL design tacked together and has begun cutting her background glass for the first window. I think we'll see this one tacked together when she comes back in which means that she can either go with adding the finishing border to this window or begin working on the background of her second window. What a gorgeous design she picked for her windows.

Jeanne spent the night at the grinder cutting the deep 6" inside cut into the piece of brown glass that will make her horse head. The hard part of this curve is that it comes to almost a point which makes the piece of glass a more fragile. I'm very impressed that she managed to make this deep a cut without breaking it (I had recommended that she cut the head and neck as two separate pieces). I know it's hard to see what's going on here, but you'll certainly see it take shape next week.

After finishing her 'L' window Linda L managed to cut the noses for her 2 pink Teddy Bears. She's decided to cut background glass for both of these bears and then add borders. Linda is making great progress in class and I'm thrilled to see her starting projects like this while at home.

Here's a look at Mary Grace's Super Sized Fleur De Lis. As promised there's a dollar bill included in the photo so you can see just how big this window really is. Mary Grace has ground most of the pieces that she's cut and has come to a bit of a standstill until some more glass arrives. But wait! Just as I predicted, her Iridized Clear Waterglass arrived on the day of her class less than an hour after Mary Grace headed home. Isn't that always the way it goes? But at least she'll be able to resume cutting glass when she comes back in.

Myrt has all of her glass cut for her Beveled Fleur De Lis Window. And if you look closely you'll see that something is different about her window this week. Myrt had originally picked a baroque glass for her inner border but when she saw how bumpy the glass was she decided that she'd go with a smooth glass so her lead lines with stay straight and narrow. While swapping out the border Myrt also invoked a color change spell and I do like the new color better. The old border drew your eye to the border rather than the window as a whole so this color let's you focus on the overall window itself. I'm guessing that Myrt will be soldering this when she comes back in.

Shelley is revisiting an old window of hers and is remaking it in different colors. With just the background left to cut Shelley is making short work of this project. At this rate she'll be onto something new before we know it! Look for some background to be cut when she comes back in.

With her Strawberries well under way Susan has also begun wrapping the Pecans that fill in the bottom right of the window. She's also changed the glass she'll be using for the raspberries on the top and has decided to use the smooth side of the glass to give the raspberries a textural difference (as well as a color difference) from the strawberries down below that are spilling out of the barrel.Things are starting to grow as she wraps these pieces so she's skimming as she goes along to make room for foil.

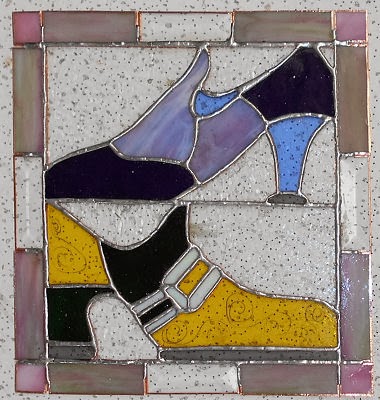
Susie's got a pair of unmatched shoes that she's working on! They're purposefully mismatched, however, and they're almost completed. The only thing these need are some solder and a designer name! After these are soldered Susie wants to add some decorative wire work to give them that little extra bit. I hope we get to see these completed!
Terry's version of the 'L' window is very near compLeted as well. With her double borders in place she's set to solder this when she comes back in. I'm unsure what she'll be doing next but I know I need to come up with a 'J' for Ann...

We're at the end of our projects here and I have to tell you that Linda F has completed her Mardi-Crown Window. Sadly, I could not find the camera to take a picture of it. Even sadder yet is the fact that when I got home I found that the camera was in my pocket and that I had it with me in the shop the entire time I was running around looking for it on a table or hidden in some remote place. Trust me when I say that Linda F did a great job with her Crown window. Below is the best I could do this week and that is to show you a picture of her pattern. Linda was contemplating making a somewhat elaborate window that I really hope she decides to do. I promise to have pictures of whatever she starts working on when we return.

And that does it for this update. We'll have a new student joining our ranks next week, but one that is familiar to us (and our ways). Becky has been here twice before in two separate Weekend Workshops but now she's about to join us for weekly lessons. She really loved the Stylized Fleur De Lis Window that she made when she was with us last and she plans on starting another when she comes in next week. Look for pictures of her progress as well as the rest of our students in our next update.
Paul
No comments:
Post a Comment