What about 16/16th's of an inch? Let's do the math. Halving the 16's gives us 8/8th's of an inch (remember that BOTH numbers in the measurement must be divisible by two or we have to stop) . Halving the 8's brings us to 4/4th's of an inch. Halving the 4's gives us 2/2's of an inch which becomes 1/1, or 1 inch.
Measuring is easy. Can you come up with names for the measurements at the blue and red arrows? The answer is at the end of this update.

Lawn Ornaments are the thing to be making this week as you will soon see. Becky S managed to complete not one but two 3D Rose Lawn Ornaments. I showed both she and Janet how the red one was put together and then watched as Becky put the yellow rose together on her own. Talk about a great job! I can't tell the difference between the two.


Sue put the finishing touches on her Tuxedo Cat and started and completed a pumpkin a well. Then she added stakes and turned them both into lawn ornaments. The wire work whiskers were fun and easy to do and now Sue knows the basics of working with copper wire.

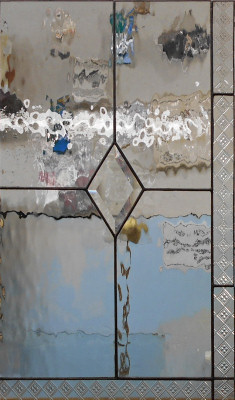
Carol completed her first of six door panels which should keep her fairly busy for a while. This panel's border may look a little off but that's only because the border runs once around the set of 6 inserts. It may not make sense now but it will as you see each panel completed. Rest assured that this window is perfect (save for the wall behind it with crap hanging all over it).
Yes, you heard me correctly when I mentioned Janet's name earlier. She's back! After watching me put together a Rose she put this one together on her own. If these 3D Roses teach us one thing it's how to bead your edges! And Janet had no problem doing that at all.

This is Betty's first 3D Butterfly Lawn Ornament. Initially she had joined the wings together flat but we were able to coax the wings to form a semi-V with a lot of heat from our soldering iron. There's really nothing to the butterfly, we just treat it as two separate projects and then join them down the center AFTER they've been completely soldered.

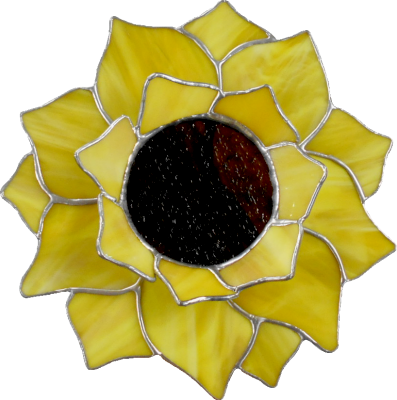
Jeanette finished another Sunflower Lawn Ornament of her own. I think it's safe to say that she has these sunflowers under complete control now.
Linda L is moving right along with her three Santa Claus Windows. She's got one tacked together, one wrapped awaiting to be tacked, and the third one ground and only in need of some foil before it can also be tacked together. Look for backgrounds and frameworks to begin getting attached to these three.

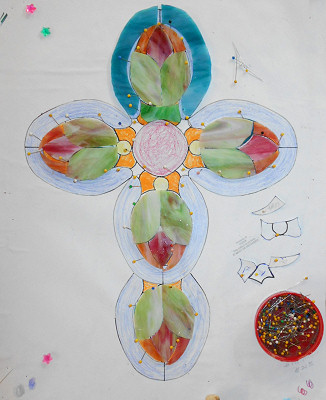
Becky B set to work on her version of the Horseshoe Cross and she made some excellent progress indeed. She even did something that always wins my respect-- re-cut a piece even though it fit perfectly. And why would she do that? Because she didn't care for the way the grain looked in that particular piece. That's called attention to detail.
Charlie boxed one of his Bird of Paradise windows and started grinding the other for a perfect fit. I've always found that the bigger the pieces the quicker the project, and Charlie might think so as well considering that in just one night he's managed to get a good two thirds of this window ground already.

Brenda re-did her pattern while she was in this week and by 're-did' I mean she's increased the width and height of her window to allow for an inner yellow border. Her background and the first border is all cut and ground leaving only the final purple border left to go.

Cindy continued to work on her Tiger Eye Fleur De Lis Window and has everything cut, ground and attached. It looks like this will just need a soldering, some brass channel, and hooks which I'm sure will be handled when Cindy returns to class.

Gale came in and brought along her grand daughter who helped design, trace out, cut out, AND grind this Butterfly Lawn Ornament. They did that all in one night mind you!

Bonnie continued working on her flower nightlights and has all three ground and 2 of them tacked together. She's taken them home with her so these may be finished next week.

Mary Grace did an amazing job of cutting out this large Christmas Tree suncatcher. She took her time cutting out her glass and the end result was that she was able to get it completely ground as well. This is excellent work.

And Betty continued with her LSU / Tiger Claw Window and everything is fitting together beautifully. I think she has the pistol grip mastered because look at all of those glorious, perfectly cut straight lines!

Jeannette worked on a small butterfly lawn ornament and it's just about ready to be wrapped and tacked together. She flew though this project because, like the sunflowers, she has these butterflies under control!

Linda F found this wonderful owl while she was on the internet and decided she had to make one for herself. The beauty of this large suncatcher is that it's made from mostly scrap glass and although Linda wants the colors to match what she saw in the original picture she's still able to use some scrap as she moves through this project. And if you look on the right of her owl you'll see that she is ready to grind a Butterfly Lawn Ornament of her own. That's quick!


Rowena is making her latest Fleur De Lis Window round and if you look VERY, VERY closely you an see that she has the circle background cut and ground already. This will be ready for a border before you know it.

Myrt got the background cut for her Cross De Lis project and then proceeded to grind it, wrap it and tack it together. This window is one border away from being all cut out!

While Carol was waiting on an approval for the border glass of her other project she decided to waste no time and wrap the bevels for a window that she'll be working on for herself.

Shelley continued soldering her Aquatic Window and even added they eyes to each of the fish. With the front side all soldered she'll be flipping this window around so she can start soldering the back side next week. And although Shelly said she was disappointed with her soldering on the front side , well, I beg to differ-- I think it's great.

And Janet is hard at work putting a bead around the petals of her next 3D Rose. Before she left for home she had everything completed and ready to be tacked together. She's going to give it her best shot during the week and I'm sure that she'll do just fine.

And somehow Ann seems to have managed to get past me somehow. She even asked if I took a picture before she left with her project and I told her that I had. After sorting through all my pictures I can safely say that I was wrong yet again. Well, we'll get a good look at her window next week when it might very well be completed.
And in wrapping things up, by counting the lines we find that the blue arrow is at the 6/16th's mark. We can divide both those numbers by two to come up with 3/8th's of an inch. Either 6/16th's or 3/8th's is correct although referring to it as 3/8th's is the more accepted manner to do so.
Which brings us to the red arrow which is pointing right at the 14/16th's of an inch mark. Dividing both numbers by two we get it's more commonly name, the 7/8th's of an inch mark. But again, either manner of speaking is correct. Hopefully we all understand rulers a little better now.

Bayou Salé GlassWorks
No comments:
Post a Comment