
So how do we do that? First and foremost, ALWAYS MARK YOUR GRAIN LINES BEFORE YOU CUT APART YOUR PAPER PATTERN!!! If you mark your grain lines after your pattern has been separated you will surely end up with variations that are easily spotted. Secondly, use a straight edge to mark your lines. Below is an example of how I see most people draw grain lines on their patterns. These grain lines (in red) give a general indication of how the grain should travel, but as you can see they aren't angled uniformly at all. Accuracy counts.

Here's how I do it. First, I put two lines, not just one, on each pattern piece-- One line on each end of the pattern no matter how small the piece may be. Secondly, I use either a square or a plastic angle to draw the line while aligning the opposite edge of the tool to the outer edge of the pattern. This ensures perfectly straight (12 to 6 o'clock, or 9 to 3 o'clock) lines. Third, and finally, when I trace my paper pattern to mark my glass I make sure that both of my grain lines follow the grain of the glass as close as possible. Making them both align to the grain of the glass ensures that the piece is as close as possible to being perfect.

So there you have it. It may seem like a lot of work but it's really just an extra second or two for each piece that more than pays off in the end. Be proud of your work. If you are doing something do it the correct way because your stained glass reputation is based on everything that you produce, big or small.
Well now, Melissa's Peacock Window caused quite a stir on the Facebook Stained Glass Patterns page. A well liked window usually gets about 200 to 300 likes but this incredibly detailed and precision laden effort has gathered almost 1,300 likes! I'd say that Melissa's work has paid off in spades. She took her time, never rushing so she could move quickly along to her next project and ended up with, well, a feather in her stained glass cap! Melissa should be very proud of this window.

Then there's Mary Grace who finished her Circular Anchor Window and her end result is also marvelous. No one would ever know that we altered the pattern to hide the fact that one of her border pieces broke and we had no more of that glass to replace it. In fact, I think it looks better than it would have had the piece not broken. Part of making stained glass involves thinking outside the box and that's exactly what we did here.


Angie's Umbrella Lady Window turned out beautiful also and kind of pays me a compliment as well. We've seen a few of these completed since I made the first one about a year ago but Angie loved my color scheme so much that she went with pretty much the same glass all throughout it. I must also say that her work on this is just as wonderful as the window itself. Oh, and she used great colors!

Betty wrapped up the work on her two smaller Flower Panels with both being head turners to say the least, even if Betty doesn't care so much for the muted border that she used in the panel on the right. Both of these windows feature beaded wire stamen and I couldn't help but notice that Betty has really been adding a lot of wire to her finished work lately. It's a talent that she refuses to let go to waste and that's great because little things mean a lot.

Jeannette finished up two Flowerpot Decorations this week: a Cardinal and a beveled Bee ornament complete with, yep, wire work! As I said above, it's the little things that can make or break a project. Imagine Jeannette's Bee without those fancy antennas. It just wouldn't be the same, would it?

Betty also made another in her series of Stylized Fleur De Lis. If you have an event that Betty is donating to, this could very well be your auction item! She makes these quickly and efficiently, and they always bring in a nice amount of money to any event.

Martha has begun working on a window that captures Main Street in Franklin by featuring one of its iconic Lamp Posts. The pattern started off as a full image of the Post but in the end we both agreed that a closeup of the top section was what looked best. She's got it all cut out already and her background glass is perfection (and sadly no longer being made now).

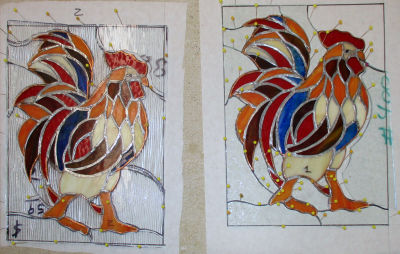
Cindy's pair of roosters both got their background glass cut and ground which means that she'll most likely wrap these while she's at home and then come in all ready to get borders attached. Chickens are very vogue right now so I have no doubt that these will sell quickly for her.
Jan worked on cutting out more of her Poodle Window and she's almost got it all cut out now. There's just the heart section and a little bit more of the face to go and then she'll begin grinding it and tacking it together. This is one of those 'exception to the rules' windows where we will cut the background out AFTER the subject is ground, wrapped, and tacked together. Why? Because the subject matter (the poodle) can easily be lifted once it's tacked together. If you can't easily lift the subject matter, you won't be able to get your background glass underneath it without things shifting all around. If you can't easily get your background glass under the subject of the window you'd best cut the background before you begin grinding so that everything fits perfectly.


Kerry began cutting out the glass for the Tiger Eyes portion of his double window. Before class was completed he finished cutting his glass pieces and began grinding. That's a lot of progress for just one night!


Linda F tried hard to get an outer green border to work for her Underwater Fish Scene but in the end the blue that you see below was by far the best visual fit for the window. All of her glass has been cut and ground so once she wraps those outer blue border pieces she'll be able to tack it together and then begin soldering.

Decisions, decisions. This week Lisa got hit with the big, burning question: Do you want a single or a double border on your Owl Window? Her first response was to go with just one border to be done with it but here at BSGW almost all of our students lean towards double borders so a minute later everyone was trying different combinations of glass which made Lisa change her mind. She got her first, inner accent border cut ground and foiled which means that when she comes back she'll quickly get the final border attached and then she'll be ready to start soldering.


Well, things are slowing down in class largely due to concerns about the Covid-19 virus. So far it looks as though we'll be having classes the week coming up but we have had more than a few cancellations already. I'm thinking that we'll be closing shop for a little while after this week passes if not before. It all depends on attendance and how our students feel about coming in. Stay healthy everyone.
Paul
Bayou Salé GlassWorks
No comments:
Post a Comment