Saturday, May 25, 2013

All Alone With Someone

We ended up having smaller set of classes for this post due to a power outage that ended up canceling our Wednesday Morning classes.  Susan and Shelley stuck around for a bit hoping that the power would come back on but that didn't happen until 12:30.  Long before that the two of them ended up taking glass home so they could work on their projects during the week.  Sadly, we missed out on all the laughs that we normally have during of our class time together.  Well, there's always next week.


So we'll start off by saying that Martha has officially wrapped up all the projects that she's been working on.  That means the last one, her Angel, is officially completed.  The soft colors she picked make the iridescent wings stand out more than they usually do when they're offset with heavier colors.   I have no clue what's up next for Martha but you can bet it will be spectacular at the very least.


Terry made this quick and simple (but very attractive) framed frame which makes this the second one she's done in as many weeks.  She'll be the first to tell you that these are quick to construct and a great way to use up small scraps of glass.  And they make a great gift!


Terry also worked on her newest window which is a Vase of Flowers.  Her inspiration came from  a coffee cup of all things.  Obviously she began cutting this at home but she accomplished a lot in class as well.  She also has 2 more HLSU Windows in the work that will probably be completed when she comes back in.  Me, I can't wait to see this finished because it's already looking like it will be another standout piece in Terry's portfolio of glass.


Brenda kept on plugging away at the grinder this week making her Fish Window fit together.  I know she was having a bit of a time with it fitting but by the time she left things were under control.  I've found that when you're grinding a window things go much better of you look at the pieces individually rather than looking at the big picture.  It's too easy to get overwhelmed if you're focusing on all of the pieces you still have in front of you.  Even though Brenda has this coming together now I know that she'll be happy when it's ready for some foil and solder and she can walk away from the grinder.


Myrt has made short work of this window, hasn't she?  It's all tacked together and the front of it is  already completely soldered.  She's taken it home with her so that means that when it returns we'll just add two hooks to hang it by and then take it's last picture before it finds a spot in a window.   Myrt did a great job on this project and really wants to get back to her balloons!  Still, I can't wait to hold this up in the light next week to get a good look at it.


Cindy wanted to do another Fleur De Lis window but she wanted it to have a little more complexity than most of the other FDL windows we see done here in class.  She found this pattern buried in one of the pattern drawers and decided instantly that this was going to fit the bill.   She traced it out, cut out the paper pattern and even got the FDL section cut and ground in glass before she headed home with the glass she was going to use for the background.  This has turned out beautifully the first 2 times it was done and I have no doubt that Cindy will will make sure that the third iteration of this window will match the first two versions as well..


Linda has all but the border of her Traditional Style Window cut and ground.   I'm even fairly sure that she'll even have it wrapped when she comes in with it during her next class. Wiggle room is what Linda is working on most with us. We never want our finished pieces of glass to fit too snugly because she still needs to get 22 pieces of foil (in this example) along the top and bottom portions of her background.  Foil may be thin but 22 pieces of it will cause everything to shift out of shape if you don't leave room for all it when grinding.  With only borders really left to cut I'm sure Linda will be soldering soon.


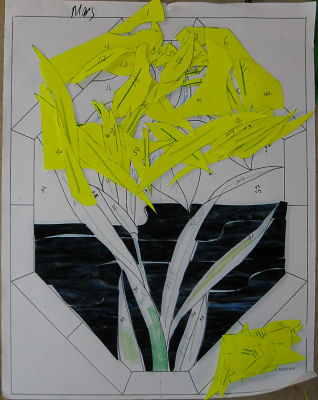
Mary has made great strides with her Iris Window this week.  She thought she had a disaster on her hands when she came it (her green glass fell and broke into many pieces before she managed to cut out any of her leaves) but with some rearranging we were able to get her pattern pieces to fit onto what was left of the glass and now she's back on track again.  She's going to skip the cutting of the sky because the glass she's picked has a pronounced grain running through it that we want to preserve.  That means that Mary will grind and tack what you see here together first and then cut the sky out of one piece of glass after placing it under this completed section.  Doing that will ensure that the flow of the sky will be retained and look natural.  This will be VERY apparent when the window is hanging. 


Tim has his first Beveled Fleur De Lis window (on the right) all tacked and ready to be soldered which he plans on doing at home.   So while he was in class he decided to start a second FDL window using a different bevel.  Tim picked this amber/yellow glass and managed to get all of his background cut and ground before he took this one home as well with only the borders needing to be sized and attached.


We're happy to announce that Donna has started a new job but because of her new hectic week she wasn't able to work on her window while she was at home.  But that doesn't mean that she's been slouching at all because Donna get's a lot done in the class time that we spend with each other.  By the time she left this week she had her borders attached as well as the brass channel the finishes off most of our windows, and the hooks to hang this by!  And if that weren't enough she also managed to get the front side completely soldered so we'll certainly see this completed when she comes back in whether she gets to work on it at home or not!


Ann's window is now completely ground and she's made an incredible amount of progress in wrapping her pieces this week.  To be honest I have to admit that I had no clue at just how quick Ann is at wrapping until tonight.  I'm sure this will be tacked together when she comes back in although that might not be next week since school is ending and Ann will be swamped with 'end of the year' work.  Nonetheless, this project is completely under her thumb now!


And that brings us to our last work in progress.  Bonnie's begun the serious part of working on her lamp and in this class she's managed to cut out almost all of her background glass.  This lamp isn't dominated by gridwork so there's still a lot to go but I'd say that the background makes up close to a third of the pieces so this is a great chunk of cutting out of the way.  These are only some of the pieces that she finished because she did grind a lot of it as well and took that home with her so she could begin wrapping.  Mark my words when I say that this is going to be a show stopper.


And that about does it this time around.  Hopefully we'll see Jane again soon-- She's had her hand operated on which certainly put a damper on her ability to use a glass cutter.  Here's hoping to a speedy recovery!


Paul
Bayou Salé GlassWorks

Monday, May 20, 2013

Pausing To Reflect

Wow, after sorting through my pictures I can't believe how much I have to post this week so I'd best get right down to business here.
 
Cindy's Mirror is officially completed and something that I've learned is that I need to come up with a better way to photograph mirrors.  Please excuse this photo because when seen 'in real life' the entire class was ohh'ing and awe'ing.  To block out the awful looking walls and ceiling in the shop I photographed the mirror in front of a flowered (and slightly wrinkled) showed curtain.  This explains the small flowers-- they are reflected in some of the mirrored sections.  The next time someone does a large mirror I think I'll just have all our students gather around for a group photo in the reflection.


Martha went ahead and put the finishing touches on her Dragonfly Window and much like her Frog Window this project turned out to be bright, bold, and beautiful.  Next up you can expect to see Martha's Angel get a good soldering and then fly out of the door.
 

Brenda came in with this Cross window almost completely finished and by the time the class was over it was 100% completed.  It's Brenda's own design and she likes it so much she has another one almost completed (although it's been made in different colors as you will see later on in this post).


Linda's first window with us, her Victorian/Geometric Window, is now a completed project as well.  The biggest tip Linda has learned is to not fit her pieces so tightly together. We always want some wiggle room to allow for the foil to fit in between our pieces.  Look at this picture and tell me that you can see where there are any gaps.  There aren't any because everything was consistent and even.  I think Linda's going to do absolutely fine on the rest of her projects with us.


Terry assembled this quick little framed Picture Frame very quickly and it was finished by the end of class.  I've taken the liberty of adding a picture of a flower in it to give you the definitive view of this cute little project that Terry essentially made with scraps.


This is a Fan Lamp that Linda made while she was at home and it only proves that she knows what she's doing when it comes to crafting stained glass.  I only touched up the soldering here and there and then threw it in a Fan Lamp Base to take this picture.


Betty made 2 projects while she was at home last week and then brought them in to be critiqued.  My final word is in and it is..."Excellent"!   This is her second cross made with bevels and it looks pretty flawless to me.


Betty's 2nd at home project was this butterfly which was made from the pattern that everyone makes when they start classes with us.  She wanted to make one completely on her own and did a great job doing it.  It looks to me like someone was paying attention during class.


Next, as promised, we take a look at Brenda's second cross window.  These are both going to be gifts so I'm not entirely sure if we'll see this one completed or not.  There's a fair chance that Brenda will finish this at home and then wrap it up and give it away.  With the front completely soldered there isn't much left to do on this one!


Talk about flying through a window!  Donna came in with her Fleur De Lis bevel wrapped and that was it.  By the time she left class she had the background and first border cut, ground, wrapped and tacked together!  Not only that-- her final border is also cut and ground so almost everything but the soldering on this has been completed in one class.  Now that's progress!


Tim, just like Donna, came in with his bevel wrapped and ready to be tacked together.  Once that was completed he managed to tie for the gold medal with Donna by accomplishing the same amount of work that he did.  I have to say that I'm always impressed with Tim (and Donna's) work both in quality and quantity.  Oh, and did I mention that they both made these windows without a pattern?  Beveled windows like this are constructed on-the-fly for perfect fits (and it shows).


While Tim and Donna worked on Fleur De Lis', Jane worked on her Angel window.  She's decided to add a background and a border to this somewhat standard pattern (That Martha is also working on).  Her background is all cut and ground and she's got half of it wrapped so that the  border will be added next week followed by a final solder job.


Ann's super-multi-piece Geometric Window will most likely be completely ground when she comes back in next week since she only has 9 pieces left to go!  Only one of these 9 pieces is currently cut but the other 8 are so small that they'll be done in the blink of an eye.  I'm expecting to see some of this wrapped in our next update and I, along with Ann, can't wait to see this completed.  The end is near and Ann may do some tiny adjustments involving the border but the lions share of the work is now completed on this magnificent window.


Linda has begun working on a Traditional Style Window and the red glass she picked for the flower in the center makes this as traditional as you can get.  The three accent pieces (the flower center and the 2 diamonds) will be done in an off yellow that will most likely match one of Linda's borders.  Although it's hard to see she also has her clear, textured background glass cut so this is another project that is moving right along.


And here's a look at Martha's Angel (the same as Jane's sans the background and border).   The iridescent granite backed glass that she chose for the wings really stands out nicely and now that the Angel is tacked together and just waiting to be soldered I can't imagine anything stopping this from being completed in Martha's next class.


Mary has started her first window with us and it's an Iris design.  After tracing out her pattern and deciding on glass colors she managed to also get all of the glass for her water cut.  There are still a lot of pieces left to go but the cuts aren't very difficult so I suspect that she'll work through this quickly.  And judging by what I've seen so far, Mary is doing wonderfully.


Myrt has begun wrapping her Pelican and she's already talking about return to work on her Hot Air Balloon Window as soon as this is completed.  And I don't think it will be that long before this window walks out the door for the last time.


Terry worked on her two HLSU windows and they're both near completion.  One has the border attached and the brass channel in place and the other just needs the border wrapped and then tacked.  After that she'll solder them both and call these finished!


Bonnie got the cartoon (and I have no clue why it's called that) portion of her lamp cut out and then attached to her styrofoam lamp mold.  She did that by simply putting put some double sided tape on the mold, affixing the cartoon pieces and then covering it all with clear packing tape to protect it from the flux, wax, and heat when she solders it.   I've found that adding a layer of packing tape makes it easier to re-prep the mold when you decide to make the lamp again in the future.   Also, since this lamp has three repeated sections we only covered one third of the mold with the cartoon (you can see where it stops on the right side in the picture).  Bonnie will make the first 3rd, tack it, then slide it to either side and then add the second 3rd of the lamp.  Doing this three times makes the complete lamp and allows her to use the same mold for other lamp patterns. 


There was a lot to cover and now that it's done I have another post to make.  Our students never stop production here so I rarely get a rest when it comes to updating our Blog.  So until our next update comes out I hope all your glass cuts easily and your grinding is minimal. ;-)

Paul
Bayou Salé GlassWorks

Wednesday, May 8, 2013

Little Things Count In Large Amounts

Since this post is all about getting up to date let's not waste any time and just jump right into things by taking a look at Susan's incredibly detailed Fleur De Lis/Gloves/Football Window  The window is barely a foot and a half wide so when you take into consideration 4 inches of borders you can easily see that the center section isn't very large at all.  A lot of Susan's pieces had to be wrapped in 3/16 foil so the lead wouldn't just swallow up her pieces whole.  Until you actually see this window you have no clue just how many pieces make this window up.  And every line is spot on.  People tend to think that just because a piece fits where it belongs it's correct but I'm going to point out that it's possible to put a round peg in a square hole if the peg is small enough-- that doesn't make it look good though.  Susan never cheated and if something was over ground and the fit wasn't perfect she re-cut it.   I wish you could see the actual window because this picture doesn't show all of the work involved in this.


Jane completed her Circular Rose Window and it's stunning.  The stems of the flowers are made with lead lines and she made sure to leave a gap between the glass so the lead would be thicker and not become lost in with the other lines that make the pieces possible to cut.  It's a subtle effect but you subconsciously notice it even if you don't pick it out right away.  I like how Jane decided to use all cathedral glasses.  There's less shading since the color is evenly distributed throughout the glass but it makes for a bright, vibrant window.


Terry went the same route (Cathedrals) with her  Faux Bevel Window and I think it looks much better than any bevel cluster could ever look.  The use of only one color and the extra attention to make sure that everything is perfectly balanced makes this one elegant looking window.  If a flower is off a bit you don't notice it, but in a geometrically designed window you will spot little imperfections with ease if the window isn't symmetrically perfect.  This is sure to be another project that everyone talks about in class this coming week.


What's this?  A Butterfly?  Well, that can only mean one thing-- we have a new student!  Mary has already taken classes elsewhere so during her first class with us she made the butterfly so I could see where her strengths and weaknesses lie.  But the joke was on me because Mary appears to have no weaknesses!  She did wonderfully and I have to say that I can't wait to see her begin the pattern she's picked for her first project with us.
 

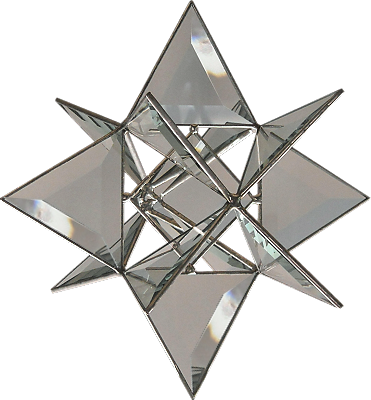
This next project is an old favorite that we haven't seen done in a while now.  It's a beveled 3D Star and we had three of them made this week.  Tim and Donna had wrapped most of their bevels for this last week before they headed home so they knew they were going to make Stars when they came in.  During the week Jane decided that since everyone else was making stars she might as well also.   So we all sat at one table and at the end of the night we had three completed Stars on the table.  Rather than posting each of them (they all look identical) we're just going to show it once and state for the record that Donna, Tim and Jane each made one of these wonderful hanging ornaments that send rainbows dancing all around the room if placed in the sunlight.


Now I wonder who could have possibly completed this window?  If you can't  connect the Lady in a Window with Brenda at this point in time then you aren't reading the Blog enough!  Her window is now 100% complete and it cleaned up wonderfully.  I'm so used to looking at stained glass women with no faces that I can't get over just how beautiful this one looks with her face painted onto the glass.  I'm going to assume that green curtains are currently the rage since Shelley had them in her window last week as well.


And, of course, Brenda didn't stop there.  Now that her Woman and Child window is completed she's resumed work on her Fish window.  It's still in need of some grinding but I don't have any doubts that she'll have this fitting together before we know it.


This week we got to see Myrt grind all but about 5 pieces of her Pelican Window.  That means that this is ripe for foiling already!  I'm unsure if Myrt has a border glass picked out but that won't take long to pick out at all.  Especially with all the help she has in the class when it comes to deciding what looks best. 


Betty's Victorian/Geometric Window is very near completion now.  She got her clear textured border cut and tacked into place and then added some brass channel to surround it all.  Once that was done she began soldering and has taken it home with her to complete the job.  She has a great deal of the front soldered already so I'm thinking that we'll see this completed when she returns in 2 weeks.


Terry's second work in progress this week is a repeat performance of her Hanson LSU Tiger Eye window.  The colors might be slightly different in this one but the overall effect is the same.  This one seems to have been knocked out in no time whatsoever which proves my old point-- you can almost cut the time it takes to make a second window in half.  Once a window is 'familiar' to you it's easy to move along quicker than you did the first time.


And Cindy's Mirror is all tacked together with the zinc channel attached.  In fact, it's even halfway soldered!  All you can see is the ceiling reflected into it so it looks a bit colorless but trust me when I say that this is beautiful.  And since Cindy needs this ASAP I'm sure it will be completed before her next class is over.


Linda's been working on the same Victorian/Geometric window that Betty has been making and they are in a dead heat when it comes to who will finish theirs first.  Linda came up with the original design and Betty started hers a week later but then Linda missed a class which allowed Betty to catch up with her.  In the end things are going to return to normal because Betty won't be able to attend class next week but Linda will.  And since Linda is soldering this I'm going to say that she'll wrap this up in her next class exactly one week ahead of Betty (This isn't a race though!)


Let's look at Martha's Dragonfly which is now ready for solder.  With both of the borders attached and her brass channel  finishing it off this Dragonfly is going to be flying out the doorbefore you know it.  And then it will be followed by the large Angel window hanging that she started a few feeks back.  (Apparently Martha is into winged things).  She loved the border on her frog so much that the color scheme followed through onto this window as well-- an ornage border picking up the orange highlights (in this case the Dragonfly body).  I can't wait to see this lit up!


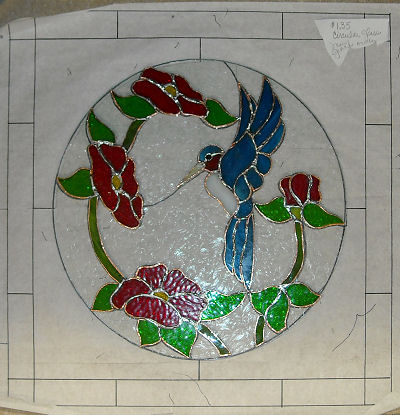
Mary Grace has a window with the same basic border/background pattern that Jane's has-- A circular square.  But the circle section is a different as can possibly be involving a humming bird surrounded by flowers.  This week she finished up the flowers and the bird and then got them all tacked together.  When she comes in again she'll learn the easy way of cutting out a background using the pieces that are already cut and ground as a pattern.  It may sound complex but it's as easy as can be.  Mary Grace has her background circle cut from glue chip and will begin carving it all up when she returns.


Next up we take a look at the new project that Shelley has started.  Her pattern was all ready so when she came in she traced it all out onto pattern paper and then cut that up into the individual pattern pieces.  She'd already picked out her glass the week before so she started cutting out the green shrubbery, the water and then even started cutting out some of the land.  The face to the dog isn't quite worked out yet as to how she'll cut it, but she'll cross that hurdle when she comes to it.  And rest assured, it's a hurdle that isn't all that high.  :-)


And rounding out our update we take a look at Bonnie's newest project-- and it's going to be a fun one.  She's decided to work on a 16" diameter Baroque lamp with 3 repeats featuring a fair amount of gridwork thus making this a nice first lamp project.  She's taken the pattern home with her so she can cut out all the paper pattern pieces and the template sections before class starts again.  Bonnie's already picked out all of her glass and hopefully it will be in soon so she can start cutting glass rather than paper and get this party started!


And that's going to do it this time around.  Since our original Blog has disappeared due to lack of use (I couldn't post anything else to it since they wouldn't give me any more Hard Drive space) I'm currently assembling a database of all of our students and all of their completed projects.  Once that's done I'll change the student gallery on our website to include every project that has been done in class.  There were a lot of beautiful windows that are no longer viewable since the first Blog was shut down on us and I hope to get these windows available for viewing again soon.


Paul
Bayou Salé GlassWorks

Tuesday, May 7, 2013

We Win! The Garden Club Loses (But There's No Rivalry Here)

We're looking at five completed windows this week but first we're going to open with an important, useful stained glass tip.  Grinding your glass to fit is an important step in making professional looking stained glass.  Many people think that the water that lies in the grinder bed is there solely for the grinder's benefit,  but it's also there for you as well.  Flowing water coming into contact with the grinder wheel carries away powdered glass that forms as you are grinding.  If there's no traveling water or even a lack of water you'll see a white power form which coats the grinding wheel and prevents your glass from grinding quickly.  So pay attention the next time you find yourself in front of the grinder and you'll see that a little water makes a HUGE difference in how quickly your piece stays on the grinder.  It's a very measurable difference that adds up quickly.  Oh, and that extra water will increase the life of your grinding wheel as well.


Okay, with that out of the way we'll move onto our students projects starting with Martha's Tree Frog Window which is now completed and most likely hanging in her window.  The orange border she picked matches the orange eyes perfectly making this window nice and bright without introducing a new random color.  I had originally envisioned black slits on the eyes but Martha didn't like the idea of the stark black on top of the orange.  In the end we simply sandblasted slits on the glass which gave it a matted, lighter effect that worked perfectly for both of us.  Now that's what I call a win-win situation


Wow, I know that Shelley went through some periods of doubt while she was making this but look at how it turned out!  Her Woman in a Tub Window is different in numerous ways from the previous versions we've seen done in class and it looks WONDERFUL!   First off, there's barely any wall in Shelley's version as she used clear glass to give the illusion of one large window (which fits the curtain much better).  She also went with a single color floor which I wasn't sure about while she was cutting but I have to say worked out perfectly.  And lastly, she went with a double border which always increases the overall appeal of a window.  Shelley used 4 shades of green in this which brings with them a feeling of life.  Great job!


I just knew that Cindy would have this Monkey Window completed this week.  The lettering came out perfectly, the monkey is as cute as a monkey can be, and this is the perfect gift for a new born baby.  I'll probably need to save the pattern because replacing the name will be simple if anyone else wants to make this. 


This Iris design has always been a favorite of mine and Donna's is no exception.  Using clear glass for the background and the border is usually problematic but Donna's choice of a heavy ripple glass for the border gives it more than enough contrast with the light, airy clear glass that she used for the background.  With color only being in the flower and the pot there's nothing to distract your eye  from the subject matter which is exactly where we want people looking.  I've got to say that Donna made this look too easy!


And our last completed window of the week was done by Terry.  This was originally a lead came window that needed some dire repairs.  There really wasn't much left to save so Terry did the next best thing by copying the pattern and then remaking it in glass that is as similar to the original as she could find.  The size is a perfect fit and this just dropped into the place of the other broken window.  All in all this is another great job by Terry.


Terry also continued working on her duo-chromatic Faux-Beveled window that is looking more and more striking with each passing week.  With the channel on and the front side completely soldered I'm going to say that we'll see this window completed in out next update.  When a window looks this good BEFORE it's soldered and washed you know that you have a winner on your hands.


Now that the border is all cut and ready to be tacked I have a sneaking suspicion that Brenda's Woman and Child Window will be seeing the light of day when it comes back into the shop next week.  She's put a lot of work into this and it certainly shows.  Brenda has her own glass studio at home and is making full use of it between classes.


Jane's Rose Window is officially ready for solder!  Going with a single colored border was the perfect thing to do since she has two clear background glasses next to each other.  Tying the border into the green leaves gives this window a well balanced look to match her expert work.  She'll be soldering this at home so expect to see it completed in our next update. 


Susan's Glove/Fleur De Lis/Football window is just about completed.  It's all been tacked together save for the final black border which she'll skim, wrap and tack while she's home this week.  You may not see it in this picture but there are a staggering amount of pieces in this window and most of them are almost too small to handle.  But Susan has ploughed through this project and made it look easy with an attention to detail that I'm so very proud of. 

Next we have Martha's second project this week and it's her latest version of the Dragonfly window she made when she first came to class.  She's added a clear inner border and has the final orange outer border all cut and ready to be ground.  Once that's done she'll wrap it, tack it and get ready to solder.  Martha also has an angel in the works but she'll resume work on that once this is completed.


Myrt's Pelican Window is moving along quickly.  She's started grinding this and as you can tell by the number of small yellow pin heads that are visible, she's got the bulk of it ground.  All those balloons that she's been cutting on her other window have certainly paid off because she's cutting through the glass in this window like a hot knife through butter!  And Myrt is so intent on finishing this window that she even favored us with her presence this week rather than going to a boring old Garden Club Meeting. *


Cindy's Bathroom Mirror is moving right along also.  It may not be easy to see what is happening here in this picture but the rectangular mirror (not in the picture) will be surrounded by a flower trellis filled with Morning Glories and assorted leaves.  This design leaves a large empty mirror in the center for an unobstructed view of whoever is looking into this mirror.  Cindy is making this by constructing her four edge borders and then attaching them to the center mirror.  In this picture you can see that she has three of the four sides completed and is working on the last section.


Donna not only completed her Iris Window but also got 12 Beveled Triangles all wrapped and ready to be be put together next week .  I think Wednesday night is going to be a big 3D Star making class which will actually be very fun.  The Stars look very impressive but they're very simple to make once you learn the simple process that's involved.


Lastly, Tim began working on numerous projects this week.  He's wrapped a Fleau de Lis Bevel to use as a centerpiece for a window, he has 12 triangle bevels all set to become a 3D star next week and he's cut out enough border glass for 5 blue picture frames.  Here are his edge border pieces all skimmed and bundled in rubber bands to take home to be wrapped.   They are sitting on the piece of glass that they're cut from and for some reason or another the picture shows the color of the glass PERFECTLY!  Why can't all my pictures turn out this colorful?


Our students have probably noticed that we've been a constant one week behind the times for a while now.  I'll be posting another update to bring us completely up to date before the week's end.  Look for that soon because the pictures are already edited and ready to go.

Paul

* It was just a joke!  We LOVE the Garden Club!