Tuesday, September 15, 2015

Careful, That Potty Might Be Loaded


Our tip this week involves knowing when you have to 'chip away' at an inside curve and when you can just take it in one long cut.  For the most part it's relatively simple to know which approach you should take.  In the picture below you can see numerous half ovals drawn out.  The green ones can be taken in one cut while the red ones need to be cut multiple time or even ground into shape.  The general rule of thumb is easy:  If the length is at least two time as long as the depth of the curve you should be safe.  However, if the depth of the curve is equal or deeper than the length then there's trouble ahead.  Look at the red curves and the green ones and pay attention to what the differences are between them.  The red curves need to be cut out a little at a time while the green ones can easily be cut with just one cut.  Once you can differentiate between a deep inside curve and a shallow inside curve you will find that you will spend far less time at the grinder and less time breaking glass.


If any of our students don't understand this just ask me in class and I'll gladly cover it with you one on one.

So Wow! Gale completed this wonderful Dove and Flower window completely on her own at home.  I was thoroughly impressed with her work as well as the intricate cuts that she made in this piece that she designed herself.  Look carefully at the background pieces and imagine what it was like for her to cut some of those pieces out.  There was a lot of grinding involved with the small grinding wheel and Gale made everything fit together perfectly.  An amazing job indeed by a student who's really turning heads in all of our classes!


Myrt came in knowing that she was going to be soldering and managed to get not one but both sides of her Butterflies and Flower Window soldered.  By the time she left it was a done deal.  It's a beautiful design and her work on it has been top notch all the way through it.  She's certainly developed a nice eye for detail.


Carol finished her two Ladybugs and decided to put them each on a stake and turn them into Lawn Ornaments.  I had no clue that was where she was going with these but they certainly make a perfect Lawn Ornament.  I have to wonder if we'll see more of these Ladybugs being made now that they're not just a suncatcher anymore.


Cindy completed quite a few Cross Suncatchers as well as six Etched Rose Ovals. She took them home to wash and polish them and a few days later I found this picture of the Rose Ovals on her Facebook account.  I have no scruples so I stole the picture and now it's posted here! She's been making a lot of wonderful small items to have on hand when she does a show next month. These ought to sell quickly.


Brenda Completed her latest Tiger De Lis which has been revamped ever so slightly.  Each time that I make something I find little things that I change the next time I make it.  Both Brenda and Terry have followed my lead with each of their patterns whenever they remake them.  A good craftsman isn't afraid to make changes to the patterns they are using if it makes the finished piece better.  Don't you love those green eyes this tiger has!


Sue completed her Tiger Claw LSU Window and the end result looks every bit as good as the other version of this window.  She also learned that it's safe to take your time while soldering because although heat will break your glass, it does take an extreme amount of heat and a long time to do that.   The key to a smooth solder line is completely melted lead.  Anything less is sub par (unlike this window!)


Rowena showed us a picture of her Six Paned Leaf Window all mounted and ready to be hung so I asked her to send the picture to me so I  could share it with out readers.  It's always nice to see the official completed results of our students work in their natural environment.


Becky S got the final clear border attached to her Bird Of Paradise/Initial Window and then she added the zinc channel as well (which you can't see because I got shutter happy and took the picture too soon).  Becky will start soldering this when she comes back in and I'm sure that won't take her long at all.


Ann had only to add a zinc channel around her window before she could start soldering and that's exactly what she did.  With the front completed and the back about three quarters of the way done I'm going to assume that she'll have this finished during her next class.   


And this week we got to see Bonnie get everything cut out but the borders on her Snowboarder Window.  The nice thing is that she has the colors picked out for the double borders that will surround this window which means that we'll get those cut and attached ASAP when she comes back in.


Vickie got her final border cut and after it was attached she worked on the small background fill-in pieces that reside in between the fruit.  Some were very tiny indeed, but filling them in with glass rather than solder will make a big difference in the look of the window when it's complete (which won't be long now).


Terry says she'd like to throw the pattern to this horse Window away so she wouldn't have to make it again but then she'd end up having to redraw it sometime down the road.  :-(  It certainly has been a popular window for her and the good thing is that she's able to knock them out pretty quickly as you can see by her progress on this one.


Glale also continued working on her version of a triple bordered Fleur De Lis, but this triple border isn't nearly as complex as the last one that she did.  It still looks great though and that's due to Gales attention to detail.


Charlie got the final border on his second Beveled Window cut, ground, wrapped and tacked.  From there he began soldering and I must say that the front side of his window looks great.  Charlie's pretty much got the hang of soldering down now because he handled this without a single problem.

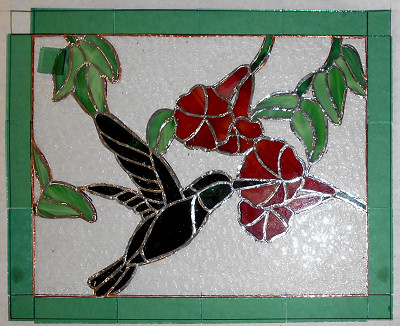

Linda F is just about ready to start soldering her Humming Bird and Flowers Window.  She got the last, biggest piece of her background cut and ground and once it was tacked into place she picked out a border glass that she cut and ground as well.  Soldering this is just a single class away now!


Rowena got the majority of her Address Window finished Her red on White numbers certainly won't be missed when this is hanging in front of her house.  With the center part of the front side all soldered there's only the border left to go.  And guess what?  It's all cut out and ready to be wrapped.


Mary Grace added a background and a border to her Baby Girl Suncatcher which has transformed it from a suncatcher into a window.  It's ready to be tacked and soldered and may very well be completed when Mary Grace returns.


Betty worked on two different projects this week and has discovered that working from the inside outward is far easier than working from the outside in.  Backgrounds are always best cut last (unless you like headaches)!


Martha has her angel wrapped and is all ready to begin soldering it.  There's no doubt in my mind that this will be completed next week and then Martha will move on to the Seafood Window that she's been anxious to make. A new project always gives people incentive to get the old one out of the way!


Sue finished one LSU window and immediately began working on another!  This one is far less complicated but then her husband requested a football in the corner which Sue was able to add rather easily.  This LSU will be a piece of cake for her.


Linda L got the border cut for one of her three Pumpkin Ornaments and then began cutting out the second.  She plans to come in with all of her borders cut and will hopefully be ready to begin soldering.


And although I have no pictures to prove it you'll just have to take my word that Paula, who was only in for a short time this week,  got her glass picked out for the numerous Dragonfly suncatchers she will be working on.  She's also about to start a medium sized Nativity Window as well which should keep her pretty busy.   I promise that we'll see picture of at least the Dragonflies next week.

That about wraps things up here.  Make sure to check back with us again!

Paul
Bayou Salé GlassWorks


Thursday, September 10, 2015

Ambiguous Designs


We're late so we'll get right to the projects after I give this simple little tip that came into play twice last week.  A few of our students are unsure of how to handle a grinder that's been filled to the point of it overflowing.  There's no need to let it continue spilling out over the edge and onto the table because all you need to do is place a dry, or well wrung out sponge on the grinding surface.  When it's absorbed as much water as it can just ring it out over your sink and repeat the process until the grinder is no longer overflowing on your table.  Try to keep this in mind because EVERYONE ends up overfilling a grinder at some point in time.  And remember to keep your grinder running while you add water to it so you can easily tell when it's time to stop adding water.  Once the water starts kicking up around the grinding wheel you know it's filled.


So, okay then!  Bonnie's Double Iris Window is complete and already resides in the frame that it was made for.  I thought I was going to have to Photoshop this into a frame but Bonnie had left it here the week before when she brought it in to double check that the panels fit.  Everything lined up perfectly and this is a project that's turned out so nicely that she plans on keeping for herself.


Brenda finished her latest double Beveled Window and as always it's a showcase in elegance.  I've honestly never really been a fan of sandblasted glass but Brenda has been using it for the background of a most of her beveled windows and has opened my eyes up to how nice this glass can be.


Rowena put the finishing touches on her Oval Fleur De Lis Window this week and it looks great.  As with all of Rowena's work it's hard to find fault with this project.  And then she even made another 3D Butterfly Lawn Ornament as well!  Rowena is a lean, mean, stained glass machine!


This week we got to see Carol put another magnolia lamp under her belt (figuratively, of course).  It's a perfect match to her last lamp and will sit on a table on the opposite side of her bedroom creating a perfect pair of matching lamps.


And Natalie completed her Dragonfly Lawn ornament this week making her the first person to use this pattern as a Lawn Ornament (which was a very good idea if I do say so myself).  She did a great job-- so great that I expect to see more of these done in the near future even though my photography skills appear to have been MIA when I took the pictures of this item.  Sorry about that Natalie!


Jeannette completed another 3D Butterfly Lawn Ornament this week which means she's making a butterfly a week.  I think she has these down to a science because she also has a window under construction that you'll see a little later on in this post.  And I must say that Jeannette's soldering around the edges of her Butterfly really impressed me.


Mary Grace finished her second Pair of Pumpkins Lawn Ornament this week and also began another project as well.  Again, you'll read about that a little further on.


With her Iris Windows finished Bonnie resumed work on her Snow Boarder Window and has come to the realization that small pieces aren't cold at all--they're a beach!  There certainly are some tiny pieces in that snowboard man but wait until she cuts the sky for that tall mountain in the background!


Carol worked on two Ladybug Lawn Ornaments and she's doing it the most effective way possible.  She's ground all of the ladybug parts and then fit it together without leaving any space for the black dots.  Once everything fit perfectly she placed the black glass globs on top of the red glass, traced around them and only then cut and ground the red glass to fit around them.  Doing it this way ensures that there is no slippage during the grinding process and her ladybug fits back together perfectly with her spots perfectly centered.  You can see in the last image that she already has one of them wrapped already.


Susan has been busy as can be working on her LSU Tiger window.  All of the background is fitted together and the yellow portion of the tiger is fitting into place nicely.  The remaining stripes will be added in next and that's when this window will REALLY grab you eye. That background grass looks like a lot of tall glass (to me anyway).


Wow did Charlie get a lot done on his first day working on his second beveled window.  All of his background is cut, ground and tacked!  In fact, the only thing left to do is is add the final glass border and then he can begin soldering it to make a perfect match for his first window.


Gale is making a Fleur De Lis Window of her own and already has her background cut, ground and attached.  Then she got her first border cut and ground and the second one cut out.  With only one border left to go Gale is making quick work of this project.


And Sue got the final border attached to her Tiger Claw/LSU Window and has decided to do something novel to this pattern by not adding the corners to the upper right and left of the window.  As you can see it really doesn't need them and help add to the 3D effect of the design.  I like it!


Jeannette is another student who made a lot of headway into her latest project.  Her Pigeon House is almost completely cut out already.  She plans on making a few changes to the roof but those will be  minor and won't take long at all.


Jeanne's made great progress with her version of the Tiger Window which is now almost completely wrapped. There's only the tail left to go and once that's complete she'll be ready for her background.  She's going to possibly add a scenery background and we'll see how that might look when Jeanne returns.


Shelley is almost finished with the wrapping on her Aquatic Window now.  She's going to bring in the glass that she had left over from the sandy bottom of her window and if she has enough of it we may incorporate it into the border in a rather unique and novel way. I'm really hoping she has enough.


Vickie's Fruit Basket Window is now just one border and a few fill-ins away from being a completely cut out window.  Once that last border is attached Vickie will begin the relaxing soldering phase of this project.  All I can say is that I love that border glass.


Mary Grace finished her Pumkin Pair and has officially become the first of our students (in Louisiana) to do what used to be a very popular pattern in Pennsylvania.  This Baby Girl already looks great and it isn't even finished yet!  And yes, there's a matching boy that goes along with this if anyone is interested.


Ann has her three borders attached to her newest Fleur De Lis Window and will be ready to start soldering this when she comes back in.  She still needs to add a zinc channel to the window but that can even be done after she starts soldering it.  The border fit together beautifully and adds so much to this design. 


Linda L has her three Pairs Of Pumpkins all ready for backgrounds.  She has one of them all cut and ground and the others are traced out and ready to be cut.  It won't be that much longer before we see the three of these completed. You can see the corner of her second window in the upper left of the picture along with part of the frame that these will reside in.


And in the end we have Betty who worked on a new cross window which is almost complete, a Geometric Beveled Window, and two Santa Faces with a LOT of pieces!  About the only thing left to do for her Cross Window is to grind the background to a perfect fit and then cut out the border.  Her choice is background is wonderful as the cross contrasts with it beautifully.  I'm normally opposed to clear borders but there's a time and a place for everything and I do believe that this is the time and place.


And that's it until we return again with more completed projects and many newly started projects.

Paul
Bayou Salé GlassWorks

Here's the Tuesday night crew along with Russ and myself  sending Cindy a Get Well message while she was in the hospital.


Saturday, September 5, 2015

Guacamole and Chocamole

We had another Fusing Workshop recently that was attended by two of our regular Stained Glass Class students, Becky and Martha.  We had a lot of fun and we covered a lot of aspects of using a kiln.  In fact, so much was covered that we're only going to look at a few projects in depth. 

Let's start by looking at the six projects that our students made. Here are all of Becky's completed items.  We've even put two castoff chunks of pattern  bar remnants in the kiln which made a pair of interesting pendants.


And here is Martha's fusing exhibit.  She was concerned about her checker platter because towards the end things weren't lining up as perfectly as she hoped but as you can see everything fused together wonderfully.


After learning about the tools and the basics of using a kiln Becky and Martha started off by designing some jewelry.  Once everything was cut and set into position the pieces were carefully transferred onto a kiln shelf which Russ carried to the small kiln where they would be fused later that night.


Here's a close look at the jewelry that Martha and Becky made.  It's all created from Dichroic Glass so the colors all shift into different hues and saturations depending on what angle light is hitting them.  Becky was so concerned that she didn't have an eye for jewelry making but everything turned out beautiful and seven she was pleased with the results.


Next up we have the start of a Pattern Bar which admittedly doesn't look like much at this stage of the game.  It's just stacks of overlapping colored glass with empty areas for the glass to slide into and curve around the other colors as they 'melt'.  Actually, when it's completed it looks more like an iPhone cover more than anything you'd make a dish out of.


Here's a look at a Pattern Bar after it is fused.  Those 30+ odd pieces of glass are now one thick chunk of glass with no spaces between them at all.


The pattern bar is then run through a tile saw four times  along the length giving us four cross sections that are arranged to form two separate mirror images.  Those two sections are surrounded by a double layer of black glass and then fused together one last time.  Below you can see that the pattern bars have a matte finish after being cut but once everything is fused they will shine once again.


And here is the finished piece along with two small drop offs of the pattern bar which fused into oval pendants which can be used for just about anything.


Next up we see one of the Poppy Bowls under construction.  Before we give it a bowl shape a 'blank' must be created which is a flat plate of glass which holds the poppy design.  If we started it off in a bowl shaped mold all the glass would run to the bottom once it started fusing.   


Here the designing phase is completed and everything has been covered in a coarse clear frit which will melt and form a nice smooth clear top surface over the poppies that you can see in the picture above.


Once everything is fused together the 'blank' enters the kiln one last time resting atop a bowl shaped mold.  Less heat is used in this final pass through the kiln.  There's just enough heat to slump the plate into a bowl shape while not allowing the piece to completely melt which would case the design to run or melt to the bottom of the bowl.


And lastly, although we skipped the making of the Fossil Vitra dish, here's a closeup of one of them.  It's made with an actual leaf but we're going to leave the making of this piece a mystery until we cover our next Fusing Workshop in October.


It was a fun weekend, very full, and very rewarding.  The process is completely different from anything our students do in our standard Stained Glass Classes so everyone is always amazed at how things work in the Fusing Class.  In October we'll look at the Fossil Vitra dish and the Checkerboard Platter in more depth.  See you then (if not sooner!)

Paul
Bayou Salé GlassWorks