
Round headed pins come in numerous colors and makes. The glass headed pins won't melt (What's that smell?) when your soldering iron brushes against them while you are tacking but they bend just as easily as plastic headed pins so their life span isn't any longer and they cost a lot more. I personally like the yellow headed pins because you can get them in bulk very cheaply. In the past I've exclusively used glass headed pins but I eventually found that they just weren't cost effective. If you're planning to purchase pins for your workshop buy the round headed variety-- they're easily the best.

If I could play a drum roll I'd be playing one right now because Linda L has completed her Long Tall Rose Window. I can honestly say that there's not a single student who didn't say, "I had no clue it was that BIG!" when they saw it (and I'm pretty sure that 95% of our students saw it). A windows size never comes across in a picture unless there's something there to give the viewer a point of reference. Linda's Yellow Rose Window is 50 inches tall, and every cut was made to perfection. We had a small issue with some actual water getting in between the double stacked glass that makes the vase, but you can't see it at all when it's lit up and the amount of water in between is evaporating more and more each day so I think that it all worked out well.

Betty's Angels look great! I know she's still unsure of this project but that's the problem that any artist has when reviewing their work-- they focus on the things that troubled them while making it rather than the admiring the overall piece. There's certainly nothing to complain about here and in the sunlight the iridized wings will stand out even more than they do here in this picture.


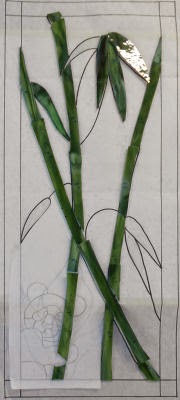
Becky made a few changes on her Bamboo window, the biggest one being the removal of the Calla Lily that she cut out last week. The flower has morphed into a panda! She also decided to make the bamboo green rather than brown because bamboo is dead when you see it in its classic brown/tan color. This window is all about life and just wait until you see the panda!

Next up are Carol's House Numbers which are well under way since she started working on them while at home during the week. When she came into class she had all of her background glass cut, ground and even wrapped. She was going to use an off reddish, orange for the numbers but the glass hadn't come in so she decided to go with blue instead. I think it was a better choice because it's less "look at me" while still having plenty of contrast to discern the numbers from the background from any distance.

Janet's pair of Hand Mirrors are almost complete. One is ready for a piece of mirror and the other just needs to be wrapped first. She's gone ahead and done a little trick I always do by exaggerating the curves in her flowers. I find that small curves get lost once they're foiled and leaded. If you exaggerate the curves you can make them appear as they were originally drawn on the pattern. Look to see these beauties finished when Janet returns.

Gale's work is astoundingly great especially when you consider that this is her first window! Everything fits together perfectly with smoothly flowing lines and nice even foil surrounding all of her pieces. This Heron is officially ready to be laid under the soldering iron when Gale comes back next week.

And Linda F's Wild Thing Window is now ready for solder. I love logos, especially cartoonish looking ones and this just makes me love them even more. They're always colorful and eye catching due to the 'odd' subject matter. Throw in Linda's excellant workmanship and you have a winner here!


Myrt's Louisiana Sheriffs Badge Window is almost ready for its closeup. Because they're hard to see I want to point out how perfectly Myrt cut and ground the six little circles that dot the points of the badge. And even when students get small circles like these cut out nicely, more than a few have sadly managed to cut the surrounding glass imperfectly therefore throwing it all off in the end. But not Myrt.

Then we have Martha who has begun work on her Humming Bird and Fuchsia Window. This is her second week on this and I must say that it's very well under way. The bird and flower are not only cut, but ground as well. With just some green leaves and a background to go I'm going to say that Martha has really got her stained glass act together!

Mary Grace came in and wrapped and tacked the final pieces of her background before we all collaborated on what color she should use for a border. We've seen this window done numerous times with a dark blue border but that wasn't working well with the light blue background. After much searching we finally turned to a color we had ruled out right away--yellow. And it worked! It's not the same yellow that's used for the Sunflower petals but it is similar, just with some orange thrown in here and there. And then to complete it and really set it off Mary Grace will be adding a second border, returning to the same blue glass that she used in the background.

Paula has the center of her Bathroom Mirror all cut which means that all she needs to do is cut and grind a border. It took almost all night to get the large center portion of the mirror cut and ground because it was large and because we didn't want the backing to get scratched. That means that every time it was ground (and it was ground countless times) it had to be held up off of the grinder's work surface. But all that work has paid off as you can see. And isn't our florescent light lovely as well? (Not to mention that cute red camera being held by a skinny arm.)


Bonnie's all set to start cutting out a large Dragon Suncatcher. Made in greens and blues with a hint of red and orange for fire, Bonnie has her glass picked and is ready to get this bad boy under construction. (Or is it a girl? Which ones breath fire?)

Do you want to talk about a long window? Then let's talk about Sue's next project which will be 65 inches long and less than 8 inches tall. Here's an approximation of the pattern (the original was drawn in pencil so I couldn't get a picture.) We may break it up into two pieces but I'm hoping we don't have to because it will really throw it off aesthetically if we do...
Paul
Bayou Salé GlassWorks
No comments:
Post a Comment