
Now, instead of telling me which curve you think matches tell me how long you looked at those curves to make your choice. 2 seconds? 5 seconds, 15 seconds? 30 seconds? Now look at these shapes made of straight lines and tell me which one was made with a straight edge to draw the lines.

And lastly, I sort of tricked you because none of the curves match each other in the first image so if you think any of them do then my point has truly been made!
OK, with that out of the way let me say that Tasha's Standing Vanity Mirror had the cards stacked in its favor to be an amazing piece and now that it's completed I can honestly say that her attention to detail in the grinding and fitting of all those small flowers and leaves has certainly paid off. Attaching the mirror to the shelf proved to be a bit taxing and although the finished piece is sturdy, it is something that needs to be handled with care. Nonetheless, this is certainly a beautiful piece of glass.

Terry's Christmas Bells Window is finished and looking even better than I ever thought it would (and my expectations were high for this). She's used leaded glass sections for the stripes of the bells as well as the clappers and the effect is wonderful. Needless to say, the colors are as perfect as the design itself!

Paula managed to complete four of her boxes this week and they all look equally wonderful. She's learned how to attach the tops to the bottoms using plenty of scotch tape, two small pieces of wire, and two drops of solder. Once the solder is applied the tape is removed and you have a perfect hinged box. Paula has 3 more to go before Christmas and I have no doubt that she'll complete them in time.

Susan R's pair of Christmas Wreath Suncatchers are every bit as beautiful as I remember this pattern being. I used to sell these in amazing numbers every Christmas but I've somehow forgotten about them over the years. Well, thanks to Susan's wonderful work they are in my mind once again. Don't you just love these?

This Christmas Tree is the first of Martha's many Christmas Suncatchers that are under way. We completed this one quickly because we used brass channel to surround the entire tree. Since it was all straight sides this was easy to do and it prevented the tree bottom from just twisting off (straight lines in stained glass are never a good thing). O Tannenbaum, O Tannenbaum, Wie treu sind deine Blätter!

Cindy put the finishing touches on her Cross Suncatcher while in class and then slid the pattern on over to Martha so she can begin one of her own. The bevel in the center usually doesn't photograph very well but it shows up perfectly in this picture.

Terry worked on two different projects this week, one being a repair and the other being a Tree Window. The repair is on the right and the original Cypress Tree pattern is something that Terry designed herself. I think it's amazing, yet I fail to understand how she manages to surprise me with her original designs as much as she does since this is the norm for her!

Roxane's 1189 Street Address Window made some MAJOR progress this week as she managed to finish grinding the numbers and background as well as get a border cut to size for it. She's added a thin white strip of glass along the top and bottom of the background glass so that the red numbers don't bump against the blue border. It's extra work but it helps give some space to the numbers and allow the window to 'breathe' a bit more.


Lara's African Woman Window has so much attention in all of our other classes that it's hard to believe. I've never had so many students ask to see a window that was still being worked on! This week Lara got her two borders cut and ground so this is nearing completion. She's taken it home with her where she will attach the final border and maybe even get some soldering underway (if time permits). This is stunning.

Jan completed the wrapping of her second Bookcase Window and then tacked everything together so we could get a zinc channel on the outside perimeter of it. Once that was done she began soldering it and almost completed the front side. That means that she'll most likely finish this when she comes back in next week.

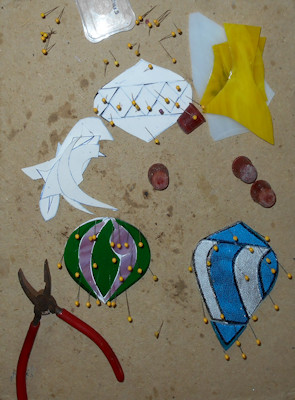
Cindy not only completed her Cross this week-- she also began working on these three Christmas ornament suncatchers as well. She already has two of them cut and ground so look out!
Jeannette's Minnie Mouse Window is all soldered and would be ready to be washed, colored and waxed, but there's still some wire work to do on it. Minnie looks great already but when you see the accent wires attached to this you'll see Minnie all dressed up to the nines. And that will surely happen next week.

Here are the rest of Martha's Christmas Suncatchers, all wrapped and ready to be soldered. I know she's been soldering at home so it will be interesting to see how far along she is on these when she comes back into class. I know they'll be completed in time for Christmas but with a little luck she'll have them finished when she comes back next week.

Ann made major progress on her Cross Window by getting the four corners cut and attached. She has the strips for her first border cut and ready to be cut down to the proper lengths so she'll have a second border attached by the time you see this again.

Our first Industrial Fleur De Lis is Linda L's and just minutes before class was over with she proudly exclaimed, "I'm finished!" She's done a wonderful job on this and next week she'll color it and then we'll get its final picture. Talk about a gorgeous window!

Our second Industrial Fleur De Lis is being made by Betty and although she started this just two weeks ago she's already making great progress with it. In fact, she's got most of the FDL and the clear pieces that will form the thick lead lines ground already. That's what I call fast work!

Sheri has most of the grided, bottom portion on her background cut and wrapped and she'll be tacking it to her Peacock Window before she cuts out any more background pieces. This is how it's done when you want grid work to line up perfectly. Sheri is nearing the end of this project and I can't wait to see it with light behind it.

Our second Peacock Window is being made by Rowena and it's all completed save for the channel and framing. I'll look it over for any problems with the soldering but Rowena knows what she's doing so I don't expect to have to do much at all to get this ready to be colored. She's purchased a wooded frame for it as well so this more than three foot tall window will really bea finished piece of work. I can't wait to photograph it next week with some light behind it. BTW, this is the back side.


And lastly we look at the picture that will soon inspire a window as Shelley begins her three legged cat window which will be based on this drawing that her son made. It will surely be interesting to watch how this progresses from painting to glass.

Christmas will be here before you know it and I want to mention that we'll be taking a bit of a break for the holidays. When we disappear for a few weeks I don't want anyone to be concerned because we'll certainly be back in 2017!!! Be sure to come back for the next two weeks though because there are still two weeks left before we take that break.
Paul
No comments:
Post a Comment