First we started with the pattern that she traced onto poster board. At first she only cut along the outside edge so we had a pattern to make the background out of one sheet of glass. Once that was traced onto the glass and cut out she ground the large piece of background until she had the swirled blue piece below.


And that's all there is to it. The entire process listed above took less than 15 minutes to cut and less than 10 minutes to grind. It saves time AND it makes for a much more beautiful window. Try it whenever you get the chance-- it will change your windows!
Well now, here it is, Mary Grace's spectacular Iris Window completely finished and ready to be hung. A lot of work went into this three foot by three foot window and although she sometimes felt overwhelmed by the number of pieces , Mary Grace never backed away from it. The end result is incredible and that's why it's our featured window of the week.

Beth completed this Stylized Iris Window this week by adding the final border, a brass channel and then some hooks. I had completely forgot that she had this on the 'back burner' until she brought it back last week. She had stopped working on it because she wasn't thrilled with how it was turning out but I have no problem with it whatsoever and I think that Beth likes it much better now that it's all cleaned up.

Terry completed this wonderfully elegant flowing Monogram Window using
two different shades of purple set on a sparkling clear textured
glass. It flows beautifully and her design is nothing short of
impeccable.

Betty certainly got her fair share of work completed this week as she turned out two new Mary, Joseph, and Child Suncatchers (featuring two different but similar color schemes) and another 3D Beveled Flower piece. Betty completely understands how (and why) this was put together in 3 different sections and will be able to figure out how to put any future 3D projects together because of this project.


Tracey completed her pair of Breast Cancer Ribbon Hearts and they look marvelous! She's beyond the point of having to ask what needs to be done next and the proof of that is plainly evident because she completed these Hearts all on her own. Beautiful work indeed.

Angie made a familiar but always beautiful Sunflower Lawn Ornament while she was in this week. The 3D part of this project usually intimidates people but once they see how easily it all fits together they realize that they've wasted their time fretting about nothing and Angie was no exception. Now that she got this finished she says that there will be more Lawn Ornaments in her future.

Barbara H has completed her pair of Kaleidoscope Planes and they are wonderful indeed. The color wheels where a bit tricky to get together but Barbara handled them well and they spin freely and evenly on their axle. The end result s are two vibrantly colored planes with a kaleidoscopic view that boggles the mind!

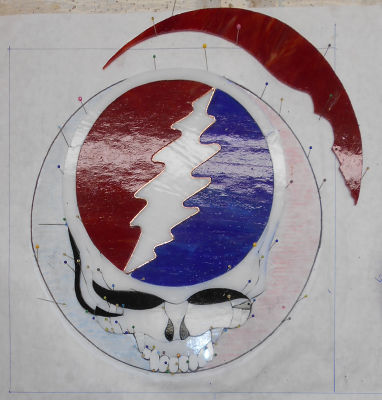
Carol's Grateful Dead Logo may be an odd choice for a window but now that she has it all fitted together you have to admit that even though it's a skull, it a very striking skull and not nearly as scary as you might have thought it would be when considering the subject matter. Her work is perfection and this is going to make someone VERY happy.
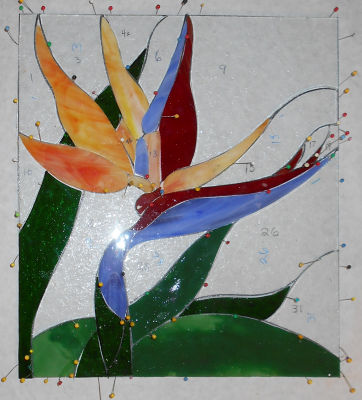
Beth also managed to get her newest flower window, a Bird Of Paradise, all ground while she was in class. Everything fits perfectly and she's about to begin wrapping this when she comes back in.
Lara continued wrapping the bottom portion of her New Orleans House and has about a third of her pieces wrapped now. With foil outlines each piece you can now see the definition and detail that you couldn't see before. However, Lara plans to start working on a second window when she comes back because this one can wait a while while her next window can't. What that window will be will remain a surprise that we'll reveal in out next update.

Susan R has begun a new project this week and as you can see she already has all of the glass for her Beach Sandals Panel cut out and ready to be ground. She's making short work of this and I believe this will be ground before she leaves her next class.

Susan D Worked on the background pieces to her Tree Of Life Window while she was in and let me tell you that there are quite a bit of those sky pieces. They may be small but they serve a distinct purpose in making the tree look light and airy. Now that those pieces have been aligned correctly and cut out she'll be able to begin grinding everything for a perfect fit.

Shelley is moving right along on her Buxom Wine Women Window and she's got probably half of it ground now. I suspect that she'll be able to begin wrapping this by the time she return to class next week because the rest of this is fairly easy to grind. I can't wait to see this one come together!

MiMi cut out all of the individual pieces for her Crab and leaves while she was at home so even though she forgot her pattern pieces last week she's back on schedule to complete this window in record time. This week she cut out her background glass and placed it with the rest of her pieces. The view on the left shows just how wonderful MiMi's cutting is and the view on the right shows the same pieces with the clear textured background cut and placed on top of everything. It may look a little messy right now but that's only because there are so many pieces. Her cutting is wonderful and I have no doubt that she'll have this fitting together in no time.

Roy made an incredible amount of progress on his Family Crest Window this week leaving him with just a border left to go and some glass to square it all off. I'll say that at this point he's got this nipped in the bud. It not only looks great-- it tells a story and has purpose as well.

Becky S has made some MAJOR headway on her trio of Geometric Windows. The center window is it's own design which you can see on the left. Then there are two matching windows on the right that will bookend the center window. Becky is cutting all of the pieces for the duplicate pair of windows at one which means that what you see laid out on the right is actually glass stacked up in piles of two. I always recommend cutting everything at once so you're not bouncing back and forth from the grinder to your cutter.


Patrice came in and got all of the pieces to her Sunflower/Sunburst window wrapped and ready for solder. After she left I checked over her work and I must say that she's got the art of foiling down pat already. This window will without a doubt get its border attached when she comes back in next week.

Cindy is officially ready to move along to the text portion of her Rosie The Dog Window now that all of the missing pieces of the dog itself has been completed. I've got to say that she's matching the picture perfectly!

This week we also saw Myrt get the background cut out for her Pair Of Cardinals Window. She already had the cardinals packed away before I got the picture taken (they've already be ground wrapped and tacked together) so you don't get the full effect of the window but you can bet that I'll give you a better view of this when we return next week.

Last week Rowena cut out the 14 pieces of glass that it takes to make two Kaleidoscope Airplanes and she took them home with her to grind and wrap. This week we got to see her assemble those pieces and add the majority of the wire work to them. She plans to work on the color wheel propellers while at home so there's a very good chance that she'll be finishing these planes upon her return.

And that wraps things up this week!
Paul
No comments:
Post a Comment