
Most people would position it on a sheet of glass as shown below. To be honest that's not incorrect as we like to line up straight edges with the straight sides of the sheet of glass, However, positioning it this way leaves no support for the inside curve. The possibility of our piece breaking incorrectly is increased because there is very little glass 'behind' the curve on either the left or below the piece. Because of this the glass could easily break along the red line due to momentum.

Below we show far better placement because for the glass to break incorrectly (again indicated by the red dotted line) the break would have to travel through a lot more glass which means that the piece is less likely to break.

Next week we'll dive even deeper into this curved piece of glass but meanwhile keep in mind that the more glass you have 'behind' your piece, the better the chances are that it will break correctly along your score line.
Now let's look at Shelley's Titus Window which really looks stunning with it's bold colors and modern design aesthetic. The lack of a border also enhances the avant-garde flavor of this window that many students first thought was an odd choice but who then came around to believe that it was neoteric with its thoroughly sumptuous implementation. Myself, I love it! It's different and it captures your attention-- that makes it everything that a stained glass window should be!

Next up we have Lisa's Butterfly Emergence Window which is another head turner. Many people couldn't envision its end result until it stared them in the face but that's the way truly artistic pieces are made. More expressive pieces are usually overshadowed by the weight of their construction and can't truly be appreciated until they are completed as in the case of this gorgeous window. Wow, listen to me- I'm starting to sound like an art critic instead of a blogger!

Now our next window just radiates inspiration! Annette did wonderful work and created a piece that will almost surely be made over and over again. I just wish my single picture of it hadn't turned out blurry! I've done what I could to sharpen things up but it's muted the colors of the cross which I can't get to reflect its actual colors. Still, I believe the point comes across and it proves that this is another standout piece in Annette's stained glass portfolio.

Betty completed the Address Window that she made for a Wrought Iron Pole that she purchased just for this application. She couldn't hang it as she initially wanted to but I believe our solution works even better than what Betty originally envisioned. Address Windows are quickly becoming the fashion here in our classes and Betty's work will do nothing but further promote the desire for our students to make more of these. By the way, there's your lottery number for the week!

Lara put the finishing touches on her latest Flower Window and her use of iridized purple for the ball in the upper corner photographed perfectly (which is never the case for iridized glass). There's a third companion window ahead on the horizon for Lara so don't be surprised to see something similar in the immediate future. The simplicity of this design makes it nothing short of charming!

Angie started and completed two bird Suncatchers this week, the first being a Beveled Dove and the second being a Large Swan. Something tells me that the Swan is going to be popular around here...

Jeannette, as expected, got the soldering all touched up on her Religious Themed Window and once we hung it up it really shined. The use of two different purples for the borders is what really makes this window. I'll be honest and tell you that using different shades of the same color in a window usually enhances the overall look as you can easily see in this piece. Jeannette is also working on a Coffee Window that I somehow didn't manage to get a picture of. I guess I'll show you that when we return next week.


Kerry finished his LSU / Tiger Window and when he had it all washed and ready to hang we discovered that one of the eyes had cracked. Since the eyes are made out of glass globs it was a definite hassle to remove. While breaking it free we also broke one of the pieces of glass surrounding it which actually went better than I expected since I was sure we'd lose BOTH pieces that surround the pupil. All in all the repair took about 25 minutes but now you'd never know there was a problem at all.

Linda F completed her Sunflower Panel and already has another one in the works that is very near completion. Here's a look at the first one and next week I believe we may very well be looking at a similar image mixed in among our completed projects.

Tracey's new Cardinal design is in the midst of being ground so that all of her pieces fit together perfectly. She's left out the branch in the upper left of the window (which is visible on the pattern through the glass that she's used for her background). We will add a simple lead line coming from the beak that extends to the left side of the window to make the cut for the beak possible.

Belinda's semi-circular Birds On A Branch Suncatcher is also coming together as you can now clearly see what it looks like in glass and what color choices she's made. She's got some amazing detail here and she's also learned that you need to fill in the open areas between pieces with clear glass to give stability to the project. And when I say clear glass, I don't mean textured. The idea is to create the illusion that those open areas are empty which textured glass won't do.)

With her borders cut and attached as well as the channel being added to her panel, Ann has begun soldering her Rosebud Window. I apologize for the brownish tint to her border-- it actually doesn't look like that at all and once we get some light behind it you'll be able to truly appreciate the actual color of her border. Cameras mixed with fluorescent lights can sometimes mess up certain colors.

This is Susan D's Pelican which she successfully ground during class. Trust me when I say that it's a far bigger piece than you might think when you see this picture. It's a different kind of big bird for sure! I'd tell you that it won't be long before this first one is completed but I got a text from Susan last night saying that she already has it assembled and decorating her back yard already. She's not only capable of accomplishing great work in our shop but at home on her own as well. I'll share a picture of the finished piece in our next edition of the blog.

Betty has begun making a Scrap Owl which is exactly what the name implies. Utilizing almost nothing but scrap glass this owl will be colorful upon its completion. Now that the face is done Betty is free to let go of convention and let chaos control the colors! Rules no longer exist in this piece.

After she finished wrapping all of the pieces on her Fruit Bowl Jeanne L discovered that just one piece needed to be re-cut to make this fit together perfectly. In a window this complex that's a very good end result because the foil expands everything and it doesn't expand evenly throughout the piece. She's going to tack this together and then replace the missing piece before cutting out the background glass when she returns.

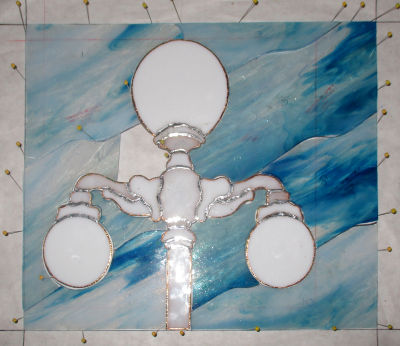
Here's Martha's newest Streetlamp window with its background glass almost completely cut. We only had one sheet of glass and things fit VERY tightly so we were VERY careful when it came time to separate those pieces. Once that was done we were able to rest easy and that's when I wasn't VERY careful and I broke one her pieces that I wanted to help cut. Never run your cutter off the edge of the glass-- that's how this was broke. Luckily, another sheet of glass was just delivered so we can replace it now.

And Mary is also making excellent headway on her Magnolia Window. She's got a good 80% of it ground and I suspect that she'll be wrapping pieces when we see her again. The leaves look stunning because she randomly mixed up the pieces between the light and dark sections of one sheet of green glass. Sometimes you really want contrast and this is one of those times.

MiMi has her Combat Vet Paratrooper Window all cut out and she's already knee deep in the hoopla into the grinding process. She's begun with the piece that rests in the corner of the square she's pinned down and is working on radiating outward from there. Look out because this will be landing soon.


Barbara came in and got all of her bevels wrapped and even managed to get the center bevel tacked together. Since this didn't come with a pattern we had to make our own and that involved pinning the bevel cluster together, tracing it out, and then folding the pattern in half to make a symmetrical drawing to build it on that works with both sides. It may sound easy but it can be time consuming. Of note is the fact that once you have the pattern it can be used with ONLY that particular bevel cluster. Others clusters, even though they're the same, will differ and not fit the pattern. Now that the bevel is tacked Barbara can cut the four remaining pieces when she comes back in next week.

Here's a look at Susan R's interpretation of the Mixed Drink Suncatcher. She's going with a pink drink and since one of the scrap pieces was close to fitting the umbrella she's going to make it fit and have an umbrella that matches the drink itself. How's that for accessorizing!

And here's Linda F's second Sunflower Window all cut out and waiting to be ground. The colors may be slightly different but the design is the same. It won't be long now.

And we end this post with a look at the pattern for Cindy's Three Birds Window. The actual birds and the berries that hang from the branches have already been tacked together so we designed this pattern around those finished pieces. We'll get a better idea of what this will look like when we see it again next week and some of the glass has been placed onto the pattern.

Wow, I've been thinking that we haven't seen many completed pieces in the past few weeks but this week we had an overflow of finished windows! I think thinks are beginning to return back to normal in our classes!
Paul
No comments:
Post a Comment