When you make a score line you can always break it from either the start of the cut or the end of the cut. A lot of times it won't matter but sometimes (frequently, in fact) it does matter. You always want to start on the end of the cut that is closer to the curve. Also, when you use your running pliers to start the break BE SURE TO ADJUST THE SCREW SO THERE IS VERY LITTLE PRESSURE ON THE GLASS! That screw on your Running Pliers is there for a reason and it's why students who insist that they don't need to adjust their pliers to get them to work need me to cut certain pieces for them.
For beginners, the following cut should be made in three steps. First the red line (point to point), then the green line, followed by the purple line. Each time the break NEEDS to be started near the curve (at the bottom of the glass) rather than at the long straight run (at the left of the glass). If you break it from the left side of the glass momentum will take over and make the break run off of your score line. Also, be sure to cut this inside curve before making the straight cuts so that your piece has more 'bracing' behind it. Failure to do so will increase the odds of your glass breaking incorrectly dramatically.

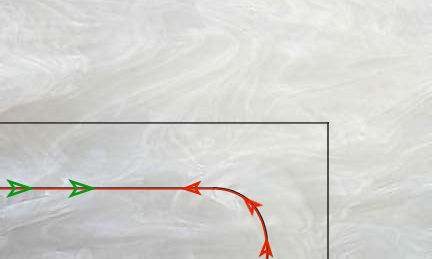
Just remember that if you make any of the straight cuts before you cut the curve you will most likely break your piece when you finally cut that inner curve. We ALWAY cut inside curves first so they have the strength of all that extra glass behind them.
Okay, so last week we saw Susan D's Pelican all ground and laying out on the pattern and now this week we see that while she was at home she soldered it together and then bent copper tubing into a circular, spiraling design. Once that was done she soldered it all together and then added the stained glass Pelican and fish to the copper tubing. The finished project is huge and looks incredible. This is a success story all around! Job well done.

I'm happy top say that Ann's Yellow Rosebud Window was completed in just two short weeks. Even though she's been out of our weekly classes for two years she's lost none of her skills. As I promised last week you can easily see just how nicely that border works with the rest of the window. This also shows what a difference having some light behind a window can make when it comes to photographing colors. I know someone who is really going to love this window when they receive it!

Belinda's circular Birds On A Branch Hanging is perfection through and through. She even attached the beaded eyes onto each bird both front side and back! You've got to love the fact that she aims to do it all by herself. And when she does it's magic.

Jeannette's Coffee Window is probably already hanging up on her kitchen wall and for good reason. She knocked this Window out in just two weeks and the end result is stunning. This monochromatic design borrows some of it's aesthetics from the Address Windows that we've been seeing here in the shop lately with one big difference-- she's replaced the curves with straight lines which fit this design wonderfully.

We have two new students this week so our last two completed projects are butterflies. We had Cheryl join us on Tuesday for her first class and this is her red Butterfly. We expect great things from her and she'll start with an Address Window of her own when she returns next week.

And this is Helen's purple Butterfly. Helen took classes with us a long time ago but had to leave after her first five classes. When she came in this week we started from square one and had her make a second Butterfly which she accomplished with ease. She's already picked out her first project which will be an LSU window that you'll see when we return.


Linda F has her next exchangeable panel cut out and is ready to begin grinding. Flags are tough to do in stained glass due to all the points on the stars so it's always interesting to see patterns that stoke patriotism without setting fire to your cutting and grinding skills. This is a beautiful compromise to a tricky problem indeed.

Mary Grace was back and she resumed work on her Candle Holder. Since this is a three dimensional piece she had to grind and tack together each of the four sides in a jig so that everything would line up perfectly and the bottom would be flat and not angled. There are only four lines left to solder on this and them Mary Grace will cut out and attach 6 small flower blossoms to finish it off.

After finishing her Rosebud Window Ann spent the remainder of her night working on a Cross that she had cut out 2 years ago and forgot about. As you can see she managed to get it ground before she called it a night.

Roxane was busy wrapping all of the tiny, thin pieces that make up her beautiful Angle and I have to say it's great to have Roxane back with us. Her work (especially her foiling) is of the utmost quality. When this window is completed I think others will ask about the pattern and then possibly decide against it when they see just how many tiny pieces it takes to make this Angel.

MiMi's Paratrooper Window is almost halfway ground (well, the logo part of it). The feathers that make up the wings are so perfectly ground that you'd swear they came from a kit! But you know what? They were all hand cut and hand ground by MiMi herself. Her work proves that if you take your time and strive for perfection you can achieve it.


Next up we look at the Mixed Drink Suncatcher that Shelley has started. In just one class she was able to trace the pattern, cut out all of the glass, and then grind it all for a perfect fit. I have a feeling this could be finished when she returns.

And here's another window that has taken complete form in just one quick 3 hour class. Susan D traced out the pattern for her Address Window and then managed to cut out both the numbers and the background glass. She's set to begin grinding this and after it's tacked together she'll decide on how many borders this will get and what color(s) the border(s) will be.


Angie had a busy day with us as she split her time between 2 Butterflies and an Angel Wing Heart Window. I'm thinking that we'll see at least two of these completed upon her return if not all three of them. I'm interested to see what color she picks for the border on the Angel Wings.


And that's about all we have to show you this week because I am slipping! First off, Melissa managed to grind 4 small Fleur De Lis but I forgot to take a picture of them so you will surely see a LOT of progress made on them when she comes back in. Secondly, Cindy got everything but her background glass cut ground, wrapped and tacked together in her Bird Window. And lastly, Martha's Streetlight Window is ready to be tacked and then get some borders added to it. Be sure to drop on by again in a weeks time to see if I can remember to take pictures of everything that I'm supposed to and to see what we've been up to in each of our classes.
Paul
No comments:
Post a Comment