Understanding what cuts are possible to make and what isn't is a huge part of your glass cutting skills. Knowing instantly if a piece can be cut in just one score or if it will take multiple scores will save you precious time. Inside curves (a curve that cuts into the piece you are saving) are the hardest cuts to make and most times you'll need to cut those curves multiple times to get them to release without breaking your glass. Here's a quick and simple guide to understanding what cuts can be accomplished in just one pass.
First we need two measurements: The depth of the curve and the length of the curve. The depth is measured from the deepest part of the curve to the edge of the glass that you will be removing (shown below with the vertical purple line). The length is measured from the curve's starting point to its ending point (shown below in blue).
If you can fit 3 or more depths along the length of the curve then you may very well be able to cut that curve in just one cut. The green arrows below are the exact same size as the purple arrow (just running horizontally rather than vertically). You can clearly see that you can't fit 2 depths along the length of the curve. That means that this cut is most probably impossible to get out in just one cut. I would make this cut in small, multiple cuts.
Each of the green arrows below are again the same depth of the purple arrow and as you can see we can get more than five of those depth measurements along the length of the curve. Anything 3 or more is great so this would be an easy cut to make with just one score.
Once you follow this 'one to three' formula just a few times you'll be able to easily tell if you should whittle away at the curve or just take it in one simple cut.
Now this was an exercise in patience. Sheri ended up with a last minute deadline to finish her Sugar Skull and to be honest I didn't think that she would make it-- but she did! Most impressive though, is the fact that the quality of her craftsmanship NEVER wavered. I've put this along side the Sugar Skull that I made last Halloween and I'm not embarrassed to say that I like Sheri's more than I do my own! This is a piece to be proud of for sure. Look at those teeth (and eyes)!
Lisa also made a completely stunning Window this week and it all started with a small cut glass bowl. She was originally going to just frame this only on the sides and leave the top and bottom blank but in the end she added two more clear borders which frame the entire piece up beautifully. This is a winner for sure and people sure seem to love it over on the Facebook Stained Glass Patterns page as well.
Kerry has completed a stained glass Ames Window which is actually an optical illusion. It works best seeing it in action rather than knowing exactly what the finished piece looks like. Watch the video and realize that the 'window' is NOT wobbling back and forth. It's spinning completely around. You may need to watch it a few times to see it because this is like those magic eye books from back in the 90's. It may not come to you at first. I've looked on line and found an easier to see version
here which also reveals how the illusion works.
Betty finished up her latest pair of Fleur De Lis Suncatcher and they are both very striking. They also sparkle quite nicely in the sunlight. Whenever you use Textured Cathedral Glasses you you can be sure that your finished piece will shine brightly.
Lastly in our completed projects we have a Kaleidoscope Biplane that Martha made a few years back which needed some MAJOR repairs after it fell off of the shelf that it had been residing on. Let's just go ahead and call it a rebuild because the plane itself was, without a doubt, totaled!) A cat may very well have had a helping paw in that sad accident but as you can see it's back together again better than ever.
Let started a new panel this week and even got it all traced onto glass and cut out. Once that was done she moved on over to the grinder and got the bottom half of it ground as well! I have no doubt that she'll be wrapping these pieces when she comes back in because at this rate the rest of the grinding won't take her very long at all.
Susan R is on a roll (almost literally) as she cut out three Easter Egg Lawn Ornaments in assorted pastel colors. The egg on the right is the toughest one to grind but she's got that one ground already. That egg may only consist of three pieces but all of those zig-zags can be murder!
Sheri also managed to get a large Owl Suncatcher mostly cut out and she stumbled upon a wonderful discovery while making it. The branch that the owl sits on broke while she was cutting it but rather than re-cutting the piece she simply shortened it and used it as it was. Unless the person who ultimately receives this finished owl reads this blog they will never know that the size of the branch was changed because either way looks fine.
Meanwhile, Steve is hard at work making five fused glass doors that match the stained glass door he made back in January. He spent his class time working with a strip cutter system getting all of his straight pieces to line up perfectly. You can see the small colorful squares that he still needs to assemble all around the blue sharpie marker which helps give you a sense of scale for this small but detailed piece. He's got one door put together and the rest will go together quickly now.

Robert has his first beveled border tacked together as well as the thin, red, inner border that rests next to the bevels as well. The leaves just the eight rectangular center pieces and the thin final outer border which expand this to it's finished size. Robert still isn't entirely sure of what he wants to put in the center pieces but he's got ideas that he'll be considering in the weeks to come. There's no need to rush because he has one more of these he can start on before deciding what to fill the center sections.
Afrer finishing up her Fleur De Lis Suncatchers Betty worked on a new LSU Panel which is almost completely ground already. With only two pieces left to cut and grind I'm thinking that this may very well be completed upon her return. Betty is making short work of this, that's for sure!
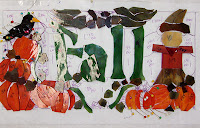
Take a look at Susan D's Fall Panel! She's also made some major headway in just one short week and now she's grinding all of the glass that makes up the different subjects in her window (a scarecrow, numerous pumpkins, and leaves). Once they are ground and tacked together she'll cut the background glass and make it fit to the pieces that she's already cut. A background should always flow around the subject matter, not vice versa. That will make an excellent tip for next weeks post.
Speaking of the background flowing around the subject matter, Jan's Santa is now getting all of those tiny leaves cut into the background glass as well as some of Santa's red coat. In this case the coat is considered to be part of the background because the leaves are in front of the coat. Jan is now taking each leaf, tracing around it and then cutting the 'background' glass to ensure a nice even fit. It's far faster to do it this way than to cut all of those pieces individually in the beginning of the project. There's far less grinding this way.
Linda L's first Beach Scene is looking incredible and a lot of that has to do with the fact that she's mixing greens throughout her palm fronds. Right now it's hard to see but when this gets a little light behind it this will truly come alive!
Linda F is getting all HLB'ed out. She has got the majority of work done one these five panels having just two more borders left to cut, grind, and foil. After that the soldering should be a nice and relaxing change of pace for Linda!
Barbara H has the flower to her Louisiana Iris all ground and she's going to be wrapping this when she comes back in. Again, this is a case of making the subject flow around the background because Barbara will tack the flower together and then set it on top of a piece of background glass which measures 7 x7 which she will then cut into the individual pieces. This may also turn into a 'step by step' tip in the weeks to come...
Lastly we look at Ann's Lady Of Guadalupe Window. It's almost completely foiled now so it's easy to see the details throughout the design now that each piece is defined by foil. This will surely have a border attached when we see it again next week. I can't wait to see what Ann picks for a border color.
And that wraps up everything for the second week of March. This year is flying by so fast that I'm expecting to see new Christmas Windows started any day now!
Paul


No comments:
Post a Comment