
When Roxie forgot to bring the letters she had wrapped the week before she decided to make something quick and simple. This Beveled Charm Chain seemed to be the ideal project since she had some spare bevels in her bag of tricks. Last week we saw her bead the bevels, and tin all the copper wire that she would then wrap around a length of tubing to make circles which she then cut and twisted into various wire decorations. This week she randomly soldered the wire and some glass globs to the bevels and ended up with this great Charm Chain.

Forgive the picture quality here but Roxie also made this stand alone beveled suncatcher when we all decided that it added too much length to her Charm Chain. On it's own it's a wonderful gift for any window where sun comes through.
 Myrt completed her Grape/Wine and Cheese window this week and while it was sitting there waiting to be cleaned Russ looked at it and said, "There's a problem with this window." I can't believe I didn't spot it myself. Can you see the problem? It's corrected in the second photo so you can play the old "find the differences in these 2 photos" game. I'll give you a hint, it's not the color of the glass. Those differences exist only because the two photo's were taken at different times during the day.

 Well, the problem is that the right wine glass in the top photo is both in front of the wine bottle and behind it at the same time! It would appear that when I drew the pattern I erased the wrong hidden line. It certainly was easier to do it the first way but easier is not always correct. Either way you look at it this is a really nice window that has received a lot of compliments since Myrt started it.
Next up we have a look at Terry's 2 windows. As you can see, the top one just needs the border to be attached and then a bit of soldering that Terry will undoubtedly do at home.
 The second picture is the wider center piece without the background or top and bottom borders. While I was working on the photo of this last week I felt as though something was missing. After pondering it for a while I decided that Terry needed another row of tan trim bordering the center oval of the design. And when Terry came in this week she told me that she thought something was missing as well! I told her that I'd been thinking the same thing and when I showed her what I'd do to fix it she agreed. Here it is with the added row of tan surrounding the center oval. And now, it's perfect.

Sonia left her class with her Peacock all cut out. It looks like it's going to light up really nicely (although that's hard to tell from the photo). Sonia will be grinding this when she comes back in and then when it's tacked together she'll add the 5 pieces of background glass and then decide what colors to use for her elaborate border.

Sadly, the glass for Janice's border had not arrived so she did some soldering on her window this week. At least her time wasn't wasted. Borders go on quickly and when her glass does come in this window will be completed rather quickly.
 Fran came in with her ducks all wrapped but she needed to add a row of white trim on the feathers. She tacked together what she had cut and foiled and then we filled in the missing pieces with white glass giving her the 2 perfect ducks that you don't see below because I didn't get to snap a picture of them before they flew out the door with Fran. :-( Instead you'll have to look at her ducks from last week once again.
 Cindy worked on her front door insert and hit a slight snag. Unfortunately we were unable to turn up another piece of the main color she was using so she found another sheet that was similar and is now replacing the pieces she cut. She started cutting this Hummingbird Flower window out while she was at home this week and when she left class she had the background glass all cut and ready to be ground into place.
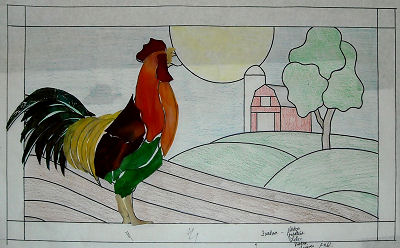
 Bonnie P. wanted to do a rooster window for her kitchen but she wanted a specific Rooster with specific colors. So we drew it out, found a nice farm painting online and put the two together to make this pattern. I was thoroughly impressed when Bonnie got all of her Rooster cut out in one class. And as you can see it's fitting together nicely before it's even touched the grinder! I suspect that with the hardest part of this being completed we'll see it all cut out next week.
 Anita's LSU Window is coming out nicely. She has the tiger eye sitting on top of the letters and as you can see she has it all just about cut out now. In fact, the eye is all done and ready to be foiled. I suspect she'll be ready for a border when we see her next week and then it will just need some soldering.
 Grace is BACK! And since Grace doesn't like to do things the easy way she's making this detailed Medical Window. The rhythm section is cut and ground so she's moving along on the hard parts first. This is shaping up to be a real eye catcher when it's completed.
 It certainly was a busy week for classes with a lot of projects started. And it doesn't look like anything is going to be slowing down any time soon.
Paul
Bayou Salé GlassWorks
No comments:
Post a Comment