A standard ruler consists of 12 inches or, as it's more commonly referred to, 1 foot. Each inch is broken down into 16 smaller sections called sixteenths of an inch. Since each inch consists of 16 of these little lines we can correctly assume that there are 32 of these little lines inside of two inches, and 48 of these lines in 3 inches etc. etc.
Any measurement can be broken down into 16th's of an inch. In the picture below the first red arrow is at the 3/16's of an inch mark. We arrive at this by counting the little lines. The second red arrow is at the 7/16th's mark and the third red arrow is at the 11/16ths mark. What do you think the measurement is at the fourth red arrow? If you said 14/16's you are correct.

If you can count to 16 then you can always read a ruler. Of course, it helps if you have good eyes especially if you are always going to be counting those little lines, but there are easier ways to do that as we will discover in the weeks to come.
Now I've been anxiously waiting for this one. Vickie's Fruit Bowl Window is a wonderful example of an old pattern done in the more modern Copper Foil Method. I think that we can all agree that it loses none of it's charm. Vickie's work was spot on all throughout this project and I especially love the color that she picked for her border. It really gives the Window an feeling of old charm.


This week we saw Charlie put the finishing touches on the second window of his pair of Beveled Windows and while he was coloring his first window we found a crack in his second panel. :-( It wasn't a big deal though because Charlie got to learn how to fix breaks in a window that has already been soldered. Although it didn't take long to fix, Charlie was only able to bring one of these windows home with him. I washed and colored the second one for him the next day so he can begin working on his newest project when he comes back in next week. Here's a look at both of his windows.
Bonnie's Snowboarder is airborne and even possibly boarding a plane. I never hold much hope for getting a window on a plane as a carry on because even pre 9-11 I've known people who have had problems bringing larges glass pieces onto a plane. And I've seen how they handle your checked luggage and there's no way I'd trust a window to the luggage loaders. That said, Bonnie's window is a perfect piece for the snow boarder in anyone's life. I know she'd like to make more of these because she had such a fun time making it. Contact her if you want one! :-/


Then we have Linda L who has all three of her Pair of Pumpkin Panels completed. These slip into a nice heavy metal stand that gets pushed into the ground which will display each window as a lawn ornament. And they can be removed from the stand easily enough to make exchanging them a piece of cake. Is anyone else thinking of seasonal Lawn Ornament panels? I think Linda might be.

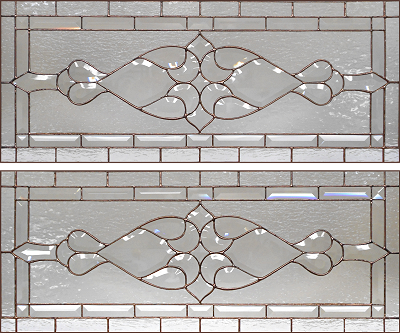
Betty completed yet another of her Beveled Geometric windows. I love the red-- it contrasts beautifully with the bevels and the textured clear.

Betty also finished working on her two Santa Faces. Betty says that these are a lot more work than she anticipated and I completely agree with her. She's going to be doing some 3D Butterflies soon and I think she'll find that the 'work invested until the completion factor' will be much more effective. There's a good reason those butterflies are so popular!

Carol also managed to make this nightlight while she was at home. I must confess that when I first looked at it I saw it as three 3D cubes rather than a star. now I can make my mind see it three different ways which makes this a new favorite of mine because I love optical illusions. (Scroll to the bottom of this post to see what I see.)

Brenda's made HUGE progress with her purple Fleur De Lis Tiger Window. When she left last week she was a little intimidated by the number of pieces in it but as Brenda is like to do, she came back in with this project almost completely cut out. About the only thing left to cut is the LSU that forms the bar of the Fleur De Lis. This is going to look great when it's completed.


Linda F also has her border attached and has begun her soldering process. She was a little worried about the humming bird's eye that she forgot to grind a hole for but we're going to make it work without any problem at all. In fact, it may even be for the best that we're changing the way the eye will be made because it was going to blend in to the dark head and be hard to see the way we originally planned. I think that our new idea is much better solution.

Myrt resumed work on her Cross De Lis Window that was working on concurrently along with her Butterfly Window. This week the Cross De Lis got her full attention and it looks like she's making great progress. I don't think it will be long at all before she starts tacking this together and cutting out her background.

Ann came in and set straight to work on her newest large Cross Suncatcher. She always puts her own spin on the colors and always comes up with a nice pattern, this being no exception. She's got this one all ground, wrapped and tacked together so she'll be soldering this when she comes back in. Look to see this one completed when we return

Betty started working on this black Fleur De Lis Window which features a wispy black baroque background. The key to using baroque glass as an effective background is to cut it all out in one continuous piece so that the swirled pattern remains intact. As you can see, Betty succeeded in doing just that. Just look at the way the pattern of the background glass flows continuously throughout the window.

Jeanne has her Tiger all tacked and is officially ready to begin cutting her background. Jeanne is going with a clear krinkle glass for the majority of the background and is considering using another clear textured glass for the ground portion of the tiger. It's amazing how completely different this Tiger is from Susan's even though it's made from the same pattern. Color choices can drastically alter how we see windows.

Paula is making a Hurricane Sports Logo at home but needed to re-adjust a few pieces while she was in class. She had a little help at home and let's just say that her help really liked using the grinder. But Paula's got it all coming together now and before you know it we'll see this cut into a background with the team's name spelled out in glass below it.

Martha helped Pampered Chef us in class this week along with her friend, Stacey. They did a marvelous job providing us all with some great food. And all the while Stacey was cooking Martha was cutting out her paper pattern for her Sea Food Window. Before she called it a night Martha began cutting out actual glass and placing it on her pattern.

Rowena began working on a new Fleur De Lis window featuring the FDL that was in her oval window. This time she plans on placing it into a rectangle and as you can see she's already got most of the FDL cut and ground. Once that's done the rest is like a walk in the park.

Terry would have had her Humming Bird completely tacked together but she left a piece of the beveled border on her work table. Just replace it, right? Well wouldn't you know that we didn't have a single 6x1 bevels in the shop? But that's okay because we simply left a space for it and then got everything else cut and tacked into place. When she gets home Terry will be able to wrap the 'missing' bevel and simply drop it into place. I suspect we'll see this finished when we see it again.


Sue is plowing through her newest LSU Window and got her borders cut, ground, and even somewhat attached. She's decided to go with one large square in each of the corners rather than two. She hasn't picked out what color she'll be using but I'm sure we'll have the answer to that question when she returns to class next week.

Cindy is a regular suncather machine and kept making more UL/Pepper suncatchers. I don't know how she feels about all these little projects but I can't wait to see her start a full sized window. Although her suncatchers are beautiful I feel her talent isn't being used to its fullest when she's making small projects like these.

After completing her Bird Of Paradise/Initial Window Becky decided to do something a little smaller and has begun tracing out the pieces for 3 different 3D Roses. She's got yellow, red and white lined up for the colors but since I couldn't see the marker on the red glass I cropped that out. But you get the idea of what's going on from the yellow and white pieces of glass.

And that's all that's fit to print for this week. We hope to catch you back here again after our next set of classes.
Paul

It's all in the eye of the beholder.
No comments:
Post a Comment