Monday, January 29, 2018

Conveying Meaning In Today's World Thru Stained Glass


Cutter maintenance is really very simple involving just two steps.  1) Just roll your cutter's head through a drop of oil before you start class and 2) remember to clean the slot that the cutting wheel resides in by inserting a pin every few weeks.   When I first posted this tip everyone was upset that I hadn't mentioned it earlier but this week I ran into two student cutters that were jammed solid.  


The slot above the cutting wheel is where all the oil accumulates trapping with it bits of glass, dust and other grime.  Once you've cleaned the slot out with a pin run the wheel through a drop of oil and you're all set!


First up in our completed projects this week we look at Lara's Starry Night Window.  I must say that all her work has paid off handsomely.   Based on Vincent Van Gogh's painting, Lara has put her own twist on a very famous and classic design.  As flawless as her workmanship is, I must say that her soldering is really the high point of this window.  


This week also saw Rowena finish her Bird Of Paradise Window.   Look at the way the leaf that runs behind the flower lines up perfectly even though its view is obstructed.   That's one of the hardest things to teach because people often look at their window piece by piece rather than as a big picture.  Yet Rowena does it with ease as is clearly evident.


Then we have Sheri who altered our standard Peacock Pattern and then really made it her own by adding a specialized border to it.  The end result is perfect and now she's moving along to a project with even more pieces.


The pattern for Terry's latest Flowing Angel Suncatcher has been tweaked each time she remakes it and this one looks even better than her last one did.  Red hair on an Angel?  Most people would go with blonde but this proves that until you actually see it, you just don't know what you might be missing out on.


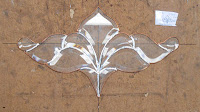
Terry also began work on this Geometric design which will be the topic of our tip in the beginning of the next update.   By the time that gets posted we may very well see the majority of this completed.


Beth has started working on a new window this week and it's going to be an Address Window for her front yard.   She has a nice sturdy metal frame that this will be mounted in when it's finished so this window will be good and safe out in the elements.  She's moving along at a nice pace and doing wonderfully with her cutting.  I think she'll begin grinding this when she comes back in because she wont cut the text portion out until after the top section is tacked together.


Our second Geometric Window is being made by Melissa.  As you can see there are a lot of repeats around the edges of this design but the work will surely go smoothly.  Melissa plans on tacking together the center circular section before getting into the harder outside edges so that the center section doesn't shift  while she's getting things on the outside to fit.  But before she tacks this she'll be adding a few amber accent pieces which you'll see next week.  They'll be small but very noticable.


Barbara H wanted to make a simple beveled Turtle Window and then she decided to add a beveled border to it to 'spice it up' a bit.  While she was working on the background she decided to angle the turtle which made all the difference in the world on this design.   I like it!


Rowena loved this Sunflower design and just had to make one for herself.  I completely understand the attraction because I want to make one of these also.   What you see below is the sum of one class worth of cutting.   That's what I call making excellent time!


Susan R's Mardi Gras Mask Panel is all cut out and just about ready to get a background attached.  She'll tack this together before cutting her background pieces for the very same reason that Melissa is tacking her window together-- to ensure that everything stays lined up as we add more pieces into the mix.


Becky S's Peacock window is looking fantastic and now that everything is ground I have to say that it fits together absolutely flawlessly and I am NOT exaggerating.   I'm unsure of what she plans to do with borders but we'll discuss that next week before the background glass gets cut.   Personally, I think a double border is required on a window of this level of elegance!


Bonnie is just waiting for some flesh colored glass to come in so she can finish cutting her Three Ladies Window.  The background will be clear and there will be some green grass added along the  bottom edge and then she'll begin grinding.  The good news is that the flesh colored glass has come in. 


Angie has her border attached on her Compass Rose Window and she also has the front side almost completely soldered.  With just the back side left to go I think that this may be completed upon her return!


This is the start of Brenda's first of two Transom Inserts.  We spent a good deal of time trying to figure out the placement of the inner beveled border but it all worked out in the end.  The sad thing is that after she left I found that I had already worked it out about a month ago and had it pinned to the wall where I didn't think of it or see it while Brenda was in class.   Sadly my mind is slipping!


Linda L's got the zinc channel curved and attached to her Easter Mickey Mouse and then proceeded to solder the front side of it.  Now that the front is completed she's able to flip this window over and move along to the back side of it.  Since she's taken it home there's a good chance that this will also be  completed when we next see it.


We seem to have a common theme running through this post.   Below is Mary Grace's 'B' Window and she's currently working on wrapping the pieces that she has cut and ground.  Why is she wrapping before everything is cut?  Because we want those stems that run throughout the letter to line up PERFECTLY and this is the best way to do it.


Myrt's second Ribbon Bordered Fleur De Lis Window is moving along very quickly.   With a lot of this already ground she'll be knocking this out in no time at all.   In fact, it may be time for her to start thinking about what she wants to do next.


Then we have Shelley who came in and filled in all of the missing background pieces in her Tree Of Life Window.  Now that everything has been tacked into place she's ready for her first border. 


Mary is back and she's never been one to shy away from a window with a lot of pieces so why would she do something easy now?   This Dream Catcher Window may have plenty of pieces but the end result is going to be spectacular.   In following with the theme of this post Mary will make the circular section and then tack it together before she moves along to the rest of the window.


And to wrap this up we take a look at the Cardinal Pattern that Tracey is going to start cutting glass out for next week.   She needed to make a second Cardinal  Window but didn't want to do the same one that she did before.  After some hunting through the pattern drawers she found a number of different patterns and ended up picking this as the winner. 


That's what happened this week--and so it goes!

Paul
Bayou Salé GlassWorks

Saturday, January 27, 2018

On Being Lackadaisical

Our tip this week is so simple that it's almost always overlooked.  The reason for this is because the sponge that comes with your soldering iron stand isn't worth 2 cents.  People use them because it came in the box but trust me when I say that it's just a waste of time.   For a sponge to be effective you MUST have it extend up and over the lip of the depression that it rests in.  In this first picture you can easily see that the sponge is nowhere near tall enough to be useful.  


Here's the same holder with a replacement sponge.  This sponge is taller than the depression made for it in the soldering iron stand which allows the tip of the soldering iron to travel quickly and smoothly over the top of the sponge without the sides of the holder hindering your movement.  When cleaning your iron's tip you simply make just one quick pass on each side of the tip.  Holding the tip of the iron on the sponge does NOT clean it all all.  Also, make sure the sponge is thoroughly SATURATED with water.  Having a merely damp sponge isn't good enough at all.  It should sizzle when the soldering iron touches it.  


With that out of the way let's move along to Melissa's Sunflower Window which was finished in an astoundingly short amount of time.  She did most of the work while she was at home which is VERY impressive considering that this is only Melissa's fourth project with us.  Just look at all of that detail and the high quality of work that she's put into this!


Beth also made quick work of her project when you consider that she started this just last week.  This is her second window and she's not afraid to throw herself at a project full force.  Straight lines are always the toughest cuts to make since any variance or unevenness shows instantly but as you can see, Beth has everything lined up beautifully.


I know that Christmas is behind us already but Betty didn't want to wait until it was 'timely' to start this Christmas Noel Window that she very much wanted to make.  As always, she did another marvelous job if I do say so myself.


Becky S has started grinding the Peacock that she cut out last week.   Since the background is made up of only two pieces of glass, she's going to tack together this all together and then trace it only a rectangle of her background glass for a nice perfect fit.  Yep, this is one of those times when we get to be bad and 'break the rules'.


Bonnie is making quick work with her Three Ladies Window which we are now going to call the 'Mother and Two Daughters' Window.  Which one is Bonnie?  Well, she's the shorter one of course!  During the past two weeks we've seen Bonnie contemplate a number of different versions of this design.  She's definitely doing the best one now..


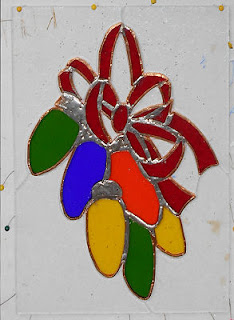
Next we have Linda F's Christmas Ornaments Window.  Although the clear class background is very hard to see in the picture it IS all cut, ground  and pinned into place.  She'll be wrapping this while she's at home so when we see this again it will surely have a border cut for it.


And lastly we look at Betty's Fleur De Lis Flag Window.  She cut the background glass out of a single piece of glass and this was all that she was able to fit on it.  We have a second sheet but decided to tack this together before she attempts to fit it together.  This will keep the window nice and square.


Yes, it was another sparse week her in our classes due to weather.  Winter hasn't been this hard on us here in Louisiana for many years now.  Hopefully this is the last cold spell because all this time off is driving me crazy.  I feel like I'm retired and understand why it takes getting used to!

Paul
Bayou Salé GlassWorks


Tuesday, January 23, 2018

It's Getting Hot In Here

Lately we've had a few Grinding Shield questions so I thought we'd lay down a few tips here in the blog here this week.  First and foremost-- NEVER WASTE YOUR MONEY ON A PLASTIC GRINDING SHIELD!  Some of these come with a built in magnifier as a selling point that makes them sound so much better than they actually are.   See, the plastic get scratched up quickly from all of the glass that it's protecting your eyes from and they are usually fit for the garbage within 2 months of purchase.  INstead of a plastic shield get a holder that you place a piece of glass in.  When the glass gets covered in glass chips just wipe the underside clean with a DRY paper towel.  It's easy and will last you forever.  Also, don't forget to secure the glass with a piece of scotch tape running from the top of the glass and over the metal shield holder to the bottom of the glass.  This will prevent you from accidentally knocking it out of the holder and onto the floor where it usually breaks.

Ok then, let's see what happened in class now.   Terry had completed her Angel as a Suncatcher and was then asked to put a name under it.  Since it was too late to turn it into a window Terry did the best thing she could and made a nameplate that hang from the bottom of the Angel from two chains.  Changing a pattern AFTER the glass has been cut for it (or in this case soldered together) is a very difficult task but Terry handled it beautifully.


Tracey made almost all of this Madonna and Child Window while she was at home and boy did she did a wonderful job with it.  She finished soldering it in class and as you can see it's spectacular.


This is Rowena's Bird Of Paradise Window all tacked together with its double border intact.   The strip of white that you see running along the right hand side is just a piece of paper under her clear border.  With the front side completely soldered this is just about ready to be seen hanging in a window!


Linda L's Easter Mickey Mouse has all of its background glass cut out as well as its multi-colored pastel border.  I have to say that Linda has done a superb job on this project all around (get it?)


Beth was looking for a quick something to tide her over until she got the actual dimensions for the next window that she wanted to make and she decided to do the same design that is in our bathroom.   In just one class she was able to cut and grind all but two pieces of glass for this project and that's what I call moving fast.  But she never would have gotten this far if I hadn't stood my ground and stopped her from neatly coloring in the pattern pieces that she will throw away after this is completed.  I understand the need to be fastidious but there are times when it just slows you down in a bad way.  Our concern is with the glass itself NOT the paper pattern (as Beth will attest to herself now).


Now this is impressive work.  Melissa got the majority of this Sunflower Window cut and ground while she was home last week.  That's a lot of pieces and she did an incredible job.  She's got her border cut now and has taken this home where she hopes to attach the border and get most of the soldering done on it.


Mary Grace's 'B' Window is coming along wonderfully as well.   With just the final border pieces to cut out she is now able to begin grinding all that she has cut out already.  Remember that we almost always leave the border pieces uncut until the center section is tacked together.  I have to say that this looks great!


Angie was with us again this week and she was able to tack together the round portion of her  Compass Rose Window and then get a background cut out to shape it from a round window into a rectangular window.


Lara's Starry, Starry Night Window has its first side completely soldered and she'll be moving along to the back side of this when she returns.  I don't think it will be very long before she can call this project completed.


Susan R made major headway with her Mardi Gras Mask Panel and is moving along quickly on it.   As you can see it's fitting together beautifully.


Becky S has almost all of her Peacock cut out but she was a bit unsure of what color to use for the inner feathers along the bottom.  While she was making up her mind about what to do with them she began grinding the pieces that she already has cut out.  I have to say that this is progressing nicely.


Martha's Daylily Oval is all tacked together and she's just begun the soldering process.   Before you know it this will be another finished project and she'll be able to put another notch in her lipstick case.


Terry just can't get enough of these beautiful flowing Angels because, as you can see, she has another one already in the works (but this time without a name plate).  I have to admit that I love the flowing red hair that this angle has!


Myrt's second Ribbon Border Fleur De Lis IS moving quicker than her last one did.  This is always the case in re-makes and Myrt is no exception to that rule.


Shelley's Tree Of Life Window is all ground and all she needs to do is tack it together and then cut a few missing pieces.  Once that's done she'll be on her way to a multi colored border!


Sheri's Peacock Window is very close to being completed now that she has the front side soldered.  Look to see this as a finished window before you know it!


Tasha was back in action with us this week and she's begun work on this beautiful Poppy Scene Window.  She's considering adding some green leaves to it but we'll see what happens.  As I pointed out with Terry's Angel at the beginning of this post it's always much more work to add things into patterns after they've been been cut out in glass. 


Carol worked on three Beveled Cross Suncatchers this week and as you can see she has them tacked together already.  All they need is solder and they'll be completed.


Brenda has two more Transom Windows that's she's starting to work on.  IN other words, Brenda has begun wrapping the beveled center pieces hat make up her transom windows.   Here's a look at one of them tacked together.


2018 is well upon us and attendance this week was FAR better than it was the week before.  Alas, weather and illness is still taking it's toll here though as you will surely see in our next post.  

Paul


Wednesday, January 17, 2018

(sigh)

Right after New Years we tried to have classes again but our students were all sick with either colds or the flu.  Some classes cancelled in entirety while others only had had one or two students.   I was looking forward to having life return to normal but illness essentially gave us another classless week where only seven out of thirty students were able to come in!!!!  Since this update is late in posting I can tell you now that attendance was MUCH better the following week.   As the first week stood, here's a look at what our 7 students accomplished after the New Year began.


Mary Grace was able to completed her beautiful Tree of Life Window featuring an assortment of colorful leaves which are framed within a border made from the same colors in random shapes and sizes.  Together they make a lovely window that Mary Grace had a great time making.


Bonnie's  Santa Face was completed right after Christmas and the workmanship is as beautiful as the window itself.   On Russ' recommendation she left the most of the lead silver but colored the  frames of his eyeglasses in black to give them some contrast.   The effect is readily apparent and really 'sells' the spectacles.  Beautiful indeed.


Linda V's Mickey Mouse Lamp has disappeared for a while but it was completed this week and it really turned out stunning.  Featured two different poses alternating across four sides Mickey is instantly recognizable.   Someone else in class has taken Linda's pattern to this so we may very well see this done again before you know it.


Susan R has started a Mardi Gras Mask Panel and she's certainly not one to be afraid to make a window with a lot of pieces.   She not only shrugs her shoulders at large numbers-- she could also care less if those pieces are small or even tiny.   Let's face it, most of Susan's windows have been barely over a foot wide with close to a hundred pieces in them, this being no exception.   Still, I'm betting that she makes quick work of this.


Melissa started working on a Sunflower and Bee Window and WOW! has she made some incredible progress on it.  This is all ready to be wrapped in foil  and she only has one week of work in on it.  She told me that she thinks things have 'clicked' with her and I'm going to say that they certainly have.


After completing her Tree Of Life Mary Grace got right to work on this elegant 'B' Window.   There will be vines cutting through the letter that she'll cut AFTER everything is ground and fitting together.  This will ensure that both the vines and the 'B' line up perfectly thus completing the effect.  I'll tell you something-- those deep cuts into the 'B' didn't give Mary Grace any problem at all.


 Betty's Noel Window got tacked together and she got the front side of it soldered as well.  She's also begun working on a large Flag window that features three small Fleur De Lis'.   With the FDL's already cut and tacked together she'll be able to cut the background out after the next glass order arrives (and it is in the shop as I type this). 


Linda L has her own Mickey Mouse in the works and this one is an Easter Window which is all set to get a background cut out (which shouldn't take long at all).   After that she'll get the round outer border cut out (which will take a little longer than normal since it's round) and then this will be ready for solder.   Doing this early in the year ensures that this will be ready to hang when Easter arrives.


Our second Tree Of Life Window is being made by Shelley and she's just about  got everything ground now.  There are a few pieces that turned up missing that she will fill in after this is tacked together and once that's done (which certainly won't be long from now) she'll be able to work on a multi colored window if she wants to border it that way.


And that was what happened during our first week of classes for 2018.  Our next post will return to its normal size and should be up by the weekend.   See you then!

Paul
Bayou Salé GlassWorks