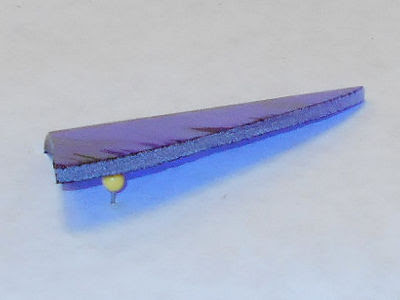
Sometimes shortcuts can be taken when cutting glass. The trick is recognizing when you are able to take them. Note the brick chimney below to the left. It consists of 9 bricks each being very tiny. Of course you can cut each brick individually and then work at the grinder to get everything to line up but that involves precisely grinding 35 sides for a nice fit. There's an easier way. Simply cut the chimney in one large piece and then grind that so that it fits perfectly and you can see the pattern line around all the glass you've just cut. It should look like the image on the right.

Next follow the horizontal lines with your cutter and snap them so your chimney is now 5 individual pieces. (see the image below and to the left) Because they were cut from each other they will fit together perfectly. Lastly, make your four vertical cuts. This will leave you with your 9 individual bricks. Now just evenly skim each piece on your grinder. There's no need for extensive grinding because even un-ground, if you push all the bricks together they'll fit together perfectly. True, you're still grinding 35 edges but you aren't trying to make them fit together because they already fit. All you are doing at the grinder is making sure that you take off enough glass to allow for your foil.
Now you can't ALWAYS do this but you'd be surprised at how often you can. Leaves and feathers may sometimes look too 'processed' when the grain matches perfectly throughout a large area of pieces but keep this tip in mind because it can be a real time saver.
So first off in our completed projects I have to say that Ann's Cross Window is spectacular and that's largely due to the elaborate border that surrounds it. Many times a triple border can overwhelm the subject matter of a window but in this case it's 100% perfect, especially since Ann introduced no new colors in the border. Her soldering was also spot on which helps make this window the stand out piece that it is.
Rowena drew this pattern entirely on her own and did a fantastic job. She said that it took most of an afternoon but I recall a time when drawing a pattern would take me that length of time as well. As with anything else, speed comes with practice. That this finished Cupcake Window turned out so deliciously is well, like a cherry on top!
Rowena certainly had a busy day with us as she also completed her Easter Bunny Panel. The changes she made over the past few weeks were all for the best as this looks as good as it possibly could. Note the common borders between her two completed windows this week. If you find a good thing you stick with it!
Tracey's newest Cardinal Window put a new spin on a popular design by making it circular. I think she likes round windows as do I. They tend to stand out just a little more especially if the circle is perfectly round as this one is. That's the trick to making a circular window-- keeping it absolutely perfect. Don't forget to admire Tracey's flawless lead lines!
Kerry's work is complete on his Humming Bird Window. The Baroque Glass that he used for the background is really the thing that sets this off the most. The swirling unbroken texture that runs throughout the cuts in the glass makes a statement as to how much time was taken in the creation of this wonderful window.
Linda L finished her Eagle/Flag Panel and even had time to spare. Her attention to detail is meticulous as her flag waves proudly and accurately. She didn't get to use the border glass that she wanted to on this but I honestly believe this one is better than what she originally wanted.
Jeannette made herself a Large Easter Egg while at home and she brought it in to be sure that the hooks would hold and that the deign itself was sound. It all looked fine to me and now this is ready to be delivered just in time for Easter.
Bee worked on two more boxes and by the time class was through she had them finished and ready to be presented to their owners. These small boxes are perfect gifts-- not too big, not too small, and very lovely to look at. Alas, she says she's now officially through with boxes (for the time being, anyway).
Martha is working on another Pelican Window but this one comes from a different pattern. With one bird under her belt and this one being somewhat easier I believe that she'll finish this before you know it. She's already well under way.
Linda L also also managed to get this Butterfly Hoop design cut and ground while she was in this week which means that we could see this completed when she comes back in. The body will be covered in lead which will also match the hoop that holds this all together.
Next up we have Jodie who made incredible progress on her first window by getting it all cut out and ground in just one night. Sure, there's still a border left to cut but as regular readers know that takes no time at all. I'm quite sure that this will see a border attached to it when Jodie comes back in because she's taken this along home with her so that these pieces can be fully wrapped in foil upon her return.
Mary Grace has all of the glass for her Double Sunflower Hoop cut and ground which means that this will be completed upon her return. She really started something when she began this project as many of our students now have hoops that they plan on filling with glass.
Cindy is also working on a Pelican Window that may look very familiar since it's the same one that Martha finished not that long ago. Cindy was cutting it as as close as possible with the glass she's using for the back feathers but she managed to get all of them cut without having any glass left to spare. I guess you could say that the pressure to not break anything was on full force!
Susan R finished grinding her Spiral Easter Egg Wreath and is now hard at work wrapping it. Since this is a large suncatcher there won't be any background glass to cut which means that if you haven't noticed she's already nearing the end of this newly started project of hers. I love the design.
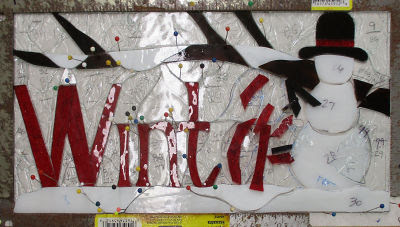
Susan D has all of the glass cut out for her Winter Scenery Panel and spent all of her time working at the grinder. The small pieces in this don't scare her at all but since this is such a detailed piece Susan will have to leave plenty of room in between her pieces for foil or this panel will grow and twist as she covers each piece with foil. I have no doubt that she'll do fine though.
Kerry not only finished his Humming Bird and Fuchsia Window but also began work on a Unicorn Window as well. See that red circle? It's pointing out the pattern piece for the eye of the Unicorn which Kerry will cut in one piece rather than three pieces. When the shape of the eye is ground into place he'll simply place a black circle on the eyeball, trace around it, cut it and then have a perfectly shaped eye with minimal grinding just like we talked about earlier.
Judy finished grinding the six remaining pieces in her Scales Of Justice Window and then set upon wrapping all of her pieces. By the end of the night she had finished foiling everything which means that she'll tack this and get a border attached when she comes back in. The end is near. Also note that the edge of the book has pink lines running through it. This told Judy not to cut the pattern along those lines. The pages are one piece of glass and now that everything is ground and fitted together she'll cut the pages into 4 separate sections and have a perfect fit. Our tip comes through again!
Sheri has her Lady Bugs all in a row and is ready to wrap them and the solder them together. There's still the leg issue to resolve but as I said last week, we'll cross that bridge when we get to it. Also, as you may have noticed, Sheri also managed to get a Double Sunflower cut out for a hoop of her own.
Cheryl's Mr Bingle is so very close to being completely ground now. There's a small break in one of her background pieces but rather than replacing the sky we will simply extend the smaller piece next to it so that it fills in the unexpected opening. In the end, no one will ever know.
Linda F worked busily on her owl Suncatcher and not only finished grinding it but started foiling at as well. Kudos to her for figuring out what the tip I was going to tell her would be. When cutting the three yellow sections that surround the pupil of each eye she should just cut one large yellow oval, grind it into place and then split it into the 3 individual pieces as we discussed earlier. In this post we've now seen three examples of this technique.
Lara spent her night soldering and by the end of the night she had everything leaded on both the front side AND the back. That means that this only needs a channel attached to it after which Lara can wash and color this sweet little Cityscape. These building will soon be open for business and I'm thinking that will be next week.
MiMi's got her hands full but she's still loving working on these Hexagon Door Inserts. She's got her mind firmly set on what the finished room will look like when she gets each of these panels completed. That vision is what motivates her as she cuts, grinds and wraps each of these endless identical pieces.
And after completing her large Cross Window Ann even had time to begin a new
Flower Hand Mirror before calling it a night. Now that's what I call
being productive!
Lastly, Jeannette did have her Heron Window ground when she came in which means that she spent a lot of time at her grinder during the week. By the time her class had ended she had her window tacked together and the first of two borders attached. She'll be soldering the front of this during the week and that final border will go on quickly when she returns.
And there you have it, another week cut somewhat short due to bad weather. We had no classes on Wednesday night of Thursday morning and when the rain came down on Wednesday evening and the thunder and lightning began I was happy that no one braved the elements. Next week we hope to be back to full classes though!
Paul


