Monday, May 30, 2022

Fortunate and Unfortunate Failures

Lara always makes windows that are thoroughly distinctive and this Profile Of A Woman is no exception.   Does it take a couple hundred pieces to make someone do a head turn to look at your design?  No.  Sometimes it's all about restraint and how that simplicity is executed.  The ever-so-slight accent 'color' that Lara used in this is the iridized white that runs throughout the ribbon.  Perfection all around.


Cindy finished her Deer Heads Window but had a small problem with it when she first walked in the door.  The right side of the face on the buck was a perfectly straight line which ruined the flow of the face.   What to do?  Well, she knocked the offending piece out of the face, rounded out the background glass using the small 1/4" grinding wheel, and then re-cut and replaced right side of the face.  Now it curves nicely and looks very natural.  I just wish I had a picture of the original drawing so you could see how perfectly she's managed to capture it in glass.


Linda F has changed up our popular Stained Glass Cross Suncatcher by substituting a square bevel in the center where a heart usually resides.  This was done to make the cross look more masculine.  Linda changed the pattern herself and although you might think that's an easy thing to do you'd be surprised at the number of people who wouldn't dare to attempt this feat.   I slowly eased myself into creating my own patterns by first making small changes on existing patterns so this is a VERY important first step.
 
 
Susan D made two beautiful three dimensional Cactus flowers that she's put into flower pots.   I didn't get a great picture of the second one but it's a duplicate of this one so just use your imagination.  These three dimensional flower pot decorations are the current rage in our classes.  Before we move along let me say that Susan made the assembly process of these look easy.   

 
Susan S also designed this Moon and Stars Hoop when she found a hoop within a hoop while shopping. Her mind took off and this is what she came up with. The stars themselves actually glow in the dark and after this picture was taken Susan put some glow-in-the-dark paint on the glass that makes up the moon as well making this a stained glass piece that's enjoyable in either bright daylight or the still dark of night.


Betty made three more Cardinals complete with wire work (again, use your imagination for the other two-- they all looked the same). The trick to bending wire is to make sure that everything curves smoothly with no kinks distorting the flow of the wire. As you can plainly see Betty's stained glass skills AND her wire bending skills are formidable.


Lisa worked on four Monogram Panels (of which I got four good pictures) and she got each one ground, wrapped and tacked together  perfectly.  Next came her borders with corners that match the color of each respective letter.  The borders and corners just need to be ground and wrapped and then these monograms will essentially be completed (save for the simple soldering job).


Susan R loved the Rosebud Panels that she saw here in a post a few weeks ago and is putting her own spin on the design by making only the rosebud itself and then soldering it as either a suncatcher or a Flower Pot Ornament. You've got to love the red water glass that she used for the flower-- it has just the right amount of deep red that a rosebud needs.


Kerry has begun work on a new project with a lot of pieces. This circular Magnolia design is always popular and has the distinction of always looking better than anyone expects it to when it's completed. This week Kerry got both the white and the darker white sections of the petals cut out. Next comes the leaves themselves where the bulk of the pieces in this window reside.


Steve Worked on replacing the glass inserts to a lantern that he picked up which had just clear glass in it.   It would be a simple matter to replace the clear glass with some textured iridized glass, right?  Well it's always the simple tasks that take the most time.  In the end the replacement glass was too thick and after much angled grinding (on the glass) and filing (on the lantern) he decided to take a breather and work on this Sunflower Suncatcher.   He got it all cut out so this is ready to hit the grinder!  Oh and there will be some wire work on this as well.


Susan D also worked on a Cardinal of her own (although this one is a female) for another in the set of lead cast branches that she has.  This one is all cut, ground, wrapped and ready to be attached so this will be finished when you see it again.


Let doesn't sit still for one minute. She left with just a pattern for this Margaretta Window last week and came in with all but the piece of lime cut out, ground, and wrapped! We showed her the easy way cut and grind those pieces and then she finished the day off by getting a border attached and the front side completely soldered. When this is finished I'm going to suggest that we all have a drink (or two) to celebrate!


Robert has one of his windows all ready for solder (the bottom one) while the top window just needs some background glass cut into place to finish it off. The glass that he likes most looks like it will be back in stock on the 3rd of June so we won't see the top window completed for another week or two.  The good news is that Robert has got three other windows just like the bottom one all set to be tacked together so there's a good chance that will be done quickly.


Judy did NOT have a fun night  this week.   Her Teapot/Plate Window was going to be finished before class ended and she was looking forward to taking it home to hang but while she was soldering the entire class heard what sounded like a small gunshot.  We all looked around wondering what made that noise and then we discovered that the heat from the soldering iron caused the plate in Judy's window to crack  straight through.  I was honestly shocked considering how thick the middle of the plate was.   But Judy isn't defeated!  She has a duplicate plate at home and next week we're going to try knocking this one out and replacing it with the new plate.  If that doesn't work we're just going to replace the plate with some other textured clear glass and no one will be any the wiser. 


Look at this! This is MiMi's second to last Hexagon Window all ground and ready for foil. I can guarantee that there will be some kind of celebration when the last of these windows is completed, which will be very soon now!


I would swear that I took a picture of Linda L's pair of Beach Scene Windows, but then I'd be wrong.  Maybe it was because we rushed to get her sky cut out before class ended but more than likely it's  because I'm just flat out losing it.  At any rate, Linda got her two crabs cut into place and the sky for one of the windows all cut out as well.  Here's a photo shopped rendition of what things sort of looked like  after she called it a day.


With only about a dozen pieces of background left to cut out Shawn is quickly approaching the next phase of the creation of her Arms Window-- the borders.   Luckily they come together quickly so I thoroughly believe that the hard part of this project is over with!


Cheryl's Tree Of Life Window is really taking shape now and there's no doubt that it will be colorful. I think Cheryl understands that no matter how many pieces there are to grind you just take them one at a time and do the work. At the end of class you'll surely see progress happening if you take it slow and steady.


Martha's Franklin Street Light Window is all cut out now.   This custom order had a single request when it came to colors:  make it black with some gold accents.   Martha hit both requests without making a truly dark window by using Fractures and Streamers glass throughout it.  


It looks to me as though Mary Grace is set to begin grinding her latest Peacock Window.   I only see one piece of branch and the beak of the bird left to be cut.  Only when this has been ground and tacked together will she begin to cut her background so that it will be the exact same size as her last Peacock Window.  Although we don't want the same colors between the two windows we do want the sizes to be precise. Mary Grace is moving quickly through this one-- I always say that you can almost cut your time in half when you make a window a second time. 


Lastly we look at Annette's Transom Window. This is the back side and it's almost completely soldered already. I have to really call out the quality of Annette's soldering- is it absolute perfect? May not quite, but is it better (MUCH better) than what you see being sold in stores and at craft shows? Hell yes! This will be completed upon Annette's return and she should really be proud of it because her skills have grown in leaps and bounds while making this!


So that's it for this week.   Long story short, this is my second time writing this blog due to a technology issue that I've taken steps to squash.  In my experience I've found that computers can cause just as many problems as they can fix.
 
Paul:    "Open the blog.txt document, Hal!"
Hal:    "I'm sorry, Paul.  I'm afraid I can't do that."
Paul:    "What's the problem?"
Hal:    "I think you know what the problem is just as well as I do."
 

Paul


Monday, May 23, 2022

Whatever Arouses Your Eyes

Here's something that's interesting but rarely (if ever) brought up in class.  When you grind a REALLY small piece it can be beneficial to flip the bottom side to the top and then quickly skim it around the grinding wheel again.   This helps keep the edge of the glass at a nice even 90 degree angle which helps  make wrapping the piece a whole lot easier.
 
First off this week we have Let who has managed to make this beautiful detailed Poppy Window in just three short weeks.  When you realize that  Let is out newest student, well, that really puts things into perspective for you.  Look how perfectly the stems of the flowers line up and connect across multiple pieces of glass.   Let's eye for perfection will take her far!


Linda F's Monogram 'M' Window with morning glories really turned out spectacular.   Sometimes a simple pattern can be just as impressive as a complex  design and this window easily proves that.   Everything from her soldering to her cutting and grinding is perfect on this.


Susan R's large stained glass Aloe Plant is finished and ready to be potted.   I've taken the liberty of photoshopping a pot below it to give you a better idea of what this will look like when Susan displays it at home.  This was built in three layers so there's actually a little bit of depth to  this.


Martha's Louisiana Iris Panel is small window but a huge success.   I know it looked very dark the past  two times we saw it but now that it has light behind it you can clearly see what beautiful glass she picked for the purple flower.  Mixed colors always bring some extra realism into a design because nothing is ever really one flat color.


Steve's got his three newest Fused Glass Doors finished.  The minor difference between these and his previously made doors is that these feature 45 degree angles cut  along the bottom  'wood' sections making them match the actual door better.  Either way, they're each equally as charming as the next.


Kerry's completed his trio of Agave Plants and these things look incredible.  He's made his hand sized which makes for great tabletop decorations.   Hmmmm, it looks like he has a place for one more small one there in the center...


Mary's second Humming Bird Panel may use a different color scheme from its first iteration but the beauty of the design is still very much front and center.   Mary has been showing a high level of proficiency with her stained glass abilities and this window, that she made with little to no help, shows off her skills admirably.


Lisa's newest Spinner has a hook at the bottom which allows an accent piece to hang off of it.   I tried everything to get a video of this spinning along with the accent piece hanging from the bottom but all I could get were very small and blurry videos so I decided to let it go.   After all, a picture speaks a thousand words, right?


Betty has two more Dragonflies under her belt and she even managed to repair a third dragonfly after  replacing a wing that 'somehow' managed to separate itself from its foil and hook.  These are the joys of selling and repairing pieces that you've made.


Mary Grace really buckled down this week and managed to get almost all of the peacock portion of her second peacock window cut out.  This one is a mirror image of the first Peacock that she made but she's changed the colors up by making this in various shades of green.  All I can say is that it's stunning already.


Susan R started and made excellent progress on a Rosebud Panel of her own.  The red glass that she's picked is incredible when it has light behind it.  Judging by the speed at which this is going, it won't be long before our readers get to see this with some light behind it to show off that red glass.


Cheryl has wanted to do a tree Of Life for a while now and started cutting this out at home.  This week she began grinding all of her pieces and she's well on her way towards getting this colorful window fitted together.


Steve also began working on two Initial Panels.   There's also two more letter 'A' Panels that have been cut out by Lisa but I didn't manage to get a picture of those.


Judy's Plate Teapot  Window has taken shape in a big way this week.   With all of her glass cut and ground (save for the border) I'd say that it's safe to say that this is one sweet idea.   Plates are becoming the rage here in class and projects like these show you why.


Ann's colorful circular portion of her 'Cross' Window is almost completely ground now having just a few more pieces left to go at the bottom of the circle.  This section will be completed and then the thin cross portion (there in the upper left) will be tacked on top of the circle to finish the whole thing off.. 


June finished cutting all of the glass for her Nursing Window and has moved on over to the grinder to make sure that each piece fits perfectly into its position.   Once all of this is ground she will cut in the ECG lines and then wrap her pieces in copper foil so they can be tacked together.


Melissa's still a little unsure of her background glass so she's been working at the grinder.  Once this is tacked together she'll be able to place different pieces of glass under it to see exactly what the window would look like with each given piece of glass.   That really takes the guesswork out of the window making process.


Cindy's been very busy working on not one but two different windows.  Her Blue Heron is all cut and ground with only the border left to be attached while her Deer Window is all set for solder.   The two deer were based on a drawing that someone wanted to immortalize in stained glass because it was a sketch that their father had drawn.   Cindy has made sure that it will never be erased now.


Martha is also trying to work out a background glass for her new Franklin Street Light Window.   She's thinking about Fractures and Streamers and she's almost to the point where she's going to have to make a decision because the hard work is already done on this.


Linda F also spent time working on her Stained Glass Cross.   All she needs now is a few border pieces to finish this off and I do believe that will happen upon her return next week.


Annette's Transom Window is officially being soldered now and it's certainly not failing to impress everyone who sees it.  This is a perfect example of how slow and steady wins the race.  Annette took her time cutting and grinding this and here she is nearing the finish line with a gorgeously stunning window.


Here's one of two beveled borders that Robert wrapped and then pinned down to a board.  He's having a large bevel made for the inside of this (and the second one that isn't pictured) and I think the bevel centers have been created judging by his text message to me.  We're possibly going to see this soldered next week.


And this is another pair of Door Inserts that Robert is making.  We were short four  3/4 x 4" bevels so Robert has filled their opening with four  1" x 4" bevels to give us an accurate size so the center of this can be cut in the weeks to come.  Rest assured that those oversized bevels in the center of this WILL be replaced with the correct bevels as soon as they come in.


Shawn has tacked her arms together (that sounds odd) and she's begun filling in her background.  She wanted something clear but she also wanted something that you couldn't easily see through.   The granite backed glass that she picked is perfect for this application. It won't be long now.


Shelley's Circular Mermaid is all set for solder.  All this missing pieces have been filled in and she even got her round zinc channel attached.  The soldering should go fairly quickly on this and, dare I say it? There's even a chance that this will be completed upon her return.


MiMi's well on her way working on her 13th Hexagon/Hexalong Window.  Alas, that '13' came into play this week as MiMi managed to drop two (or was it three?) of her pieces onto the hard cement floor of the shop.   They didn't break, but it's interesting to note that this is the first time (I think) this has happened in the making of all of her previous windows. Leave it to unlucky number 13.


Linda L spent the day wrapping glass so that she can tack this second beach Scene together and then cut the 'missing' red crab into place.  This one is close to completion and will be finished before you know it, but not before it gains a small crab in the center of the sand.


And there you have it.  See you again next week when the finished windows will all be different and then works in process will be even closer to being completed.
 
Paul


Monday, May 16, 2022

Spilling Your Flux Is Part Of It

Wire work is an added accent that you can apply to most suncatchers if they are flowers.   In windows we add wires to form cuts that can't actually be made in 'real life'-  the wires fool the eye into thinking that there are cuts that only go partially into the glass.   In suncatchers they are used as accents to add delicate sweeping curves to a piece.  The question that I'm always asked is 'What sized wire should I use?'

The answer is simple but not always pleasant:  The wire should be VERY firm to the point of being somewhat difficult to bend.  If you use a very soft, thin wire it will easily and quickly distort and make your suncatcher look worse than if you hadn't added wire to it.   
 
Wire work is NEVER easy.  It adds considerable work and effort to the piece you are applying it to and if you can't do it correctly then you should consider skipping it altogether.  It's always an optional step.


So with that said let's jump on into our completed projects this week starting with Martha's colorful Butterfly.  I'm really impressed at just how far along she's come.   Even though she's uncomfortable with a ruler she managed to mark and score her border pieces perfectly. Her colors are striking and her finished work is something to be proud of.  And most important of all, it's completely symmetrical.


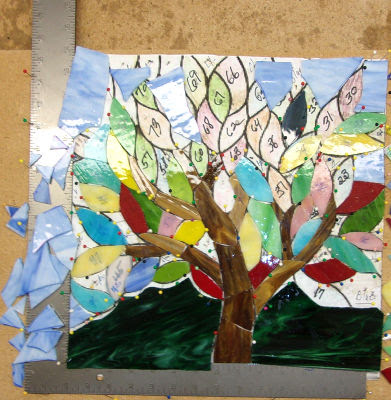
Susan D brought her back Fall Window back so I could get a finished picture of it while it rests in the frame that she specifically made it for.  The autumn colored Fractures and Streamers glass that she used for the background really look like falling leaves and complete the illusion of this being set in a Pumpkin Patch while in its height of 'bloom'.


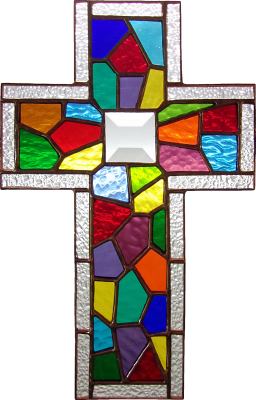
Cheryl made this unique Cross design because she fell in love with it after seeing it in a stained glass shop out of state.  The owner/creator graciously gave her a pattern for it and Cheryl immediately set upon making this one for herself.  It certainly has a very Wabi Sabi quality to it which is part of its appeal for sure.


Up next we look at the Cardinal that Judy completed.  As I mentioned before the tail feather was attached to the bird in a manor that created a hinge point which means that it can easily fold along the  lead line that attaches it to the bird.  Once a lead line folds the piece falls completely off.   To prevent that from happening we added a small branch to the bottom of the bird which stops the tail from folding.  A simple, stylish and practical solution indeed.  Why doesn't the flower fold off?   Do you see that small downward curve it makes along the back of the bird?  That small angle prevents a hinging motion from happening.


Betty finished another Owl this week and decided to leave the lead silver for this one.   She felt that it went well with the blue glass that she used throughout the Owl and I agree.  Silver and blue ALWAYS go together well.


With a bevel yell, he cried more, more, more!  Robert has his next two Door Inserts under way now that he's worked out the design.  Since he's using outer bevel borders he had to figure out a combination of sizes that took him close to the measurements that he needed the inserts to be.  Now that he has a game plan he begun wrapping all of the bevels so he can tack them together and hopefully get a single piece of glass beveled for the center of these two windows.


Melissa's Heron Window only has some background glass left to be cut but she isn't entirely sure of what that will be yet.   She's begun grinding her pieces and even got the top rim of flowers foiled while she was in class.   Once this is tacked together she will be able to try different glasses behind this to see just what they will look like.  Melissa does know one thing though-- there will be a beveled border added to this next.
 
 
Let was a busy woman while she was at home last week.  When she came back into class she had all of her Poppies Window ground AND wrapped!  So the first thing she did was to tack everything together and then we set upon cutting out her borders. Now that everything is cut and attached Let can begin soldering which means that the end is near!


Betty began a trio of Cardinals which will be finished off with a holy leaf, some berries, and a little bit of wire work which we will most likely see next week.Wire work doesn't scare Betty at all!


Mary has her second of three Humming Bird Windows ready for solder and I have to give her some extreme praise for the way she got her background cut out and fitting together.  Most students cringe when they trace something out onto a solid piece of background glass but Mary didn't even blink  an eye.


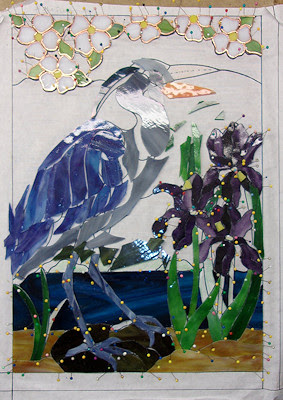
Wow, this is another window which saw some impressive progress happen to it in just one week.  Cindy's got this Blue Heron  together!  I love the glass she picked for her sky.  There's just something about having thin threads of purple in the sky that really appeals to me.  I'm sure that we'll see this get a border attached to it when Cindy comes back next week.


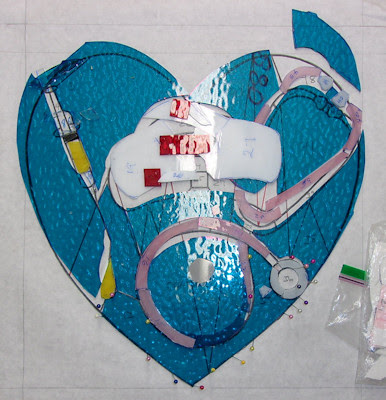
Last week there was only background cut out for this Nursing Window but this week June got her nurses cap and hypodermic needle cut out for it as well.  That means that there's just the stethoscope left to go before June can begin grinding all of her pieces after which she'll cut in her ECG lines.


Steve got two more doors assembled during class which means that these two, along with his first door, can be put into the kiln.   Consider these done because all it will take now to finish these off is an 'oven' set to somewhere around 1400 degrees for roughly 6 hours.  Steve says 'if you can't stand the heat, get out of the Kiln Room!'


With two sides ground for her eight sided Panel Lamp Barbara is well under way.  After she gets each side fitting perfectly together she bags the side separately so that she'll end up with eight bags of pieces (one for each panel).  If she were to mix them up they'd never fit back together correctly.  Panel lamps are the easiest lamp to make but incredible precision is the key to having all of those panels align correctly after you've joined them all together.


Speaking of precision, here's a look at the newest Spinner that Lisa is making.   With everything cut, ground, wrapped, and soldered the only thing left to be done is to join all six of the sides together.   It's easy enough to do but trust me when I say that it can get confusing while you're tacking and trying to keep all the front sides facing you!


I usually go for top down views of our students work but this week we have two angled views because they actually revealed more of what you need to see to get a feel for the final result.  Here we have two projects that are very close to being completed that Susan D worked on.  To the right (with the twisted wire coming out of the center0 is a small 3D cactus that she'll mount in a small flower pot.   She's left the wire that will go into the pot long so she can cut it to the exact size that she needs.  The second project is a Hoop Window which features a full moon and numerous glow in the dark(!) stars!


Yeah, this is one of those windows that I figured would be nice but that I had no clue for as to how 'nice' it would actually be. Linda F has the front side of this essentially soldered which means that it will surely be completed upon her return and I, for one, can't wait to see this with some light behind it.


Martha's Louisiana Iris got its first border cut and sized.  Once she tacks that into position she'll be able to cut the final purple border strips into their respective sizes and then get to work on soldering this window.  She's just about home free on this.


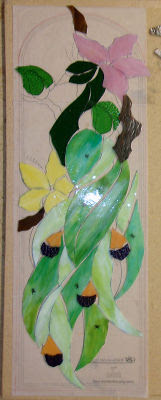
Susan R left class having all three sections of her Aloe Plant soldered and ready to be joined together.   Having assembled one of these before I believe I've found a better way to attach the posts that will go down into the flower pot to stabilize this large stained glass plant.   We'll see how that works when we see this completed in our next post.


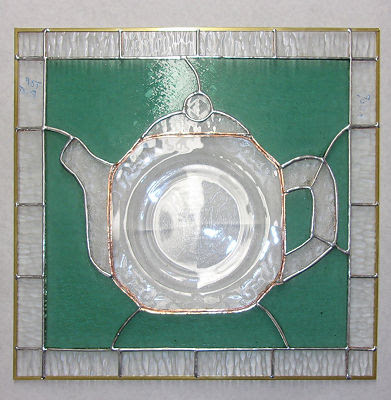
Jan's first Plate Window has been soldered on its front side which means that she's ready to turn this over and finish it off when she returns.  That plate, along with the four corner bevels, is really going to catch the light when it's hanging up in a window


Check it out, Annette's Transom Insert has all of its glass officially cut and ground!  You've got to love that border.  It's a lot of extra work but the end results are so worth it!  Someone is going to be VERY happy to receive this!


And here at the end of our post we look at the pair of Beach scenes that Linda L is nearing completion on.  With just the sky and the two little crabs left to go these will be finished before you know it.  I know that Linda will be happy when that day comes because all of those little pieces in the crabs and palm tree leaves are a pain to work with!


We've hopefully discovered what the problem was with our Bayou Salé GlassWorks Facebook page.   After abandoning it because they wouldn't allow me to make blog announcements on it they finally notified me and told me that it was an old business account that was being turned off.   We'd be able to set up a new page using the same name with added features.  It's fully up and running as of this morning and now I'm off to see if I can post that a new edition of the BSGW Blog is up and ready to be viewed.  Wish me luck!
 
Paul