Flux Brushes are finicky tools. To work correctly (much like a toothbrush) they should have fairly short bristles. I ALWAYS trim the brushes that we use in the shop to a more manageable length. The shorter bristles have more support. When you flux your project you should almost be scrubbing the flux onto the copper foil. The common misconception of fluxing your project is that you are applying liquid on top of the foil. What you should be doing is cleaning the copper foil using the flux as a cleaning agent. Flux is a mild acid (which is why it burns if you get it in a cut) that eats through grime and oil that coat the copper foil. You may not see it, but it's there. Use only the tips of the bristles while fluxing your copper foil and BE SURE TO WIPE OFF EXCESS FLUX FROM YOUR BRUSH AFTER REMOVING IT FROM YOUR FLUX! If you see puddles of flux on your window you are making things much harder for yourself. Finally, NEVER leave your flux brush resting in the flux. It's acid. Place your brush on your project, off to the side, or resting on top of something but never leave the bristles immersed in flux.

So then with that out of the way, Susan D has finished her large Geometric Flower Window in which she used all earth tones. It measures a full 28 x 28 inches and that's why she used 1/4 inch foil on this piece. As large as this is I have to say that the extra foil (which translates to extra lead) and the zinc channel have helped make this fairly sturdy. Geometric repeating patterns are hard to make because the slightest deviations from the pattern stand out like a sore thumb but there aren't any deviations here because Susan took her time and followed her pattern perfectly.

Linda L finished up the work on her Flowers and Humming Bird Window and once it was washed, colored and waxed she completely changed her mind about it. Last week it was covered in flux and only partially soldered (which never showcases the strengths of a project) and Linda just didn't 'feel' it for her window. Once it was hanging up she had to admit that it was FAR better than she gave it credit for. Me, I love the lead beak-- It's a nice extra flourish of design.
Lisa put the finishing touches on her Bass Suncatcher which will be mounted on top of a piece of driftwood to finish it off completely. Lisa picked out the colors herself and seemed to instantly understand that to really do a fish like this justice you just need to color it in a wide assortment of greens. What a beautiful job.
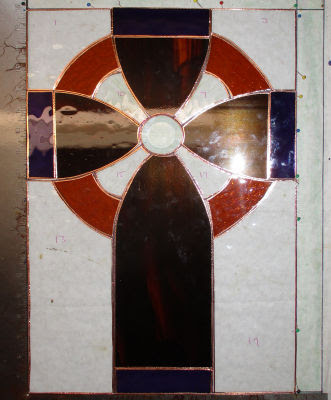
Kerry finished soldering his Cross Window and left with it only needing to be washed and colored. When something is that close to being completed I have a hard time letting it rest because I'm anxious to get a picture for the blog sooooo, I washed and colored it. If you look closely you can see that Kerry used a bevel in the center of the cross. He's also added red accents to this which weren't in his first rendition of this window that he made with us when he first started class.

Bee wrapped up the work on her Dove Suncatcher and then went the extra mile by adding an Olive Branch to the beak using wire for the branch. How do you attach the branch, you ask? You simply place it into the position you want it and solder it firmly wherever the wire touches a lead line. Bee tacked it behind the beak so that any extra solder wouldn't be seen from the front. If you look closely though you can see the solder between the leaves. Once they were attached and the lead cooled she was able to play with the lead a little bit to make it flow seamlessly onto the wire branch but the trick is to let it cool completely else you risk the chance of melting it right off the beak!
Jeannette's large Angel Suncatcher has always been a favorite of mine and everyone in class loved her minimal use of color throughout this piece. I wish you could better see the texture of the clear glass that she used for the dress-- it's outstanding and dare I say 'angelic'.
Betty saw Jeannette's Reindeer Pattern last week and managed to beat Jeannette to the punch line by completing hers first. You've got to love the wire antlers but they ARE a pain to bend into the correct shape since you need two of each piece and they need to match each other perfectly so that the antlers are symmetrical.
Beth's Address Window is behind her now and the end result is as stunning as it is informative. When you use a white background you can pretty much rest assured that the numbers, no matter the color chosen, will stand out easily. In this case that's a big clear 24!
It's been a while since we've seen someone make a Flower Hand Mirror but Ann brought this popular pattern back into the limelight this week. These are perfect gifts especially for Christmas which makes Ann's timing perfect. Speaking of the time, I can't believe it's 8:30 already!
Lara was perplexed about what to make this week since she really wasn't ready to start a large project so she wanted something she could finish in one class. This Christmas Ornament fit the bill perfectly and before her class was officially over Lara had this completed and hanging for its picture. I have a sneaking suspicion that she's going to start a trend by making this. Does it look familiar? It's one of the Ornaments that Shawn is making in her window!
Melissa made a veritable slew of mid-sized projects this week to auction off for a great cause. What a great job she did but she was running late finishing these off and this was the best picture I could get of her treasure trove of stained glass. She's since sent me a better picture and we'll feature these in a much better spotlight when we return next week.
What is this interesting pattern of glass? Well, it's going to turn into a Spinner next week when Susan R puts the finishing touches on these six 3x3 squares and then connects them to form a uniquely shaped Yard Ornament. I can't wait to show this one to you-- the pattern looks intriguing even in this unfinished state.
Susan D began grinding this Sunflower Heart once her Geometric Flower Window was soldered. It looks like she's ready to wrap and tack this which means that we'll see it completed upon her return.
Ambitious? Perhaps, but sometimes one complex element in a large project gives the entire piece an extra air of intricacy. Yes, this LSU Tiger face may be daunting but Linda only needs to make two of them and after that the rest of her LSU Lamp will be easy. I have faith in her and better yet, she has faith in herself!
With her leaves, background and borders all cut, ground, wrapped and tacked into place, Linda F's Dragonfly Panel is just about finished. She even got the front of this soldered which means that next week she'll wrap this up and we'll be looking at another completed window by her.
With approximately another 100 hexagons cut out this week, MiMi is traveling along comfortably on the Hexagon Glass Expressway. Here we examine a few short stacks of her assorted textures from a slightly different angle. MiMi is discovering and bringing to light all sorts of new textures that our other students are going crazy over!
It won't be long now before Sheri starts cutting her background glass because almost everything else has been ground at this point. She still has a little more glass to grind but it won't be long now. I know it's hard to see right now but when this is finished I know it'd going to be breath taking!
With a LOT more of her glass cut out, Martha's elaborate Pelican is REALLY taking shape now. This has all the makings of a classic stained glass window starting with her gorgeous choice of glass down to the L.C. Tiffany styled pattern.
Then we have Bee who has begun cutting out her Dog In A Tub Window after settling in on a pattern and a dog head. You've got to love the floor and then admit that his dog must be a pure breed (judging by his owners exquisite bathroom!)
Jan's Madonna Panel is all cut, ground and tacked together. The pattern (and therefore the window) fits on a standard piece of paper so it's smaller than you might initially think. What you see below is the entire window as this needs no border. When we next see this Jan will easily have it completed and be ready to move on over to a Santa Window..
Shawn has six Ornaments completed tacked together as of this week. Once the ornaments are finished the background will go quickly. I'm still thinking this can be finished in time for the Holiday and let me tell you that when I get a time frame in my head I'm always correct.
With the front side of her Double Fleur De Lis Window completely soldered Annette is ready to flip this over and do the back side. With a little luck she can have this completed when she comes back in since she got the front soldered so quickly. Slow and steady always wins the stained glass race!
With her Tree Of Life Circular Window completely tacked together Lisa began soldering the front of her incredible design. She's taken it home so she can solder on it throughout the week and knowing Lisa's track record I have a sneaking suspicion that this will be completed when she comes back in. Once both sides are soldered all we need to do is bend a zinc channel to the correct size and then wash and color it!
Mary Grace wasted no time when she came in. First she traced out her pattern, then she cut it apart and traced it onto glass. By the end of class she had cut out all of that glass as you can see in the picture below. She'll begin grinding this when she comes back in!
Jeanne L is making a plain panel insert for the top of her bathroom cabinet and got it all cut and ground. She's taken the pieces home to wrap and possibly even solder. No matter what she accomplishes at home I know that she only needs one more class to complete this project.
Cheryl got her Pelican Window all ground and is ready to begin wrapping her glass now. There's one small piece of orange glass missing (it's in the foot of the bird) but we're going to fill that in after this is wrapped and tacked together. It's so much easier that way. Next up though, it will be border time for Cheryl which means that she'll need to pick a color or two!
So then, Betty is making more than one of these Reindeer Hangings (of course) and Jeannette is making them as well. Now that we've changed the work table tops so that they are all the same I can't tell which table this Reindeer was on so I'm unsure if it belongs to Jeannette or Betty! Either way, they are both working on this same pattern so here's one of them under construction complete with some googly eyes on the face!
Then we have Tracey who ran out the door without me getting a picture of her Butterfly! This is last weeks picture but I know it's all wrapped and ready for solder now. I give this just one more week before she takes it home.
And this is Angie's latest Angel which she will (probably) turn into a window by putting some background glass around it and then a border. I'm pretty sure that will happen when she returns if she doesn't manage to get that far on her own during the week.
Finally we wrap things up with a look at the Nicholls Fleur De Lis pattern that Helen will be starting. She's actually got a few things in the works right now but I didn't get a picture of what she was working on this week. I know she wants to get a Snowman started so perhaps we'll see where she gets on that upon her return.
Whew, it was a busy week here with a lot of finished projects. This post is getting done early because we are having classes today (due to Thursday being a Holiday) which sort of screwed up my Monday night schedule for getting this post out on time. But in the end you get this earlier than normal so I guess it's all for the better. Happy Thanksgiving everyone!
Paul
Bayou Salé GlassWorks


