Monday, August 29, 2022

Some Finesse Will Be Required

Mary's Winged Heart is gorgeous.   This piece is all about the deep curves which you normally don't see in stained glass.  If you go out of your way and add extra time and effort to a piece it always pays off and this Heart proves it.  Instead of merely surrounding the heart these wings gently embrace it.  Mary has outdone herself with this one.


Here's the first of three Santa Faces that Linda L has completed for three Lanterns that she will replace the clear glass panels with.   Each side of the Lantern will feature a different Christmas scene so expect to see some Christmas Trees, some Reindeer, and a few snowmen as well in the weeks to come.


Lisa's got two Flower Angels finished and we'll be seeing even more of these when she returns next week.  She's on a roll and has made one of these as Flowerpot Ornament (hence the stake).  Things are looking good for her as she prepares for a show coming up in Centerville and I believe she'll do quite well there.


This is the last of Susan D's Birch on a Branch series because she's officially made the entire set.   Her pieces got more and more detailed as she honed her painting skills on each successive bird.  I remember when a single drop of glass paint was a great eye, but now she provides eyes with pupils and multicolored spots on some of the birds feathers. 


And here's Susan's window with all of her birds in it.  This looks even better than the advertisement I always see for the Bird Branch kits that you find in stained glass catalogs!


These Dragonflies are ever so popular when they are completed.  This was actually made (and sold) at the last show we did in Alexandria, LA.   I made three of them in three different color schemes and came back home without a single one.  They sell that quickly.


I also made this window for a local customer to match the stained glass that she has in her front door.   This is being installed above the door at the rear of the house and although it isn't a perfect match (space prohibited that) the glass textures are the same and the basic pattern has been carried through.  I'd have no problem installing this above the original door that its pattern was derived from.


Let cut this entire Bathtub Lady Window out in just one class!   Rather than staring at pieces and wondering how long it will take to cut them, Let set her mind on getting the job done.  Although there are no bubbles in this window yet, Let will add them after everything has been ground.  Hopefully we'll be able to find either some iridescent glass for bubbles or some small clear glass globs.


Next we look at the Wedding Invitation that Martha began. She got all of the tiny leaves cut from three different yet similar shades of green glass and then got everything ground as well. Once this has been wrapped and tacked together she'll cut out the background glass and then finish the box lid for a beautiful wedding gift.


Shawn's new window goes out to the Krewe of Hera.  This Hera Flag Window will be made in three sections and then tacked together to form one window.  With her Greek style lettering already cut out the center third of this window is well under way.


Steve has got another Wine Glass in the works but this one is considerably smaller than his first. It still looks just as good and Steve made sure that this was PERFECTLY symmetrical unlike so many other wine glass projects that I see when I'm online looking at stained glass.  The man has an eye for detail.


Ann finished grinding her version of the Winged Heart as well as a Wrought Iron Cross while she was in.   Once her work at the grinder was completed she began foiling her pieces. I'm thinking that there will be some soldering going down on these when Ann returns.


Here are the remainder of Lisa's Flower Angel Suncatchers.  as you can see she only has one more to wrap and then the remaining four can be soldered and packed away until it's showtime!


Featuring THE most perfect border you could ever imagine for a window, Kerry's Umbrella Lady will surely be the talk of our classes.   Just wait until this gets lit up because then the heads will REALLY turn!  This is all about good planning.  Kerry saw the purple and pink glass that he wanted to use as a border and then used those individual colors for the umbrella and the dress so that everything would tie together perfectly.


Annette finished all four of her butterflies which means that she's about ready to get these strung up to create one large Butterfly Mobile.  It's all about weight and balance and I have a feeling that it's going to be very interesting.  Hopefully the metal rods will be here next week so you can see just what this is all about!


With only five more pieces of water left to cut in her Wood Ducks Window, Cindy will be wrapping this up shortly.   Now that the water is in place (essentially) someone in class noticed that there's not just one duck in the window-- there's two!  They sort of got lost on the white paper but now that there's glass surrounding them the differences in contrast make the pair hard to miss.


Jan has begun her second Plate Window and has the four background pieces cut out and halfway wrapped.   With just a border left to go for this window Jan is going to be finishing it lickity split. 


Lara was busy foiling all of the petals for the largest flower in her Peony Window.  Things are coming together nicely and it won't be long now.  I'd say that slow and steady wins the race but there's honestly been nothing slow about Lara's progress on this detailed window.


Next up we have yet another window with a perfect border.   Melissa chose a glass that is very similar to the glass she used in her Heron's feathers.  There is a definite difference but that difference lies in hues alone because both pieces of glass feature a mix of both purple and blue.  They're close but they aren't THAT close-- you wouldn't be able to replace one with the other and that makes this the perfect accent color for a border.   Melissa has taken this home to solder and with a little luck we'll see this hanging next week.


As you know, Linda L has one Santa Face completed and these are the other two that are on the way.   She's wrapping them as you read this so I doubt it will be long before both of these are completed and featured at the top of our next blog post.


And there ya go. Come back over the weekend when we'll feature another Tip of the Week.
 

Paul

Sunday, August 28, 2022

Support You Windows (Part 2)


There are right and wrong ways to move your windows and for some reason people ALWAYS want to transport them incorrectly. The most important thing to understand about windows is that glass doesn't bend-- It breaks.  With that in mind, first and foremost:  NEVER CARRY YOUR WINDOW LIKE A PLATTER!

With no support in the center it can easily flex which leads to a broken window.
 
 
When moving your window both hands should be on the top edge and the window should be in a vertical (hanging) position.


Always start with both hands on the same side of the window.  If it's rectangular then your hands should both be on the longest side closest to you. If it's square it doesn't matter which side you hold.


Lift your hands but keep the opposite side of the window on the table (as if you were turning the page of a book) until the window is in a vertical position (the way that it will hang).  Your hands will be (and should ALWAYS be) on the top.


It is now safe to lift and transport your window.  In the vertical position your window is strong because it can't flex.  If you have to rotate it (perhaps to wash it) simply put one hand on the side you want to be the top and then rotate the window to its new orientation after which you then move your second hand to the top of the window along side your first hand. 

Never place your hands on opposite sides of the window!  This inevitably leads to carrying the window like a platter. 


Your hands should always be on top of the window.


Again, and most importantly: Never hold your window as if it were a platter (horizontally).  Carrying it as a platter provides no support to the center and allows the window to flex which causes glass to break.

And that's all there is to it.

Paul

Bayou Salé GlassWorks

Saturday, August 20, 2022

Stubborn Bite Marks

Shawn's Ethnic Hands Window is monster big!  It's far bigger than you would imagine measuring in at a whopping 22 inches wide by 32 inches tall.  Her glass choices are perfect (you've got to love that fractures and streamers inner border) and the flowers are divine.  Another job well done by Shawn.


June's Nursing Window has been officially completed and she was very happy about how it turned out.  The colors work wonderfully allowing the needle, the nurses cap, and the stethoscope to be easily seen in front of that vibrant blue background.  I've got to say that June's biggest strengths are her grinding and her soldering which she's pretty much got down pat.


Let's Trio of Cats Window is purfection!  She worried a bit that the purple border was too dark but it only appeared to look dark because it was on the table without any light behind it.  Once this was hanging up the purple glass that she chose wasn't dark at all. Windows always look their best when there's a little light behind them.


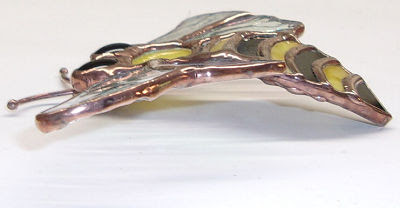
Susan D assembled a beautiful Honeycomb Suncatcher along with a curved Bee to go with it. It's hard to see the curve of the bee so I'm providing a side view of it as well.

Here's what the Bee looks like when it's resting on the table.  The wings are also curved and the end result gives it a VERY unique effect.


Lisa's large Split Leaf Philodendron Suncatcher shows that she has a natural eye for color.  I've seen these done so many times in two different greens but to mix the greens up the artist uses the alternating color method which makes the leaf look like a ladder.  Lisa understands that it's fine, even necessary, to have two touching sections share the same color.   It gives it a thoroughly natural random look.


Linda finished her three Butterfly Suncatchers and they look very similar indeed.  I don't believe that anyone will be fighting for one particular Butterfly since they all look equally stunning.


Sheri's last Teardrop Seascape was made in ambers while her newest Seascape has been made in colder silvers and blues (and greens).  They say the sea is cold  and Sheri's newest silver beauty reflects that perfectly.


Kerry is WELL under way with his version of the classic Umbrella Lady.  The purples and pink work wonderfully together and now that Kerry has this woman all cut out and ground he will tack her together and then get the background cut.  I'm expected to see rain hitting that umbrella next week!


Barbara is working on an eight sided panel lamp and now that everything has been ground and wrapped in foil she's begun assembling each panel by completely soldering them.  As you can see, she's got four panels finished.   Why don't we tack them all together and then solder them?  Because it's far easier to solder the panels while they are laying flat on the table than it is to try to balance them in your lap and keep them level while soldering them.


With almost half of her Grinch Window already ground I'd say that it's safe to say that Martha has complete control over the situation.  She may take a break from this next week though because she's discovered that she needs to complete a wedding box as quick as possible.


It must be Christmas in August because not only do we have a Grinch in the works, we also have Linda L working on three Santa Faces as well.   She's got the red and the flesh all cut out as well as the white trim on Santa's hat as well.   Next week the white glass for Santa's hair will be in and Linda will be able to finish cutting these out.  


Steve's Wine Glass Yard Decoration has its bubbles all tacked into position.   The hardest part of this project is getting the soldering iron to heat up hot enough to make the solder connections smooth.   The problem is that although copper is an excellent metal to solder to, it also conducts heat effortlessly.   That means that the heat of the soldering iron spreads quickly through the copper rod that makes the outline of the wine glass, which in turn means that it just takes a lot of patience to get things nice and smooth on this (and when I say a lot, I mean a LOT!)


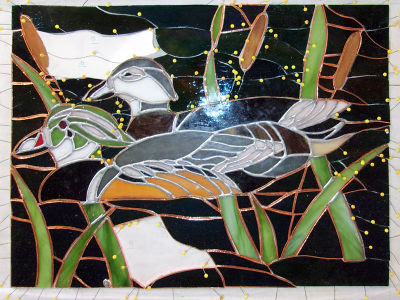
Cindy is making huge strides in her Duo of Ducks window! The only thing left to go is cutting out the rest of the glass for the water. I don't see this window lasting too much longer for Cindy-- she's a glass making machine!


MiMi was back in class and finished grinding and washing the remaining pieces of the repair window that she's rebuilding. It's been a learning process all around for MiMi as she discovers just how badly crafted this window was. First, nothing was ground, second, nothing fits together very well even after we reduced the overall size of the window by a quarter of an inch! It's hard to believe that the gaps she is trying to work around were even bigger before we reduced the pattern size. But she's wrapping pieces now and soon she'll be ready to solder this back together and actually have it looking even better than it was before the glass was broken.


Cheryl came in, got her final border tacked into in position, and then began soldering.   She took her time, she didn't rush, and everything is smooth.  There's a little touching up to do here and there on the front side but not much.   Slow and steady has Cheryl winning this race with her Tree of Life! 


Melissa's got all her pieces filled in and her first beveled border attached.   The next (final) border will go on quicker than Ashlee Simpson killed her music career!  Expect to see solder on this when you see it again and when it's done Melissa may even do a little jig for us!


Annette has her remaining three Butterflies cut and ground.  She's taken them home so she can come in with them foiled and ready to be assembled.   I think we can easily accomplish that next week.   I can't wait to see these all floating around each other when they hang in their mobile state!


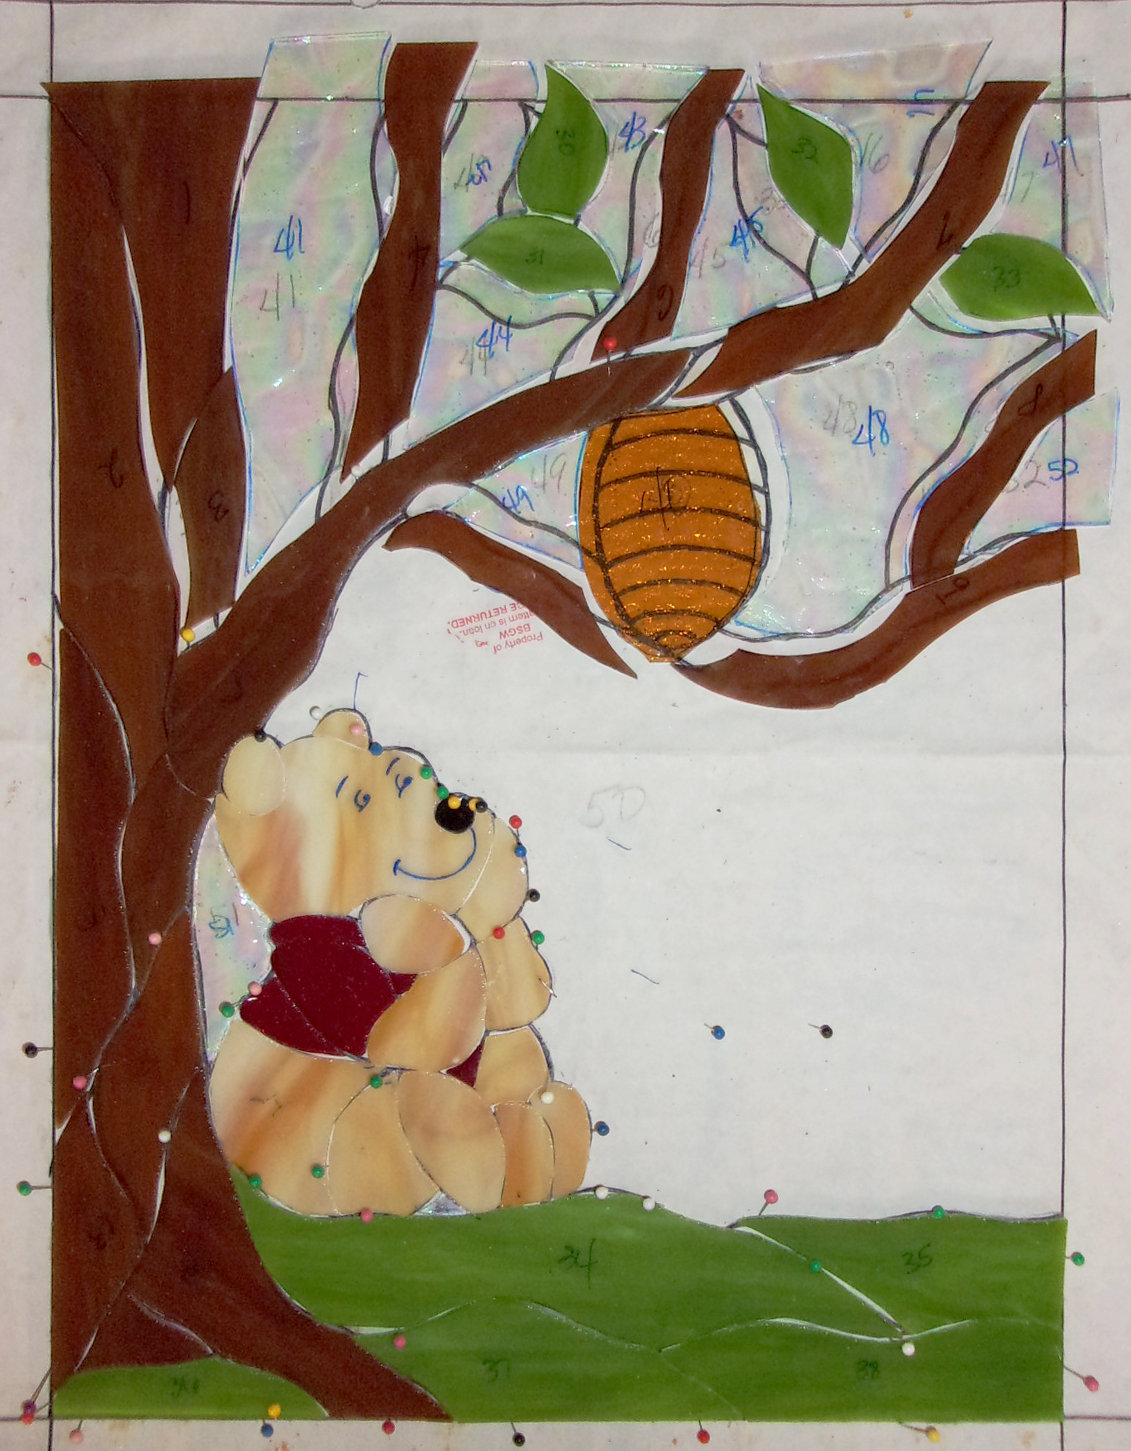
Judy finished cutting all of her glass for her Winnie The Pooh Window and even had time to move on over to the grinder.   By the night's end she was able to grind everything from Pooh's ears on downward.  Not bad at all!  I have no doubt that she'll finish grinding this when she returns. 


Sheri's next Teardrop Seascape will feature a lighter, slightly pastel color arrangement highlighted by an iridescent textured glass for the teardrop itself.  It sounds like another winner to me!


And there you have it-- all the news that's fit to be blogged about! 
 
Paul


Support Your Windows


There are plenty of times when we rest our windows along their edges.  Most times we don't think twice about it but if you are resting your window on the corner of a table, for one reason or another, there is a general rule of thumb to doing so correctly.

One case where this often happens is when students wash their windows in the sink.  They will rest the window on the edge of the sink (similar to the picture) below while they grab a sponge or a brush with their free hand.  This is the wrong way to handle the situation.
 
 
Instead, be sure to have the weight of the window rest on one of the lead lines that come out to the edge of the window.  Why?   First of all it gives your window much more support but ultimately it's because the brass channel can easily bend or become dented.  We always position the soft brass channel that surrounds the outer edge of our windows so it forms a straight line.  Sometimes that means that there's a little space between the channel and the glass.   Resting your window on an edge where there isn't a lead line can easily put an unsightly dent in the channel.

 
Keep your edges straight by resting your windows along the most solid parts of the border-- the lead lines.

Paul